Red Velvet Cupcakes

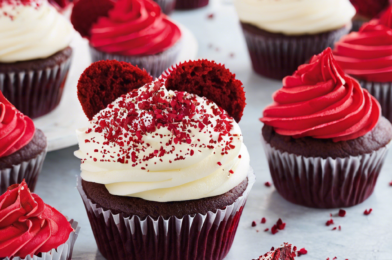
Red velvet cupcakes have long held a special place in the hearts of dessert lovers around the world. Their vibrant color and subtle cocoa flavor, combined with a creamy frosting, make them an irresistible treat for any occasion. I recently decided to revisit this classic recipe to see if it would win the approval of my family, who are known for their discerning palates. The result? A resounding success! The cupcakes disappeared almost as quickly as they were made, with my family praising their moist texture and perfect balance of flavors. It’s safe to say that this recipe has now become a staple in our household, and I’m thrilled to share it with you.

Ingredients

Creating the perfect red velvet cupcake requires a careful selection of ingredients that come together to create its distinct flavor and texture. Here is what you’ll need:

  • 1 and 1/4 cups all-purpose flour
  • 1 tablespoon unsweetened cocoa powder
  • 1/2 teaspoon baking soda
  • 1/4 teaspoon salt
  • 1/2 cup unsalted butter, softened
  • 3/4 cup granulated sugar
  • 1 large egg
  • 1 teaspoon vanilla extract
  • 1 teaspoon white vinegar
  • 1/2 cup buttermilk
  • 1 tablespoon red food coloring
  • 1/2 cup cream cheese, softened
  • 1/4 cup unsalted butter, softened (for frosting)
  • 2 cups powdered sugar
  • 1 teaspoon vanilla extract (for frosting)

Instructions

Creating these delicious cupcakes is a rewarding process. Follow these steps to ensure your cupcakes turn out perfect every time:

Step 1: Preheat your oven to 350°F (175°C) and line a 12-cup muffin tin with cupcake liners.

Step 2: In a medium bowl, whisk together the flour, cocoa powder, baking soda, and salt. Set aside.

Step 3: In a large bowl, beat the butter and granulated sugar together until light and creamy. Add the egg and vanilla extract, mixing until well combined.

Step 4: Mix in the vinegar and buttermilk. Gradually add the dry ingredients, mixing until just combined. Stir in the red food coloring until the batter is evenly colored.

Step 5: Divide the batter evenly among the prepared cupcake liners, filling each about two-thirds full.

Step 6: Bake for 18-20 minutes, or until a toothpick inserted into the center of a cupcake comes out clean. Allow the cupcakes to cool in the pan for 5 minutes before transferring to a wire rack to cool completely.

Step 7: To make the frosting, beat the cream cheese and butter together until smooth and creamy. Gradually add the powdered sugar and vanilla extract, mixing until the frosting is light and fluffy.

Step 8: Once the cupcakes have cooled, generously frost each one with the cream cheese frosting. Enjoy!

Nutrition Facts

The following nutrition facts are based on a serving size of one cupcake:

Servings: 12 cupcakes

Calories per serving: Approximately 300 calories

Preparation Time

Preparing these delightful red velvet cupcakes is a straightforward process that doesn’t take much time:

  • Prep time: 20 minutes
  • Cook time: 20 minutes
  • Total time: 40 minutes

How to Serve

Red velvet cupcakes are versatile and can be enjoyed in various ways. Here are a few serving suggestions:

  • Serve as a delightful dessert at parties and gatherings.
  • Pair with a scoop of vanilla ice cream for an indulgent treat.
  • Enjoy with a cup of coffee or tea for a sweet afternoon break.
  • Decorate with fresh berries or a sprinkle of chocolate shavings for added flair.
  • Gift them to friends and loved ones as a homemade treat.

Additional Tips

To ensure your red velvet cupcakes are a success, keep these tips in mind:

  • Tip 1: Use gel food coloring for a more vibrant red hue without altering the batter’s consistency.
  • Tip 2: Ensure all your ingredients are at room temperature before starting, as this helps them combine more smoothly.
  • Tip 3: Do not overmix the batter to maintain a light and fluffy texture.
  • Tip 4: Allow the cupcakes to cool completely before frosting to prevent the frosting from melting.
  • Tip 5: Store cupcakes in an airtight container in the refrigerator for up to five days to keep them fresh.

FAQ

Here are some frequently asked questions about red velvet cupcakes:

Q: Can I substitute the buttermilk?

A: Yes, you can make a buttermilk substitute by adding 1 tablespoon of lemon juice or vinegar to a cup of milk. Let it sit for 5 minutes before using.

Q: Why is vinegar used in this recipe?

A: Vinegar reacts with the baking soda to help the cupcakes rise and achieve a fluffy texture. It also enhances the red color.

Q: Can I use a different frosting?

A: Absolutely! While cream cheese frosting is traditional, you can use buttercream or any frosting of your choice.

Q: How do I achieve a deeper red color?

A: Using gel food coloring instead of liquid will give you a more intense color without affecting the batter’s consistency.

Q: Can these cupcakes be made ahead of time?

A: Yes, you can bake the cupcakes a day in advance and frost them the next day. Just be sure to store them in an airtight container.

Apple Crumble Crisp

There’s something incredibly comforting about the aroma of a freshly baked apple crumble crisp wafting through the house. This classic dessert combines the best of both worlds: the sweet, tender apples and the buttery, crunchy topping. It’s a dessert that has stood the test of time, beloved by many for its simplicity and the homey warmth it brings. As the weather turns chilly, there are few things more satisfying than sitting down with a warm serving of apple crumble crisp, perhaps topped with a scoop of creamy vanilla ice cream. My family couldn’t get enough of it; the kids were particularly delighted, scraping their plates clean and asking for seconds. It’s these little moments, sitting around the table and sharing something so universally adored, that truly highlight the joy of home baking.

Ingredients

The magic of the apple crumble crisp lies in its straightforward ingredients, which you likely already have in your pantry. You will need:

  • 6 to 8 medium-sized apples, peeled, cored, and sliced
  • 1 cup granulated sugar
  • 1 tablespoon all-purpose flour
  • 1 teaspoon ground cinnamon
  • 1/4 cup water
  • 1 cup quick-cooking oats
  • 1 cup all-purpose flour
  • 1 cup packed brown sugar
  • 1/4 teaspoon baking powder
  • 1/4 teaspoon baking soda
  • 1/2 cup butter, melted

Instructions

Creating an apple crumble crisp is a rewarding and straightforward culinary endeavor. Begin by preheating your oven to 350°F (175°C). In a large bowl, toss the apples with granulated sugar, a tablespoon of flour, and cinnamon. Spread the apple mixture evenly in a 9×13-inch baking dish and pour the water over the apples. In another bowl, combine oats, flour, brown sugar, baking powder, and baking soda. Stir in the melted butter until the mixture is crumbly. Sprinkle the oat mixture evenly over the apples. Bake in the preheated oven for 45 minutes until the topping is golden brown and the apples are tender. Allow it to cool slightly before serving, letting the flavors meld together. The warm, spiced scent filling your kitchen is a prelude to the delightful experience of tasting this classic dessert.

Nutrition Facts

For those mindful of their dietary intake, it’s useful to know the nutritional breakdown of this dessert. This recipe serves approximately 8, with each serving containing roughly 320 calories. Of course, these values can vary slightly based on the specific brands and quantities of ingredients used. Enjoying a serving of apple crumble crisp as part of a balanced diet can provide a wonderful sweet treat without overindulgence.

Preparation Time

From start to finish, preparing your apple crumble crisp will take about an hour. The preparation, including peeling and slicing the apples and mixing the ingredients, takes about 15 minutes. The baking time is approximately 45 minutes, during which you can enjoy the anticipation built by the tempting aroma that fills your kitchen. This makes the apple crumble crisp a perfect option for those who want a quick yet fulfilling homemade dessert.

How to Serve

Serving apple crumble crisp can be as simple or as elaborate as you wish:

  • Classic Style: Serve warm, straight from the oven, to capture the delightful contrast between the tender apples and the crunchy topping.
  • With Ice Cream: Add a scoop of vanilla ice cream on top for a creamy, cool contrast.
  • Caramel Drizzle: Drizzle with a bit of caramel sauce for extra sweetness.
  • Whipped Cream: Top with a dollop of freshly whipped cream for a light, airy addition.
  • Nuts and Seeds: Sprinkle some toasted nuts or seeds for added texture and flavor.

Additional Tips

To further enhance your apple crumble crisp experience, consider the following tips:

  1. Apple Variety: Use a mix of apple types for a balance of sweet and tart flavors. Granny Smith and Honeycrisp are excellent choices.
  2. Spice It Up: Experiment with additional spices like nutmeg or cloves for a unique twist.
  3. Make Ahead: Prepare the crumble topping in advance and store it in the fridge for a quick assembly when needed.
  4. Gluten-Free Option: Substitute the all-purpose flour with almond flour or a gluten-free baking mix for a gluten-free version.
  5. Storage: Store leftovers in an airtight container in the refrigerator and reheat in the oven for best results.

FAQ Section

Q: Can I use other fruits besides apples?

A: Absolutely! Pears, peaches, and berries are excellent alternatives or additions.

Q: How can I prevent the topping from becoming soggy?

A: Ensure the topping is well-mixed and evenly distributed. Baking it until golden brown will also help maintain its crispiness.

Q: Can I make this dessert vegan?

A: Yes, replace the butter with a vegan alternative and ensure all other ingredients are plant-based.

Q: What’s the best way to reheat leftovers?

A: Reheat in the oven at 350°F (175°C) for about 10-15 minutes to regain the original texture.

Q: Can I freeze apple crumble crisp?

A: Yes, you can freeze it before or after baking. If freezing after baking, allow it to cool completely and wrap it tightly before storing it in the freezer.

Cookies & Cream Trifle

The first time I prepared the Cookies & Cream Trifle, I knew it was going to become a family favorite. The layers of creamy, velvety goodness combined with crunchy cookie bits make this dessert irresistible. When I presented the trifle at a family gathering, it was met with rave reviews from everyone, including the kids who often have a reputation for being picky eaters. The blend of textures and flavors is exquisite, and it’s a treat that satisfies both the sweet tooth and the need for something a bit more decadent. This trifle is not just a dessert; it’s an experience that brings people together, creating moments of joy and indulgence. Its aesthetic appeal also makes it a showstopper at any event, as its layers are as delightful to the eyes as they are to the taste buds.

Ingredients

Creating a Cookies & Cream Trifle requires a handful of simple yet delicious ingredients. Each component plays a crucial role in building the trifle’s unique flavor profile. Here’s what you’ll need:

  • 1 package of chocolate sandwich cookies (such as Oreos)
  • 2 cups of heavy whipping cream
  • 1/4 cup of powdered sugar
  • 1 teaspoon of vanilla extract
  • 1 package (8 ounces) of cream cheese, softened
  • 1 cup of confectioners’ sugar
  • 1 teaspoon of vanilla extract
  • 2 cups of milk
  • 1 package (3.4 ounces) of instant vanilla pudding mix
  • 1 package (3.4 ounces) of instant chocolate pudding mix

Instructions

To achieve the perfect Cookies & Cream Trifle, follow these step-by-step instructions:

  1. Prepare the Cookie Layer: Begin by crushing the chocolate sandwich cookies. You can do this by placing them in a sealed plastic bag and using a rolling pin or by pulsing them in a food processor. Aim for a mix of small chunks and fine crumbs to provide a nice texture.
  2. Whip the Cream: In a large bowl, beat the heavy whipping cream, powdered sugar, and vanilla extract until stiff peaks form. Set this aside as it will be used to layer the trifle.
  3. Mix the Cream Cheese: In another bowl, beat the softened cream cheese with confectioners’ sugar and vanilla extract until smooth and creamy.
  4. Prepare the Pudding Layers: Using two separate bowls, prepare the vanilla and chocolate pudding mixes according to the package instructions, using the milk. Allow them to set in the fridge for about 5 minutes.
  5. Layer the Trifle: In a large trifle dish or individual serving glasses, start by adding a layer of crushed cookies. Follow with a layer of cream cheese mixture, then a layer of chocolate pudding, a layer of whipped cream, and finally a layer of vanilla pudding. Repeat the layers until all ingredients are used, finishing with a layer of whipped cream and a sprinkle of crushed cookies on top.
  6. Chill and Serve: Refrigerate the trifle for at least 2 hours before serving to allow the layers to set and the flavors to meld together beautifully.

Nutrition Facts

This dessert serves approximately 8 people, with each serving containing about 450 calories. The calorie count may vary slightly depending on the specific brands of ingredients used. Despite being a decadent treat, it can fit well into your diet if consumed in moderation.

Preparation Time

The preparation time for a Cookies & Cream Trifle is quite manageable. From start to finish, you can expect to spend around 30 minutes assembling the trifle. The chilling time, however, is crucial for achieving the desired texture and flavor, so plan for at least 2 hours in the refrigerator before serving. This makes it an excellent make-ahead dessert for parties and gatherings.

How to Serve

Serving the Cookies & Cream Trifle can be as creative as you like. Here are some suggestions:

  • Serve in a large, clear trifle dish to showcase the beautiful layers.
  • Use individual glass cups for personal servings, making them easier to distribute and manage.
  • Add a dollop of whipped cream and a whole chocolate sandwich cookie on top for garnish.
  • Pair with a cup of coffee or a glass of milk for a perfect dessert experience.
  • Consider adding some fresh berries on top for a pop of color and a hint of freshness.

Additional Tips

To ensure your Cookies & Cream Trifle is a success, consider these tips:

  1. Use Fresh Ingredients: Always use fresh cream and high-quality cookies to enhance the flavor and texture of the trifle.
  2. Adjust Sweetness: You can adjust the sweetness of the whipped cream and cream cheese layers according to your taste preferences.
  3. Chill Thoroughly: Allowing the trifle to chill well ensures that the flavors meld together and the layers set properly.
  4. Experiment with Layers: Feel free to experiment with different pudding flavors or add layers of fruit for a unique twist.
  5. Make Ahead: This trifle can be made a day in advance, making it a hassle-free option for entertaining.

FAQ Section

Q: Can I use a different type of cookie?

A: Absolutely! While chocolate sandwich cookies are traditional, you can use any cookie you prefer, such as shortbread or chocolate chip cookies.

Q: Can I make this dessert ahead of time?

A: Yes, the trifle can be made up to a day in advance. Just be sure to keep it refrigerated until you’re ready to serve.

Q: What can I use as a substitute for cream cheese?

A: Mascarpone cheese can be a great substitute for cream cheese, providing a similar creamy texture with a slightly different flavor profile.

Q: Is it possible to make this trifle gluten-free?

A: Yes, simply use gluten-free cookies and check that all other ingredients are certified gluten-free.

Q: How can I store leftovers?

A: Store any leftovers in an airtight container in the refrigerator. It’s best consumed within 2-3 days for optimal freshness.

Peanut Butter Fudge Bars

There’s something truly magical about the combination of peanut butter and chocolate. This iconic duo has transcended generations, delighting taste buds with their sweet and salty harmony. Recently, I decided to try a recipe that promised to bring these flavors together in the most decadent way possible: Peanut Butter Fudge Bars. As a food enthusiast, I was eager to see if these bars would live up to their promise of indulgence. After spending a cozy afternoon in the kitchen, I was not disappointed. The rich, gooey texture of the fudge, paired with the creamy peanut butter and a touch of crunch, made for a dessert that quickly became a family favorite. Each bite seemed to melt in the mouth, leaving behind a lingering sweetness that was simply irresistible. My family devoured them in no time, and I knew this recipe was a keeper.

Ingredients

Creating the perfect batch of Peanut Butter Fudge Bars requires a careful selection of ingredients that complement each other to bring out the rich flavors. Here’s what you’ll need:

  • 1 cup of unsalted butter
  • 1 1/2 cups of granulated sugar
  • 1 cup of brown sugar, packed
  • 1 cup of creamy peanut butter
  • 2 teaspoons of vanilla extract
  • 3 large eggs
  • 2 1/2 cups of all-purpose flour
  • 1 teaspoon of baking powder
  • 1/2 teaspoon of salt
  • 1 1/2 cups of chocolate chips
  • 1/2 cup of chopped peanuts (optional for added crunch)

These ingredients work together to create layers of flavor and texture, making each bar a delightful treat.

Instructions

Making Peanut Butter Fudge Bars is a straightforward process, but it requires attention to detail to achieve the perfect consistency and flavor. Follow these steps carefully:

  1. Preheat your oven to 350°F (175°C) and line a 9×13 inch baking pan with parchment paper.
  2. In a medium saucepan, melt the butter over medium heat. Once melted, remove from heat and stir in granulated sugar, brown sugar, and peanut butter until smooth.
  3. Add the vanilla extract and eggs, one at a time, beating well after each addition.
  4. In a separate bowl, whisk together the flour, baking powder, and salt. Gradually add this dry mixture to the wet ingredients, stirring until just combined.
  5. Fold in the chocolate chips and chopped peanuts, if using.
  6. Pour the batter into the prepared baking pan, spreading it evenly with a spatula.
  7. Bake in the preheated oven for 25-30 minutes, or until the edges are golden brown and a toothpick inserted into the center comes out with a few moist crumbs.
  8. Allow the bars to cool completely in the pan before slicing into squares.

These steps will guide you in creating a batch of bars that are both delicious and visually appealing, perfect for any occasion.

Nutrition Facts

It’s always helpful to know the nutritional value of what we consume, especially when indulging in sweet treats like Peanut Butter Fudge Bars. Here’s a breakdown of the nutrition facts for this recipe:

Servings: 16 bars

Calories per serving: Approximately 280

Each serving provides a delightful balance of carbohydrates, fats, and proteins, making these bars a satisfying treat that can fit into most diets when enjoyed in moderation.

Preparation Time

Time is of the essence when it comes to baking, and knowing how long you’ll spend in the kitchen can help with planning. Here’s a rough estimate of the preparation time for Peanut Butter Fudge Bars:

  • Preparation time: 15 minutes
  • Cooking time: 30 minutes
  • Total time: 45 minutes

This quick and easy recipe is perfect for those who want to whip up a delicious dessert without spending hours in the kitchen.

How to Serve

Serving Peanut Butter Fudge Bars can be as creative as you’d like. Here are some serving suggestions to enhance your experience:

  • Serve warm with a scoop of vanilla ice cream for a dreamy dessert.
  • Dust with powdered sugar for an elegant presentation.
  • Pair with a hot cup of coffee or tea for an afternoon treat.
  • Wrap individually in parchment paper for a grab-and-go snack.
  • Top with a dollop of whipped cream and a drizzle of chocolate sauce for added decadence.

These serving ideas will help you turn a simple treat into a memorable experience for you and your guests.

Additional Tips

Creating the perfect Peanut Butter Fudge Bars can be an art form. Here are some additional tips to ensure success:

  1. Use quality peanut butter: Opt for creamy, natural peanut butter for the best flavor and texture.
  2. Don’t overmix: Be careful not to overmix the batter to maintain a tender texture.
  3. Check for doneness: Use a toothpick to check if the bars are done; it should come out with moist crumbs, not wet batter.
  4. Cool completely: Allow the bars to cool fully in the pan before slicing to prevent them from falling apart.
  5. Store properly: Keep the bars in an airtight container at room temperature for up to a week.

Following these tips will help you achieve the perfect balance of flavors and textures in your bars.

FAQ Section

Here are some frequently asked questions about Peanut Butter Fudge Bars to help you better understand this delightful dessert:

  1. Can I use crunchy peanut butter instead of creamy? Yes, you can use crunchy peanut butter for added texture and a nutty bite.
  2. Can I substitute almond butter for peanut butter? Absolutely! Almond butter can be used as a substitute for a different flavor profile.
  3. What is the best way to melt the butter? You can melt the butter in a saucepan over low heat or in the microwave in short intervals until fully melted.
  4. Can I freeze these bars? Yes, you can freeze the bars for up to three months. Wrap them tightly in plastic wrap and store in a freezer-safe container.
  5. How can I make these bars gluten-free? Substitute the all-purpose flour with a gluten-free flour blend to make the bars gluten-free.

These FAQs aim to address common concerns and help you customize the recipe to your liking. Enjoy creating and savoring your Peanut Butter Fudge Bars!

Dark Chocolate Mousse

Dark chocolate mousse is a decadent dessert that manages to strike the perfect balance between indulgence and sophistication. Its silky texture and rich flavor make it an irresistible treat for chocolate lovers. This dessert not only satisfies a sweet tooth but also provides the distinct pleasure of savoring something that feels both luxurious and comforting. The allure of dark chocolate mousse lies in its simplicity; with just a few ingredients, it delivers a dessert experience that feels like a reward. Whether enjoyed after a special dinner or as a treat to brighten a regular day, dark chocolate mousse has a way of elevating any occasion. The whipped texture and intense chocolate flavor create a harmony that is both satisfying and delightful.

The process of making dark chocolate mousse can be as enjoyable as eating it. Watching the transformation of chocolate and cream into a light, airy mousse is a kind of culinary magic. The ingredients typically include dark chocolate, cream, sugar, and eggs, each playing a vital role in achieving the perfect consistency. The dark chocolate provides depth and a slight bitterness that balances the sweetness of the sugar, while the cream adds a luxurious feel. Whipping the cream to the right consistency and folding it into the chocolate mixture allows air to be incorporated, resulting in the mousse’s characteristic lightness. Despite its rich flavor, dark chocolate mousse is surprisingly light, making it an excellent choice for a dessert that won’t overwhelm the palate.

Dark chocolate mousse also offers a canvas for creativity and personalization. It can be served in various ways to suit different tastes and occasions. For a classic presentation, it can be piped into elegant glasses and topped with a dollop of whipped cream or a sprinkle of grated chocolate. For those looking to add a twist, consider infusing the mousse with flavors like orange zest, coffee, or a hint of chili for a surprising kick. Garnishing with fresh berries, mint leaves, or nuts can add color and texture, enhancing the visual appeal and flavor profile. Whether you stick to tradition or experiment with new combinations, dark chocolate mousse remains a timeless dessert that delights the senses and brings a touch of elegance to any gathering.

Raspberry Macaron Bliss

Raspberry macarons are a delightful fusion of delicate sweetness and vibrant fruitiness, offering a true taste of bliss in every bite. The very essence of these French confections lies in their exquisite texture and flavor, which can transport anyone to a world of culinary delight. My family recently indulged in these raspberry macarons, and the verdict was unanimous—they were a hit! The gentle crunch of the outer shell, followed by the soft, chewy center, was perfectly complemented by the tartness of the raspberry filling. These macarons didn’t just capture our taste buds; they also brought us together, as we savored each bite and shared moments of joy and laughter. The experience reminded me that sometimes, the simplest pleasures—like a well-crafted macaron—can create the most cherished memories.

Ingredients

To create the perfect batch of raspberry macarons, you’ll need a precise list of ingredients. The base of the macaron shell is made from almond flour, powdered sugar, and egg whites. It’s crucial to use superfine almond flour to achieve that smooth, glossy surface. The powdered sugar adds sweetness and helps bind the mixture together, while the egg whites provide the necessary airiness and structure. For the raspberry filling, fresh or frozen raspberries work beautifully, along with granulated sugar to balance out the natural tartness. A touch of lemon juice enhances the raspberry flavor, making it pop with a refreshing zing.

Here’s the complete list of ingredients you’ll need:

  • Macaron Shells:
    • 1 cup almond flour
    • 1 3/4 cups powdered sugar
    • 3 large egg whites
    • 1/4 cup granulated sugar
    • 1/4 teaspoon cream of tartar
    • Red or pink gel food coloring
  • Raspberry Filling:
    • 1 cup raspberries (fresh or frozen)
    • 1/4 cup granulated sugar
    • 1 tablespoon lemon juice
    • 1 tablespoon cornstarch

Instructions

Creating raspberry macarons is both an art and a science, requiring care and precision at every step. Start by preheating your oven to 300°F (150°C) and lining two baking sheets with parchment paper. Next, sift the almond flour and powdered sugar together in a bowl to ensure there are no lumps. In a separate bowl, whisk the egg whites until they’re foamy, then add the cream of tartar. Gradually add the granulated sugar while continuing to whisk, until the mixture forms stiff peaks. This part is crucial, as the stiffness of the meringue will determine the rise and texture of your macarons.

Gently fold the dry ingredients into the meringue, adding the gel food coloring until you achieve your desired shade of pink. The folding process, known as “macaronage,” is critical; too much mixing can deflate the meringue, while too little can result in a lumpy batter. The batter should be smooth and flow like lava. Transfer it to a piping bag and pipe small circles onto the prepared baking sheets. Tap the sheets firmly on the counter to release any air bubbles, then let the piped macarons sit at room temperature for 30 minutes to an hour, or until they form a skin.

Bake the macarons for 15-18 minutes, rotating the sheets halfway through to ensure even baking. They should have a smooth top and a characteristic “foot” at the base. Let them cool completely before removing them from the parchment paper. For the filling, heat the raspberries, sugar, and lemon juice in a saucepan over medium heat. Stir in the cornstarch until the mixture thickens. Allow it to cool before piping onto the macaron shells. Sandwich together, and voila! You have made raspberry macarons.

Nutrition Facts

This recipe yields approximately 24 macarons, with each serving containing around 150 calories. The exact calorie count may vary depending on the specific brands of ingredients used, but these macarons are a delightful treat that can fit into a balanced diet when enjoyed in moderation. They provide a sweet indulgence with a touch of fruitiness, making them a perfect dessert for family gatherings or special occasions. Remember, savoring even a small dessert like this can bring immense satisfaction without compromising your dietary goals.

Preparation Time

The preparation time for raspberry macarons is about 45 minutes, with an additional 30 to 60 minutes of resting time for the macaron shells before baking. This allows the shells to develop their characteristic “feet” and ensures a smooth, glossy finish. Baking time is approximately 15-18 minutes, and the filling takes just about 10 minutes to prepare. Overall, the entire process can be completed in about two hours, making it a feasible project for a leisurely afternoon of baking.

How to Serve

Raspberry macarons are versatile and can be served in various ways, depending on the occasion and your personal preferences. Here are a few suggestions:

  • As a dessert centerpiece at a dinner party, arranged elegantly on a tiered serving platter.
  • Accompanied by a cup of tea or coffee for a delightful afternoon snack.
  • Wrapped in a decorative box or bag as a gift for friends and family.
  • Incorporated into a dessert buffet, alongside other bite-sized treats.
  • Paired with a glass of champagne for a luxurious treat at a special celebration.

Additional Tips

Making macarons can be a challenging yet rewarding experience. Here are some tips to help ensure success:

  1. Use aged egg whites: Letting egg whites age for 24 to 48 hours in the refrigerator can improve their stability when whipped.
  2. Measure ingredients precisely: Use a kitchen scale for accuracy, as even small deviations can affect the outcome.
  3. Practice patience: Allow the piped macarons to rest long enough to form a proper “skin” before baking.
  4. Invest in a good oven thermometer: Oven temperatures can vary, so an accurate thermometer is essential for consistent results.
  5. Experiment with flavors: Once you’ve mastered the basic recipe, try different fillings or add flavor extracts to the shells for variety.

FAQ Section

Here are some frequently asked questions about raspberry macarons:

  1. Why do my macarons have cracks?

    Cracks can occur if the oven temperature is too high or if the macarons haven’t rested long enough before baking. Ensure your oven is properly calibrated and let the macarons develop a good skin before baking.

  2. Can I use liquid food coloring?

    It’s best to use gel food coloring, as liquid can alter the consistency of the batter. Gel coloring provides vibrant color without affecting texture.

  3. How long do macarons last?

    Stored in an airtight container in the refrigerator, macarons can last up to a week. Allow them to come to room temperature before serving for the best flavor and texture.

  4. Can I freeze macarons?

    Yes, macarons freeze well. Place them in an airtight container with parchment paper between layers to prevent sticking. They can be frozen for up to three months.

  5. What if I don’t have almond flour?

    You can make your own by grinding blanched almonds into a fine powder. Be sure to sift the flour to remove any larger pieces.

Lemon Meringue Pie

When it comes to desserts that delight the taste buds and evoke a sense of nostalgia, Lemon Meringue Pie holds a special place in many hearts. This classic dessert, with its tangy lemon filling and fluffy meringue topping, has been a favorite in households around the world for generations. Personally, my family absolutely adores it. I remember the first time I made Lemon Meringue Pie; the kitchen was filled with the zesty aroma of fresh lemons, and the pie’s vibrant yellow hue was a feast for the eyes. When I served it, the meringue was perfectly golden and had a delightful balance of sweetness that complemented the tart lemon filling beautifully. Everyone went back for seconds, a sure sign that this pie was a hit!

Ingredients

To create this delectable Lemon Meringue Pie, you will need the following ingredients:

  • 1 pre-made pie crust (or homemade, if you prefer)
  • 1 cup of granulated sugar
  • 1/4 cup of cornstarch
  • 1/4 teaspoon of salt
  • 1 1/2 cups of water
  • 3 egg yolks, beaten
  • 2 tablespoons of unsalted butter
  • 1/3 cup of fresh lemon juice
  • 1 tablespoon of grated lemon zest
  • 4 egg whites
  • 1/4 teaspoon of cream of tartar
  • 1/2 cup of granulated sugar (for meringue)

Instructions

Begin by preheating your oven to 350°F (175°C). Line your pie pan with the prepared crust and bake it according to the package instructions until it’s lightly golden. Set aside to cool.

In a medium saucepan, combine the 1 cup of sugar, cornstarch, and salt. Gradually stir in the water until smooth. Cook over medium heat, stirring constantly, until the mixture thickens and comes to a boil. Boil for 1 minute and remove from heat.

Whisk a small amount of the hot mixture into the egg yolks, then return all to the pan, stirring constantly. Bring to a gentle boil; cook and stir for 2 minutes. Remove from heat and stir in butter, lemon juice, and lemon zest. Pour the hot filling into the cooled crust.

For the meringue, beat egg whites and cream of tartar on medium speed until soft peaks form. Gradually add the sugar, 1 tablespoon at a time, on high until stiff peaks form. Spread evenly over hot filling, sealing edges to crust.

Bake at 350°F for 10-12 minutes or until meringue is golden. Cool for 1 hour, then refrigerate for at least 3 hours before serving. Enjoy your homemade Lemon Meringue Pie!

Nutrition Facts

This recipe yields approximately 8 servings. Each serving contains about 320 calories. It’s a delightful treat that can be enjoyed in moderation as part of a balanced diet.

Preparation Time

The total preparation time for this Lemon Meringue Pie is about 45 minutes, with an additional 3 hours for cooling and setting. It’s a perfect dessert to prepare ahead of time for gatherings.

How to Serve

  • Serve chilled for a refreshing treat on a warm day.
  • Pair with a dollop of whipped cream for extra indulgence.
  • Garnish with lemon slices or zest for a decorative touch.
  • Enjoy with a cup of tea or coffee for a comforting snack.
  • Perfect as a light dessert following a hearty meal.

Additional Tips

  1. Use fresh lemons: Freshly squeezed lemon juice and zest will give your pie the best flavor.
  2. Room temperature ingredients: Ensure eggs and butter are at room temperature for better consistency.
  3. Prevent meringue weeping: Spread meringue over hot filling to help it adhere and reduce weeping.
  4. Seal the meringue: Make sure the meringue touches the crust to prevent shrinking.
  5. Cooling time: Allow the pie to cool completely before refrigerating to set properly.

FAQ Section

Q: Can I use bottled lemon juice instead of fresh?

A: While you can use bottled lemon juice, fresh lemon juice is recommended for the best flavor and aroma.

Q: How do I store leftover pie?

A: Store leftovers in an airtight container in the refrigerator for up to 3 days.

Q: Can I make the pie crust from scratch?

A: Absolutely! A homemade pie crust can add a wonderful homemade touch to the pie.

Q: How do I know when the meringue is ready?

A: The meringue is ready when it forms stiff peaks and is glossy. It should hold its shape when lifted.

Q: Is there a way to make this pie dairy-free?

A: Yes, you can substitute the butter with a dairy-free alternative to make the pie dairy-free.

Cinnamon Sugar Churros

There’s something universally delightful about the crispy, golden allure of a freshly made churro. With their roots tracing back to Spain, these elongated pastries have traveled across continents and cultures, finding a place in the hearts (and stomachs) of food enthusiasts everywhere. Recently, I decided to whip up a batch of Cinnamon Sugar Churros for my family, and the experience was nothing short of magical. As the aroma of cinnamon and sugar wafted through the air, it was as if the kitchen transformed into a cozy corner of a bustling Spanish market. The churros emerged from the oil with a satisfying crunch, their exterior perfectly crisp while the inside remained soft and slightly chewy. My family gathered around, each bite accompanied by delighted murmurs and the inevitable question: “Is there more?” This recipe has now become a staple in our home, a testament to its irresistible charm and the joy it brings to those who indulge in it.

Ingredients

Crafting the perfect churro begins with quality ingredients that come together to create this beloved treat. Here’s what you’ll need for a batch that serves six:

  • 1 cup of water
  • 2 1/2 tablespoons of white sugar
  • 1/2 teaspoon of salt
  • 2 tablespoons of vegetable oil
  • 1 cup of all-purpose flour
  • 2 quarts of oil for frying
  • 1/2 cup of white sugar, or to taste
  • 1 teaspoon of ground cinnamon

Instructions

Creating churros at home is a rewarding process that combines simple steps with a bit of culinary magic. Follow these instructions for a delightful result:

  1. In a small saucepan over medium heat, combine water, 2 1/2 tablespoons of sugar, salt, and 2 tablespoons of vegetable oil. Bring to a boil and remove from heat. Stir in flour until the mixture forms a ball.
  2. Heat oil for frying in a deep-fryer or deep skillet to 375°F (190°C). Pipe strips of dough into hot oil using a pastry bag. Fry until golden, about 2 minutes on each side.
  3. Remove churros from hot oil and drain on paper towels.
  4. Combine 1/2 cup sugar and cinnamon in a small bowl. Roll drained churros in sugar mixture.

Nutrition Facts

These churros serve six people, making it a great option for a family dessert or a small gathering. Each serving comes in at approximately 150 calories. While the sweetness of cinnamon and sugar is undeniable, it’s important to enjoy these treats in moderation, given their fried nature. However, the occasional indulgence can be a delightful escape from the routine diet, adding a bit of sweetness to your day.

Preparation Time

Making churros at home is a relatively quick affair, perfect for a spontaneous dessert craving or a planned culinary adventure. From start to finish, the entire process takes about 45 minutes. This includes the time needed for preparation, cooking, and a few moments to let the churros cool slightly before serving. The efficiency of this recipe makes it an ideal choice for both novice cooks and experienced chefs looking for a quick yet impressive treat.

How to Serve

Churros are a versatile treat that can be served in various delightful ways. Here are some serving suggestions to elevate your churro experience:

  • Classic Style: Serve warm churros dusted with cinnamon sugar alongside a cup of hot chocolate for dipping.
  • Ice Cream Dream: Pair churros with a scoop of vanilla or chocolate ice cream, allowing the warmth of the churros to slightly melt the ice cream.
  • Fruit and Churros: Add a fresh twist by serving churros with a side of berries or sliced fruits.
  • Nutty Delight: Drizzle churros with a bit of melted chocolate and sprinkle with crushed nuts for a crunchy texture.
  • Spicy Kick: For those who enjoy a hint of spice, add a dash of cayenne pepper to the cinnamon sugar mixture.

Additional Tips

To ensure your churros turn out perfectly every time, consider these helpful tips:

  1. Use a Sturdy Pastry Bag: The dough can be quite thick, so opt for a robust pastry bag or a churrera to pipe the churros with ease.
  2. Maintain the Oil Temperature: Keep the oil at a consistent 375°F (190°C) to ensure even cooking and a golden brown crust.
  3. Don’t Overcrowd the Fryer: Fry the churros in small batches to prevent the oil temperature from dropping and to avoid sticking.
  4. Experiment with Flavors: Feel free to add a touch of vanilla or a sprinkle of nutmeg to the dough for a unique twist.
  5. Store Properly: If you have leftovers, store them in an airtight container and reheat in the oven to restore their crispiness.

FAQ Section

Here are some frequently asked questions about making churros at home:

  1. Can I make churros without a deep fryer? Yes, you can use a deep skillet or a pot with enough oil to submerge the churros. Ensure the oil is deep enough for even cooking.
  2. What can I use instead of a pastry bag? If you don’t have a pastry bag, you can use a plastic zip-top bag and cut a corner to pipe the dough.
  3. Can churros be baked instead of fried? While traditional churros are fried, you can bake them at 400°F (200°C) until golden brown, though they may lack the signature crispiness.
  4. How do I prevent churros from becoming soggy? Ensure the oil is at the correct temperature and avoid overcrowding the fryer. Drain churros on paper towels immediately after frying.
  5. Can I prepare the dough in advance? Yes, you can prepare the dough a day ahead and store it in the refrigerator. Bring it to room temperature before frying.