Dairy-Free Matcha Latte

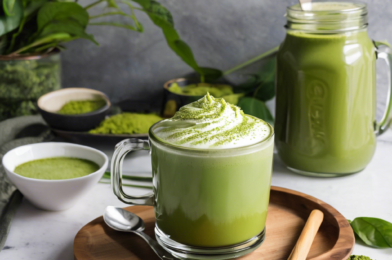
As someone who enjoys exploring different beverage trends, the dairy-free matcha latte has been a delightful discovery. This vibrant green drink, rooted in centuries-old Japanese tradition, has recently surged in popularity for its health benefits and rich, earthy flavor. It’s not just about the aesthetic pleasure of its lush hue; the matcha latte offers a unique combination of taste and wellness, making it a favorite among many, including myself. My family, who are avid coffee enthusiasts, were initially skeptical about replacing their morning brew with something so different. However, after a few sips, they found themselves appreciating the nuanced flavors and the gentle energy boost that matcha provides. The combination of creamy plant-based milk and finely ground matcha powder results in a beverage that is not only satisfying but also nourishing, making it a staple in our morning routine.

Ingredients

The beauty of a dairy-free matcha latte lies in its simplicity and the quality of its ingredients. Here’s what you’ll need to make a perfect cup:

  • 1 teaspoon of matcha powder: Opt for high-quality, ceremonial-grade matcha for the best flavor and health benefits.
  • 1 cup of plant-based milk: Almond, oat, or coconut milk work particularly well, each adding a unique flavor profile.
  • 1 tablespoon of hot water: This helps to dissolve the matcha powder properly.
  • Sweetener (optional): You can use honey, maple syrup, or agave nectar to taste.
  • A pinch of vanilla extract (optional): For an added depth of flavor.

Instructions

Creating a dairy-free matcha latte at home is a simple yet rewarding process. Follow these steps to enjoy a delicious cup:

  1. Step 1: Start by sifting the matcha powder into a bowl or a cup to ensure there are no lumps.
  2. Step 2: Add the hot water to the matcha powder. Whisk using a bamboo whisk or a milk frother until the mixture is smooth and frothy.
  3. Step 3: Heat the plant-based milk in a saucepan over medium heat. Alternatively, you can microwave it for about a minute until hot.
  4. Step 4: Pour the hot milk into the matcha mixture, stirring gently to combine. Add sweetener and vanilla extract at this stage, if desired.
  5. Step 5: Pour the latte into a cup and enjoy it warm, or let it cool and serve it over ice for a refreshing cold drink.

Nutrition Facts

This dairy-free matcha latte recipe makes one serving, with approximately 150 calories per serving, depending on the type and amount of sweetener used.

Preparation Time

Preparing this delightful drink takes about 5 minutes, making it a quick and easy addition to your morning or afternoon routine.

How to Serve

There are several ways you can enjoy your dairy-free matcha latte:

  • Serve it warm with a sprinkle of matcha powder on top for an extra touch of elegance.
  • For a chilled version, pour the prepared latte over ice cubes and enjoy it as a refreshing iced beverage.
  • Add a dollop of coconut whipped cream for a decadent treat.
  • Garnish with a sprinkle of cinnamon or nutmeg to enhance the flavor profile.
  • Pair it with a light snack like a slice of banana bread or a handful of nuts for a complete and satisfying experience.

Additional Tips

To make the most out of your dairy-free matcha latte experience, consider these tips:

  1. Tip 1: Invest in a good quality matcha powder. The taste and nutritional benefits are significantly better with higher-grade matcha.
  2. Tip 2: Use a bamboo whisk, known as a chasen, to mix the matcha. It helps in achieving a frothy texture, which is key to a good latte.
  3. Tip 3: Experiment with different plant-based milks to find the one that best suits your taste preferences.
  4. Tip 4: If you find the matcha flavor too strong, start with a smaller amount and gradually increase as you get accustomed to the taste.
  5. Tip 5: Store your matcha powder in an airtight container in a cool, dark place to maintain its freshness and prevent it from becoming bitter.

FAQ Section

Q1: What is matcha, and how is it different from green tea?

Matcha is a type of green tea made from young tea leaves ground into a fine powder. Unlike traditional green tea, where leaves are steeped in water, matcha involves consuming the whole leaf, providing more antioxidants and nutrients.

Q2: Can I use regular milk instead of plant-based milk in this recipe?

Yes, you can use regular milk if you are not avoiding dairy. However, using plant-based milk makes the drink suitable for those who are lactose intolerant or prefer a vegan diet.

Q3: Is matcha latte caffeinated?

Yes, matcha contains caffeine, but it typically provides a more sustained energy boost compared to coffee, thanks to the presence of L-theanine, an amino acid that promotes relaxation without drowsiness.

Q4: How can I make my matcha latte frothy without a bamboo whisk?

If you don’t have a bamboo whisk, a milk frother or a small electric whisk can work as alternatives to achieve a frothy latte.

Q5: Are there any health benefits to drinking matcha lattes?

Yes, matcha is rich in antioxidants, particularly catechins, which are known to boost metabolism, enhance mood, and even support heart health. It’s a great way to enjoy a healthy and delicious drink.

Vegan Cauliflower Alfredo

When the aroma of a comforting pasta dish wafts through my home, it often signals a gathering of family and friends, eager to dive into a meal that’s both delicious and soul-satisfying. Recently, I introduced my family to the delightful surprise of Vegan Cauliflower Alfredo. This recipe, while entirely plant-based, had everyone at the table reaching for seconds. The creamy texture, combined with the subtle nuttiness from the cauliflower, created a sauce so rich and flavorful that it was hard to believe there wasn’t a speck of dairy in sight. Even the skeptics in the family, who usually shy away from anything labeled “vegan,” couldn’t help but express their delight. The dish was met with unanimous approval, and it has since become a staple in our household, providing a healthier alternative to the traditional Alfredo sauce without compromising on taste.

Ingredients

The magic of this Vegan Cauliflower Alfredo lies in its simple yet wholesome ingredients that come together to create a dish that’s both nourishing and indulgent. Here’s what you’ll need:

  • 1 medium head of cauliflower, chopped
  • 2 tablespoons olive oil
  • 4 cloves garlic, minced
  • 1 cup unsweetened almond milk (or any plant-based milk of choice)
  • 3 tablespoons nutritional yeast
  • 1 tablespoon lemon juice
  • Salt and pepper to taste
  • Fresh parsley, chopped (for garnish)
  • Your choice of pasta (spaghetti, fettuccine, or penne work well)

Instructions

Creating this creamy Alfredo sauce is a straightforward process that even novice cooks will find manageable. Follow these simple steps:

  1. Begin by bringing a large pot of salted water to a boil. Add the cauliflower florets and cook until tender, about 8-10 minutes. Drain and set aside.
  2. In a pan over medium heat, add the olive oil. Sauté the minced garlic until fragrant, being careful not to brown it.
  3. In a blender, combine the cooked cauliflower, sautéed garlic, almond milk, nutritional yeast, lemon juice, salt, and pepper. Blend until smooth and creamy.
  4. Return the sauce to the pan and heat gently, adjusting the seasoning as needed.
  5. Cook your choice of pasta according to package instructions, then drain.
  6. Toss the pasta with the creamy cauliflower Alfredo sauce and serve hot, garnished with fresh parsley.

Nutrition Facts

This recipe generously serves 4, with each serving providing approximately 250 calories. The calories are kept low by the substitution of cauliflower for traditional heavy cream, making it a healthier option for those watching their intake without sacrificing the creamy texture we all love in an Alfredo sauce.

Preparation Time

The total preparation and cooking time for this Vegan Cauliflower Alfredo is about 30 minutes. This makes it an ideal choice for a quick weeknight dinner or a last-minute entertaining option that doesn’t compromise on flavor or presentation.

How to Serve

While this dish is a delight on its own, here are some serving suggestions to elevate your dining experience:

  • As a Main Course: Serve with a side of garlic bread for a complete meal.
  • With Vegetables: Toss in some steamed broccoli or peas for added nutrition and color.
  • As a Side Dish: Pair with grilled tofu or a hearty plant-based protein.
  • Garnish: Add a sprinkle of vegan Parmesan or nutritional yeast for an extra umami kick.
  • For a Crowd: Double the recipe and serve it as part of a buffet with a selection of toppings like roasted red peppers or sun-dried tomatoes.

Additional Tips

To ensure your Vegan Cauliflower Alfredo is a success every time, consider these handy tips:

  1. Blending Tips: For the smoothest sauce, use a high-speed blender, and be sure to blend until all the cauliflower is completely pureed.
  2. Variations: Experiment with different herbs such as basil or oregano to tailor the sauce to your taste.
  3. Storage: Leftover sauce can be stored in an airtight container in the refrigerator for up to 3 days. Reheat gently on the stove before serving.
  4. Thickening: If the sauce is too thin, let it simmer on low heat until it reaches the desired consistency.
  5. Flavor Enhancements: Add a pinch of nutmeg or smoked paprika for a unique twist.

FAQ Section

Here are some frequently asked questions about Vegan Cauliflower Alfredo:

  1. Can I freeze the sauce? Yes, the sauce can be frozen for up to a month. Thaw it in the refrigerator overnight before reheating.
  2. What can I substitute for nutritional yeast? Nutritional yeast provides a cheesy flavor, but you can substitute it with a vegan cheese of your choice or omit it entirely if desired.
  3. Can I use a different type of plant milk? Absolutely! Coconut milk will add a richer texture, while soy milk can be used for a more neutral taste.
  4. Is this recipe gluten-free? The sauce itself is gluten-free, but ensure to use gluten-free pasta if required.
  5. How do I prevent the sauce from becoming grainy? Ensure the cauliflower is thoroughly cooked and blended until smooth to avoid any graininess in the sauce.

Balsamic Roasted Brussels Sprouts

Balsamic roasted Brussels sprouts have become a beloved dish in my household, and for good reason. These tender yet crispy vegetables, caramelized to perfection, offer a delightful balance of sweet and tangy flavors that even the pickiest eaters in my family can’t resist. As someone who has cooked these multiple times, I’ve witnessed the magic they bring to the dinner table, turning a once-dreaded vegetable into a star attraction. Whether served as a side to a hearty roast or enjoyed as a main dish in a vegetarian meal, these Brussels sprouts have earned their place as a staple in our weekly menu.

Ingredients

The ingredients list for balsamic roasted Brussels sprouts is refreshingly simple, allowing the natural flavors of the vegetables to shine. You’ll need:

  • 1 1/2 pounds of fresh Brussels sprouts, trimmed and halved
  • 3 tablespoons of olive oil
  • 1/4 cup of balsamic vinegar
  • 2 tablespoons of honey or maple syrup
  • Salt and pepper to taste
  • Optional: 1/4 cup of grated Parmesan cheese or toasted nuts for garnish

These straightforward ingredients not only make this dish easy to prepare but also ensure that the Brussels sprouts remain the focal point of the meal.

Instructions

Creating the perfect balsamic roasted Brussels sprouts is a simple process that can be completed in just a few steps:

  1. Preheat your oven to 400°F (200°C) and line a baking sheet with parchment paper or aluminum foil for easy cleanup.
  2. In a large bowl, toss the halved Brussels sprouts with olive oil, ensuring that each piece is well-coated. This step is crucial for achieving that desired crispy texture.
  3. Spread the Brussels sprouts in a single layer on the prepared baking sheet, cut side down. This allows for even roasting and caramelization.
  4. Roast in the preheated oven for 20-25 minutes, or until the sprouts are tender and golden brown on the edges.
  5. While the sprouts are roasting, whisk together the balsamic vinegar and honey or maple syrup in a small bowl.
  6. Remove the Brussels sprouts from the oven and drizzle them with the balsamic mixture. Toss to coat evenly.
  7. Return the sprouts to the oven for an additional 5 minutes, allowing the glaze to thicken and adhere to the vegetables.
  8. Season with salt and pepper to taste, and if desired, garnish with Parmesan cheese or toasted nuts before serving.

Nutrition Facts

This recipe serves approximately four people, with each serving containing about 150 calories. These figures can vary slightly depending on the specific ingredients used, but the overall nutritional profile makes this dish a healthy addition to any meal plan.

Preparation Time

One of the many advantages of this recipe is its efficiency. From start to finish, balsamic roasted Brussels sprouts can be prepared in just 35-40 minutes, making them a perfect option for busy weeknights or when you need to whip up a quick side dish for a dinner party.

How to Serve

These versatile Brussels sprouts can be served in a variety of ways, enhancing numerous dishes:

  • As a side dish: Pair them with grilled chicken, steak, or fish for a balanced and nutritious meal.
  • In a salad: Toss them into a fresh green salad with feta cheese, cranberries, and walnuts for added texture and flavor.
  • On a grain bowl: Add them to a bowl of quinoa or brown rice, along with roasted sweet potatoes and avocado, for a satisfying vegetarian meal.
  • As a pizza topping: Spread them over a white pizza with goat cheese and caramelized onions for a unique twist.
  • In a sandwich: Layer them in a sandwich with turkey and cranberry sauce for a delicious post-Thanksgiving treat.

Additional Tips

  1. Don’t overcrowd the pan: Ensure that the Brussels sprouts are spread out in a single layer to allow for even roasting.
  2. Use fresh Brussels sprouts: Fresh, firm sprouts will roast more evenly and have a better taste than older, softer ones.
  3. Adjust sweetness: If you prefer a less sweet glaze, reduce the amount of honey or maple syrup according to your taste.
  4. Experiment with flavors: Add a sprinkle of red pepper flakes for a hint of heat, or a dash of lemon juice for brightness.
  5. Try different garnishes: Experiment with various toppings like crumbled blue cheese, toasted almonds, or crispy bacon for added flavor and texture.

FAQ Section

Q: Can I make this recipe ahead of time?

A: Yes, you can roast the Brussels sprouts a day in advance. Store them in an airtight container in the refrigerator, and reheat them in the oven before serving to ensure they remain crispy.

Q: Can I use frozen Brussels sprouts for this recipe?

A: While fresh Brussels sprouts are ideal for roasting, you can use frozen ones in a pinch. Just be sure to thaw and pat them dry before roasting to avoid excess moisture.

Q: What can I use as a substitute for balsamic vinegar?

A: If you’re out of balsamic vinegar, you can substitute it with red wine vinegar mixed with a little sugar or honey to mimic the sweetness of balsamic.

Q: How do I store leftovers?

A: Store any leftovers in an airtight container in the refrigerator for up to three days. Reheat them in the oven or on the stovetop to regain their crispy texture.

Q: Can I double this recipe?

A: Absolutely! Simply double the ingredients and use two baking sheets to ensure the Brussels sprouts have enough space to roast evenly.

Coconut Curry Chickpeas

Coconut Curry Chickpeas have become a beloved staple in my household, transforming regular weeknight dinners into something extraordinary. The warm, spicy aroma that fills the kitchen as the dish simmers is nothing short of inviting. My family eagerly gathers around the table, bowls in hand, ready to indulge in the comforting flavors of coconut milk, aromatic spices, and tender chickpeas. The first time I prepared this dish, I was uncertain how it would be received by everyone, especially the kids, who have their peculiar preferences. Much to my surprise and delight, it was an instant hit. The subtle sweetness of the coconut milk perfectly balanced the spices, making it palatable even for the youngest members of the family. This recipe has since become a regular in our meal rotation, loved for both its simplicity and rich, complex flavors.

Ingredients

The beauty of Coconut Curry Chickpeas lies in its simplicity and the ease of sourcing ingredients. Most of the components are pantry staples, making this dish accessible and convenient for any home cook. Here’s what you’ll need:

  • 2 tablespoons of olive oil
  • 1 large onion, finely chopped
  • 3 cloves of garlic, minced
  • 1 tablespoon of grated fresh ginger
  • 1 teaspoon of ground cumin
  • 1 teaspoon of ground coriander
  • 1 teaspoon of turmeric
  • 1 teaspoon of garam masala
  • 1/2 teaspoon of chili powder (adjust to taste)
  • 2 cans (15 ounces each) of chickpeas, drained and rinsed
  • 1 can (13.5 ounces) of coconut milk
  • 1 cup of vegetable broth
  • 1 tablespoon of tomato paste
  • Salt and pepper to taste
  • Fresh cilantro, chopped, for garnish
  • Cooked rice or naan, for serving

Instructions

Creating Coconut Curry Chickpeas is a straightforward process that even novice cooks can master. Follow these steps to bring this delightful dish to your table:

  1. In a large skillet or saucepan, heat the olive oil over medium heat. Add the chopped onion and sauté until translucent, about 5 minutes.
  2. Add the minced garlic and grated ginger, cooking for another 2 minutes until fragrant.
  3. Stir in the spices: cumin, coriander, turmeric, garam masala, and chili powder. Cook for 1-2 minutes, allowing the spices to release their oils and become aromatic.
  4. Add the drained chickpeas, coconut milk, vegetable broth, and tomato paste. Stir well to combine.
  5. Bring the mixture to a simmer, then reduce the heat to low. Let it simmer gently for 20-25 minutes, stirring occasionally, until the sauce has thickened and the flavors have melded together.
  6. Season with salt and pepper to taste.
  7. Garnish with fresh cilantro before serving.
  8. Serve hot over cooked rice or with warm naan.

Nutrition Facts

This recipe serves approximately four people, making it an ideal meal for a family dinner or meal preps for the week. Each serving contains approximately 350 calories, making it a nutritious choice that doesn’t compromise on flavor.

Preparation Time

One of the many advantages of this Coconut Curry Chickpeas recipe is its relatively quick preparation time. From start to finish, you can have this delicious dish ready in about 40 minutes. This includes the time spent gathering ingredients, prepping your vegetables, and allowing the curry to simmer to perfection. It’s a perfect option for those busy weeknights when you want something wholesome and satisfying without spending hours in the kitchen.

How to Serve

There are several ways to serve Coconut Curry Chickpeas that can enhance your dining experience:

  • Serve over a bed of fluffy basmati or jasmine rice for a complete meal.
  • Accompany with warm naan or roti to soak up the creamy curry sauce.
  • Offer a side of steamed vegetables such as broccoli or green beans for added nutrition.
  • Top with a dollop of plain yogurt or a squeeze of lime for a refreshing contrast.
  • Pair with a crisp salad of cucumbers, tomatoes, and red onion, dressed with lemon and olive oil.

Additional Tips

To make the most out of your Coconut Curry Chickpeas, consider these helpful tips:

  • Adjust spice levels: If you prefer a milder curry, reduce the chili powder or omit it altogether. Conversely, increase it if you like more heat.
  • Use fresh ingredients: Fresh ginger and garlic provide a more vibrant flavor compared to powdered alternatives.
  • Experiment with vegetables: Consider adding spinach, bell peppers, or sweet potatoes for a different twist and extra nutrients.
  • Make it ahead: This curry tastes even better the next day as the flavors continue to develop, making it perfect for meal prep.
  • Freeze leftovers: Coconut Curry Chickpeas freeze well for up to three months. Portion into containers for easy future meals.

FAQ

Here are some frequently asked questions about Coconut Curry Chickpeas:

  1. Can I use dried chickpeas instead of canned?
    Yes, but you’ll need to soak and cook them beforehand. Start with about 1.5 cups of dried chickpeas to yield the equivalent of two cans.
  2. Is there a substitute for coconut milk?
    You can use almond milk or cashew cream as a non-dairy alternative, though it may alter the flavor slightly.
  3. Can I make this dish in a slow cooker?
    Absolutely! Combine all ingredients in a slow cooker and cook on low for 6-8 hours or on high for 3-4 hours.
  4. How can I thicken the curry?
    If you prefer a thicker curry, reduce the amount of vegetable broth or simmer the curry uncovered until it reaches your desired consistency.
  5. Is this recipe vegan-friendly?
    Yes, this Coconut Curry Chickpeas recipe is entirely plant-based, making it suitable for vegans and vegetarians.

In conclusion, Coconut Curry Chickpeas is a versatile and flavorful dish that suits a variety of dietary preferences while offering a comforting meal option. Whether you’re feeding a family or meal prepping for the week, this recipe is sure to become a favorite in your culinary repertoire.

Dairy-Free Chocolate Chip Cookies

When it comes to baking, few treats are as universally cherished as the classic chocolate chip cookie. However, for those who are lactose intolerant or choose to avoid dairy for other reasons, finding a satisfying alternative can be a challenge. Enter the dairy-free chocolate chip cookie, a delicious twist on the beloved classic that doesn’t compromise on taste or texture. For anyone who’s ever had to forgo these sweet delights due to dietary restrictions, this recipe is a game-changer. When I first baked a batch of these cookies for my family, I was met with rave reviews. The cookies were devoured in minutes, and even the staunchest dairy lovers in the house couldn’t tell the difference. The rich flavor and soft, chewy texture won everyone over, proving that going dairy-free doesn’t mean sacrificing indulgence.

Ingredients

Creating the perfect dairy-free chocolate chip cookie begins with selecting the right ingredients. These cookies rely on a blend of traditional elements and innovative substitutes to achieve their classic taste and texture. Here’s what you’ll need:

  • 1 cup coconut oil: This serves as a rich and flavorful substitute for butter, lending the cookies a subtle tropical taste that complements the chocolate perfectly.
  • 1 cup packed brown sugar: The molasses in brown sugar adds moisture and a deeper flavor profile.
  • 1/2 cup granulated sugar: This helps balance the sweetness and provides a slight crispness to the edges of the cookies.
  • 2 teaspoons vanilla extract: Essential for enhancing the overall flavor.
  • 2 large eggs: The binding agent that holds everything together.
  • 2 1/4 cups all-purpose flour: The foundation of any good cookie.
  • 1 teaspoon baking soda: Helps the cookies rise just the right amount.
  • 1/2 teaspoon salt: Balances the sweetness and enhances the chocolate flavor.
  • 2 cups dairy-free chocolate chips: The star of the show, ensuring each bite is filled with chocolatey goodness.

Instructions

Transforming these ingredients into mouthwatering cookies is straightforward and rewarding. Follow these steps to ensure perfect results:

  1. Preheat your oven to 350°F (175°C) and line two baking sheets with parchment paper.

  2. In a large mixing bowl, combine the coconut oil, brown sugar, and granulated sugar. Beat together until the mixture is smooth and creamy.

  3. Add the vanilla extract and eggs to the mixture, beating well after each addition until the ingredients are fully incorporated.

  4. In a separate bowl, whisk together the flour, baking soda, and salt. Gradually add the dry ingredients to the wet mixture, stirring until just combined.

  5. Fold in the dairy-free chocolate chips, ensuring they are evenly distributed throughout the dough.

  6. Drop spoonfuls of dough onto the prepared baking sheets, spacing them about 2 inches apart to allow for spreading.

  7. Bake for 10-12 minutes, or until the edges are golden brown and the centers are set. Allow the cookies to cool on the baking sheets for a few minutes before transferring them to a wire rack to cool completely.

Nutrition Facts

This recipe yields approximately 24 cookies, each serving packed with flavor and satisfaction. For those mindful of their caloric intake, each cookie contains around 150 calories. While these cookies are a treat, they don’t skimp on the delightful experience we all seek in a sweet indulgence.

Preparation Time

Baking these cookies is a relatively quick process, perfect for those who crave instant gratification. The total time from start to finish is about 30 minutes, with 10-12 minutes for baking and the remaining time dedicated to preparation. This makes them an ideal choice for last-minute gatherings or when a sudden craving strikes.

How to Serve

Serving these dairy-free chocolate chip cookies can be as creative or as straightforward as you desire. Here are a few suggestions to enhance your cookie experience:

  • Classic with a Twist: Enjoy warm cookies fresh from the oven with a cold glass of almond or oat milk.
  • Ice Cream Sandwiches: Pair these cookies with your favorite dairy-free ice cream for a delightful dessert.
  • Cookie Crumble: Crumble the cookies over a bowl of dairy-free yogurt or smoothie bowl for added texture and flavor.
  • Cookie Stack: Stack them up with layers of dairy-free whipped cream for an impressive treat at parties.
  • Gift Box: Package them in a decorative box to share as a thoughtful homemade gift.

Additional Tips

To ensure your dairy-free chocolate chip cookies are nothing short of perfection, consider these additional tips:

  1. Room Temperature Ingredients: Ensure the coconut oil and eggs are at room temperature for easier mixing and better consistency.
  2. Chill the Dough: Refrigerate the cookie dough for at least 30 minutes if you prefer thicker cookies that don’t spread as much.
  3. Experiment with Mix-Ins: Customize your cookies by adding nuts, dried fruits, or even a dash of cinnamon for a unique twist.
  4. Store Properly: Keep the cookies in an airtight container at room temperature to maintain their freshness for up to a week.
  5. Freezing for Later: To enjoy fresh cookies anytime, freeze the cookie dough balls on a baking sheet, then transfer them to a freezer bag. Bake from frozen, adding a couple of extra minutes to the baking time.

FAQ Section

Here are some frequently asked questions about dairy-free chocolate chip cookies:

  1. Can I substitute another oil for coconut oil?

    Yes, you can use other vegetable oils like canola or avocado oil, though the flavor and texture might vary slightly. Coconut oil is recommended for its flavor and consistency.

  2. What can I use instead of eggs?

    If you are also avoiding eggs, you can use flaxseed meal as an egg replacement. Mix one tablespoon of flaxseed meal with three tablespoons of water for each egg and let it sit for a few minutes to thicken.

  3. Are these cookies vegan?

    Yes, as long as you use a vegan egg substitute, these cookies can be considered vegan.

  4. Can I make these cookies gluten-free?

    You can try using a gluten-free flour blend in place of all-purpose flour. Make sure to select a blend that is suitable for baking to ensure the best texture.

  5. How do I prevent the cookies from spreading too much?

    Chilling the dough before baking and ensuring your baking sheets are cool can help prevent the cookies from spreading too much in the oven.

Quinoa & Roasted Veggie Bowl

The allure of a well-crafted Quinoa & Roasted Veggie Bowl isn’t merely in its vibrant colors or enticing aroma but lies deeply rooted in its nutritional value and the symphony of flavors it offers. As a journalist with an appreciation for culinary delights, I had the pleasure of indulging in this particular dish with my family, and it did not disappoint. The blend of fluffy quinoa with roasted vegetables not only satiated our hunger but also left us feeling revitalized and content. Each bite delivered a delightful crunch from the veggies, perfectly complemented by the soft, nutty texture of quinoa. My children, often finicky with their vegetable intake, found themselves reaching for seconds, a testament to the dish’s universal appeal.

Ingredients

To recreate this delightful Quinoa & Roasted Veggie Bowl, gather the following ingredients to ensure a harmonious blend of flavors and nutrition:

  • 1 cup quinoa – Rinsed and drained.
  • 2 cups water or vegetable broth – For a richer flavor.
  • 1 large red bell pepper – Chopped into bite-sized pieces.
  • 1 zucchini – Sliced into half-moons.
  • 1 cup cherry tomatoes – Halved.
  • 1 red onion – Sliced thinly.
  • 2 tablespoons olive oil – For roasting.
  • Salt and pepper – To taste.
  • 1 teaspoon garlic powder – Adds depth of flavor.
  • 1 teaspoon dried thyme – For a hint of earthiness.
  • 1/2 lemon – Juiced, for a fresh zing.
  • Fresh parsley – Chopped, for garnish.

Instructions

Crafting the perfect Quinoa & Roasted Veggie Bowl is a straightforward process that brings out the best of each ingredient. Follow these steps for a successful culinary experience:

  1. Cook the Quinoa: In a medium saucepan, combine the rinsed quinoa with water or vegetable broth. Bring it to a boil over medium-high heat, then reduce the heat to low, cover, and let it simmer for about 15 minutes, or until the quinoa is tender and the liquid is absorbed. Fluff with a fork and set aside.
  2. Prepare the Veggies: Preheat your oven to 400°F (200°C). In a large bowl, toss the chopped red bell pepper, zucchini, cherry tomatoes, and sliced red onion with olive oil, salt, pepper, garlic powder, and dried thyme. Spread the veggies evenly on a baking sheet.
  3. Roast the Veggies: Roast in the preheated oven for about 20-25 minutes, or until the vegetables are tender and slightly caramelized at the edges, stirring halfway through for even cooking.
  4. Assemble the Bowl: In a large serving bowl, combine the cooked quinoa with the roasted vegetables. Drizzle with lemon juice and toss to combine. Taste and adjust seasonings if necessary.
  5. Garnish and Serve: Top with freshly chopped parsley before serving to add a burst of color and freshness. Serve warm or at room temperature for a delightful meal.

Nutrition Facts

This Quinoa & Roasted Veggie Bowl serves 4 people, with each serving containing approximately 350 calories. The nutritional profile is balanced, making it an excellent choice for those seeking a wholesome and satisfying meal.

Preparation Time

The preparation and cooking time for this delightful dish is approximately 40-50 minutes. This includes both the time needed to prepare the ingredients and the cooking time to deliver a meal that is both quick and satisfying.

How to Serve

Present the Quinoa & Roasted Veggie Bowl in a way that highlights its vibrant colors and textures. Here are some serving suggestions:

  • Serve as a main course for a light lunch or dinner.
  • Pair with a side of crusty bread for a more substantial meal.
  • Top with a dollop of hummus or a sprinkle of feta cheese for added flavor.
  • Include a fresh, green salad on the side to complement the bowl.
  • For a protein boost, add grilled chicken or chickpeas to the dish.

Additional Tips

To enhance your cooking experience and the flavors of this dish, consider these additional tips:

  1. Rinse the Quinoa Thoroughly: Rinsing removes quinoa’s natural coating, saponin, which can make it taste bitter or soapy.
  2. Customize the Veggies: Feel free to swap or add vegetables such as sweet potatoes, carrots, or broccoli, depending on what’s in season.
  3. Spice it Up: Add a pinch of chili flakes or a dash of hot sauce for a spicy kick.
  4. Store Properly: Leftovers can be stored in an airtight container in the refrigerator for up to 3 days.
  5. Reheat Gently: When reheating, do so on a low heat to maintain the texture and flavor of the quinoa and veggies.

FAQ Section

Here are some common questions and answers about the Quinoa & Roasted Veggie Bowl:

  1. Can I make this recipe ahead of time?
    Yes, you can prepare the quinoa and roast the vegetables in advance. Store them separately in the refrigerator and combine them just before serving.
  2. What can I use instead of quinoa?
    You can replace quinoa with couscous, bulgur, or brown rice for a different taste and texture.
  3. Is this dish vegan?
    Yes, the Quinoa & Roasted Veggie Bowl as described is vegan. Ensure any additional toppings, like cheese, are vegan if maintaining the dish’s vegan status.
  4. How can I add more protein to this dish?
    Consider adding grilled chicken, tofu, or chickpeas to increase the protein content of the meal.
  5. Can I freeze the leftovers?
    While the dish is best enjoyed fresh, you can freeze the leftovers. Be sure to thaw completely and reheat thoroughly before enjoying.

This Quinoa & Roasted Veggie Bowl is more than just a meal; it’s an experience that brings together flavor, nutrition, and satisfaction. Whether you’re cooking for family, friends, or yourself, this recipe is sure to become a staple in your culinary repertoire.

Lemon Garlic Grilled Chicken

Every so often, a recipe comes along that redefines simplicity and flavor in home cooking, and the Lemon Garlic Grilled Chicken is precisely that kind of dish. This recipe has become a staple in my home, a favorite that never fails to impress both family and guests alike. The first time I prepared it, the aroma of garlic and lemon wafted through the house, drawing everyone into the kitchen. The succulent chicken, infused with zesty lemon and aromatic garlic, was met with rave reviews. Even the pickiest eaters in my family couldn’t resist the juicy, flavorful bite of this perfectly grilled chicken. It’s become a go-to dish for dinner parties and casual family meals alike, always leaving plates empty and hearts full.

Ingredients

The magic of this Lemon Garlic Grilled Chicken lies in its simplicity, allowing the fresh ingredients to shine. Here’s what you’ll need:

  • 4 boneless, skinless chicken breasts
  • 2 tablespoons olive oil
  • 1 large lemon, juiced and zested
  • 3 cloves garlic, minced
  • 1 teaspoon salt
  • 1/2 teaspoon black pepper
  • 1 teaspoon dried oregano
  • 1/2 teaspoon paprika
  • Fresh parsley for garnish (optional)

Instructions

Creating this dish is as easy as it is delicious. Follow these steps to achieve grilling perfection:

  1. Prepare the marinade: In a large bowl, combine the olive oil, lemon juice, lemon zest, minced garlic, salt, pepper, oregano, and paprika. Mix well to ensure the flavors are evenly distributed.
  2. Marinate the chicken: Add the chicken breasts to the bowl, ensuring each piece is thoroughly coated with the marinade. Cover the bowl with plastic wrap and refrigerate for at least 30 minutes, allowing the flavors to penetrate the meat.
  3. Preheat the grill: While the chicken is marinating, preheat your grill to medium-high heat. This will ensure the chicken cooks evenly and develops a beautiful char.
  4. Grill the chicken: Remove the chicken from the marinade and place it on the preheated grill. Cook each side for about 6-8 minutes, or until the internal temperature reaches 165°F (74°C). Be sure not to overcook, as this can result in dry chicken.
  5. Rest and serve: Once cooked, remove the chicken from the grill and let it rest for a few minutes. This allows the juices to redistribute, ensuring each bite is moist and flavorful. Garnish with fresh parsley before serving.

Nutrition Facts

The Lemon Garlic Grilled Chicken is not only tasty but also a healthy meal choice. Here are the nutrition facts:

  • Servings: 4
  • Calories per serving: Approximately 250

Preparation Time

The beauty of this recipe lies in its efficiency. From start to finish, you can have a delicious meal ready in under an hour.

  • Preparation time: 10 minutes
  • Marinating time: 30 minutes
  • Cooking time: 15 minutes

How to Serve

The versatility of Lemon Garlic Grilled Chicken makes it an excellent choice for various meal settings. Here are some serving suggestions:

  • Serve with a side of steamed vegetables for a healthy, balanced meal.
  • Pair with a fresh garden salad and a light vinaigrette for a refreshing summer dinner.
  • Chop the chicken and add it to a wrap or sandwich for a quick and satisfying lunch.
  • Serve alongside a creamy pasta dish for a comforting, indulgent meal.
  • Use leftovers to top a homemade pizza for a unique twist on a classic favorite.

Additional Tips

Here are some tips to help you make the most of your Lemon Garlic Grilled Chicken experience:

  1. Use fresh ingredients: Fresh lemon and garlic make a significant difference in flavor. Avoid pre-packaged lemon juice and garlic powder for the best results.
  2. Don’t skip the marinating: Allowing the chicken to marinate is crucial for infusing it with flavor. If time permits, marinate for up to 4 hours for even more depth.
  3. Monitor grill temperature: Maintaining a consistent grill temperature ensures even cooking and prevents the chicken from drying out.
  4. Rest the chicken: Letting the chicken rest after grilling is essential for keeping it juicy and tender.
  5. Experiment with herbs: Feel free to experiment by adding other herbs like thyme or rosemary for a different flavor profile.

FAQ Section

Here are some frequently asked questions about Lemon Garlic Grilled Chicken:

  1. Can I use chicken thighs instead of breasts?

    Absolutely! Chicken thighs are a great alternative and offer a richer flavor. Adjust the cooking time as they may take slightly longer to cook through.

  2. Is it possible to bake instead of grill?

    Yes, you can bake the chicken in a preheated oven at 400°F (200°C) for about 20-25 minutes, or until the internal temperature reaches 165°F (74°C).

  3. Can I prepare the marinade in advance?

    Definitely! The marinade can be prepared and stored in the refrigerator for up to 3 days. Just give it a good stir before adding the chicken.

  4. What if I don’t have a grill?

    No worries! You can use a grill pan or a regular skillet on your stovetop for similar results.

  5. How do I know when the chicken is done?

    Using a meat thermometer is the best way to ensure your chicken is cooked through. It should read 165°F (74°C) when inserted into the thickest part of the chicken.

Dairy-Free Pesto Zoodles

The culinary world has a way of reinventing itself, bringing fresh twists to classic dishes, and one such delightful innovation is the ‘Dairy-Free Pesto Zoodles.’ This dish strikes a harmonious balance between health and taste, offering an alternative for those who love pesto but need to avoid dairy. Zoodles, or zucchini noodles, serve as the perfect base, capturing the essence of pasta without the carbs. The pesto, traditionally rich in Parmesan, undergoes a transformation here, relying on nutritional yeast to provide that signature cheesy flavor without dairy. This not only makes the dish vegan-friendly but also a lighter, more digestible option for many. The vibrant green of the zucchini and basil, combined with the aromatic allure of garlic and nuts, create a sensory delight that is both visually appealing and tantalizing to the taste buds. It’s a recipe that has garnered appreciation across diverse palates, from the health-conscious to the flavor aficionados.

The ingredients for Dairy-Free Pesto Zoodles are straightforward yet packed with flavor. You’ll need fresh zucchini, preferably organic, to spiralize into noodles. For the pesto, gather fresh basil leaves, garlic cloves, pine nuts or walnuts, nutritional yeast, lemon juice, and extra-virgin olive oil. A pinch of salt and pepper enhances the taste, while a dash of red pepper flakes can add a hint of heat for those who enjoy a bit of spice. The simplicity of these ingredients is deceptive, as they come together to create a dish that feels gourmet yet is incredibly easy to prepare. The emphasis on fresh produce not only ensures a burst of flavor but also aligns with the growing trend towards plant-based eating. This dish proves that you don’t need dairy to enjoy a creamy, rich pesto that can elevate any meal.

Preparing Dairy-Free Pesto Zoodles is as rewarding as it is straightforward. Begin by spiralizing the zucchini into noodles and set them aside. For the pesto, blend the basil, garlic, nuts, nutritional yeast, lemon juice, and olive oil until smooth, adjusting the consistency with water as needed. Season to taste with salt, pepper, and red pepper flakes. Gently toss the zoodles with the pesto until well coated. This dish can be enjoyed as a refreshing cold salad or lightly sautéed for a warm meal. It’s versatile enough to serve as a stand-alone dish or a side. The beauty of this recipe is its adaptability—feel free to experiment with different nuts or add vegetables like cherry tomatoes or spinach for an extra nutrient boost. Dairy-Free Pesto Zoodles is more than just a meal; it’s a testament to how creativity in the kitchen can lead to healthier, tastier options that satisfy both the palate and the body.

Dairy-Free Pumpkin Soup

As the crisp autumn air begins to weave its way through our days, the comforting embrace of a warm bowl of soup becomes a staple in many households. Among the plethora of seasonal delights, dairy-free pumpkin soup stands out, not just for its vibrant hue reminiscent of falling leaves, but for its rich, savory flavor that embodies the essence of fall. Recently, I had the opportunity to whip up a batch of this delightful soup for a family gathering, and it was met with enthusiastic reviews. The velvety texture and the subtle interplay of spices made it a standout dish, even among our traditional family favorites. My family, particularly the kids, who are usually skeptical of new recipes, found themselves reaching for seconds, their bowls emptied and their hearts warmed. This recipe has since become a family favorite, a testament to its universal appeal and heartening essence.

Ingredients

Creating a truly spectacular dairy-free pumpkin soup requires a careful selection of ingredients that not only enhance the soup’s natural flavors but also contribute to its creamy consistency without the use of dairy. Here’s what you’ll need:

  • 2 tablespoons olive oil
  • 1 large onion, chopped
  • 2 cloves garlic, minced
  • 1 teaspoon ground ginger
  • 1 teaspoon ground cinnamon
  • 1/2 teaspoon ground nutmeg
  • 1/4 teaspoon ground cloves
  • 1 can (15 ounces) pumpkin puree
  • 4 cups vegetable broth
  • 1 can (14 ounces) coconut milk
  • Salt and pepper to taste
  • Fresh parsley, chopped (for garnish)

Instructions

The process of making dairy-free pumpkin soup is as straightforward as it is rewarding. Follow these steps for a soup that’s sure to impress:

  1. Heat the olive oil in a large pot over medium heat. Add the chopped onion and garlic, sautéing them until the onion becomes translucent and the garlic is fragrant, about 5 minutes.
  2. Add the spices – ginger, cinnamon, nutmeg, and cloves – and stir for another minute, allowing the aromas to release and fill your kitchen with the scent of fall.
  3. Stir in the pumpkin puree, mixing well with the onions and spices. Gradually pour in the vegetable broth, stirring to combine all ingredients thoroughly.
  4. Bring the mixture to a boil, then reduce the heat and let it simmer for about 15 minutes, allowing the flavors to meld together.
  5. Remove the pot from heat and use an immersion blender to puree the soup until smooth. If you don’t have an immersion blender, carefully transfer the soup to a blender, working in batches if necessary.
  6. Return the soup to the pot and stir in the coconut milk. Heat gently until the soup is warmed through. Taste and season with salt and pepper as needed.
  7. Serve hot, garnished with fresh parsley for a touch of color and freshness.

Nutrition Facts

This recipe makes approximately 6 servings, with each serving containing around 180 calories. The use of coconut milk not only provides a dairy-free alternative but also contributes healthy fats, making this soup a nourishing option for those watching their dietary intake.

Preparation Time

One of the many advantages of this dairy-free pumpkin soup is its quick preparation time. The entire process, from chopping the onions to garnishing the final dish, takes about 30 minutes. This makes it an ideal choice for a quick weeknight dinner or a last-minute gathering where time is of the essence.

How to Serve

To truly elevate the experience of enjoying this soup, consider the following serving suggestions:

  • Crusty Bread: Pair the soup with a slice of crusty sourdough or a warm baguette to complement its creamy texture.
  • Salad: A light, crisp green salad with a simple vinaigrette can provide a refreshing contrast to the rich soup.
  • Toasted Seeds: Sprinkle toasted pumpkin or sunflower seeds on top for an added crunch and nutty flavor.
  • Herb Infusion: A drizzle of herb-infused olive oil can add an extra layer of flavor.
  • Spice it Up: For those who prefer a bit of heat, a pinch of cayenne pepper or a dash of hot sauce can be added to individual bowls.

Additional Tips

To ensure your soup turns out perfectly every time, consider the following tips:

  1. Quality Ingredients: Use high-quality pumpkin puree for the best flavor. If possible, opt for organic or homemade puree.
  2. Consistency Control: Adjust the consistency of the soup by adding more or less vegetable broth, depending on your preference for thickness.
  3. Flavor Boost: A splash of apple cider vinegar or lemon juice can enhance the soup’s flavor and add brightness.
  4. Storage: This soup can be stored in an airtight container in the refrigerator for up to 3 days. Reheat gently on the stove or in the microwave.
  5. Freezing: For longer storage, freeze the soup in individual portions. Thaw and reheat as needed for a quick, comforting meal.

FAQ Section

Here are some frequently asked questions about dairy-free pumpkin soup:

Q: Can I use fresh pumpkin instead of canned puree?
A: Yes, you can use fresh pumpkin. Simply peel, cube, and roast the pumpkin until tender before blending it into a smooth puree.

Q: Is there a substitute for coconut milk?
A: If you prefer not to use coconut milk, almond milk or cashew cream are excellent alternatives that will maintain the soup’s creamy texture.

Q: Can I make this soup in advance?
A: Absolutely! This soup tastes even better the next day as the flavors continue to develop. Prepare it a day ahead and store it in the refrigerator until ready to serve.

Q: How can I make this soup spicier?
A: To add some heat, incorporate a diced jalapeño or a pinch of crushed red pepper flakes during the cooking process.

Q: Is this recipe suitable for vegans?
A: Yes, this dairy-free pumpkin soup is entirely vegan, as it contains no animal products.

In conclusion, dairy-free pumpkin soup is a versatile, delicious, and nourishing dish that captures the spirit of fall. Its simplicity, combined with the depth of flavor and ease of preparation, makes it a go-to recipe for anyone looking to savor the season’s bounty. Whether you’re serving it as a starter or the main event, this soup is sure to warm both the body and the soul.

Mango Coconut Ice Cream

Mango Coconut Ice Cream is a tropical delight that has captured the hearts and taste buds of dessert enthusiasts worldwide. This delectable treat combines the rich, creamy texture of coconut milk with the vibrant, sweet flavor of ripe mangoes, creating a refreshing dessert that’s perfect for warm weather. As you take a scoop, the silky smoothness of the ice cream melts in your mouth, releasing a burst of tropical flavors that transport you to a sun-kissed beach. This culinary creation is not only a feast for the taste buds but also a visual delight, with its sunny yellow hue and inviting aroma. Whether enjoyed in a bowl, a cone, or as part of a more elaborate dessert, Mango Coconut Ice Cream offers a soothing escape from the ordinary.

What sets Mango Coconut Ice Cream apart is its simplicity and natural ingredients. The recipe often features just a handful of components: fresh mangoes, creamy coconut milk, a touch of sugar, and perhaps a hint of lime juice to elevate the flavors. The process is straightforward, making it an ideal project for both novice and experienced home cooks. The absence of artificial additives and preservatives means you can indulge in this treat without guilt. Additionally, because it’s dairy-free, it caters to a wide range of dietary preferences, including those who are lactose intolerant or following a vegan lifestyle. This versatility has helped Mango Coconut Ice Cream gain popularity, as it offers a healthier alternative to traditional ice cream without sacrificing taste or texture.

As the demand for unique and exotic flavors continues to rise, Mango Coconut Ice Cream stands out as a must-try delicacy. Many artisanal ice cream shops and restaurants have embraced this flavor, adding their own creative twists, such as incorporating chunks of fresh mango or a sprinkle of toasted coconut flakes for added texture. It’s also a favorite among those who enjoy experimenting in the kitchen, as it allows for endless customization. For a gourmet touch, some enthusiasts add a dash of cardamom or a swirl of passion fruit puree. Others enjoy pairing it with tropical fruits like pineapple or serving it alongside a warm dessert to create a delightful contrast. Whether you’re a seasoned ice cream aficionado or simply someone seeking a new dessert experience, Mango Coconut Ice Cream is sure to satisfy and inspire with its exotic allure and irresistible taste.