Coconut Yogurt Parfait

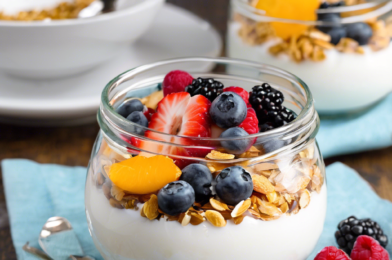
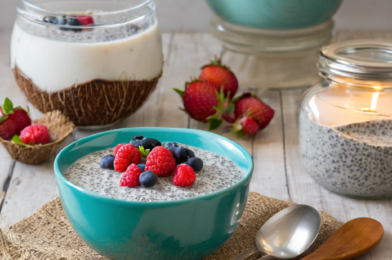
The Coconut Yogurt Parfait has become a beloved staple in my household, and for good reason. The first time I whipped up this delightful treat, it was an instant hit with my family. The creamy texture of the coconut yogurt combined with the vibrant taste of fresh fruits and the satisfying crunch of granola created a perfect harmony of flavors and textures. It’s a versatile dish that pleases everyone, regardless of age or dietary preference. Whether enjoyed for breakfast, as a snack, or a light dessert, this parfait has become a go-to recipe that never fails to impress. The ease of preparation and the ability to customize with various toppings make it a winner, time and time again.

Ingredients

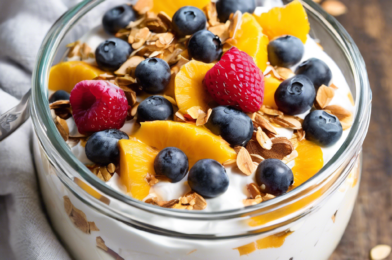
The magic of the Coconut Yogurt Parfait lies in its simplicity and the freshness of its ingredients. For a basic version, you will need the following:

  • 2 cups of coconut yogurt
  • 1 cup of granola
  • 1 cup of mixed berries (such as strawberries, blueberries, and raspberries)
  • 1 tablespoon of honey or maple syrup (optional)
  • 1 teaspoon of chia seeds (optional)
  • A handful of nuts or seeds (e.g., almonds, walnuts, or sunflower seeds)

These ingredients can be easily found at any grocery store, and you can always substitute with your preferred fruits or toppings based on availability and personal taste. The recipe is highly adaptable, allowing for endless variations that cater to different dietary needs and flavor profiles.

Instructions

Creating a Coconut Yogurt Parfait is as simple as layering your favorite ingredients. Here’s a step-by-step guide to assembling this delightful treat:

  1. Prepare your ingredients: Wash and dry the berries, and if necessary, chop them into bite-sized pieces. Gather all your toppings and have them ready for layering.
  2. Start layering: In a glass or bowl, add a layer of coconut yogurt as the base. The thickness of this layer can be adjusted based on personal preference.
  3. Add granola: Sprinkle a generous layer of granola over the yogurt. This will add a delightful crunch to the parfait.
  4. Layer the berries: Add a layer of mixed berries on top of the granola. Feel free to get creative with the pattern or mix them up evenly.
  5. Repeat: Continue layering yogurt, granola, and berries until you reach the top of your glass or bowl. Aim for at least two layers of each for a well-balanced parfait.
  6. Finish with toppings: Drizzle honey or maple syrup over the top if desired, and sprinkle with chia seeds and nuts or seeds for added texture and flavor.
  7. Chill and serve: For the best experience, chill the parfait in the refrigerator for about 15 minutes before serving. This allows the flavors to meld together beautifully.

Nutrition Facts

The Coconut Yogurt Parfait is not only delicious but also nutritious. Here’s a quick look at the nutritional breakdown:

  • Servings: 4
  • Calories per serving: Approximately 250 calories

Each serving is packed with vitamins, minerals, and healthy fats, making it a wholesome choice for any time of the day.

Preparation Time

One of the most appealing aspects of the Coconut Yogurt Parfait is its quick preparation time. From start to finish, you can have this delightful dish ready in just 10 minutes. It’s perfect for those hectic mornings when you need something nutritious and satisfying but don’t have much time to spare. The simple process of layering makes it a fun and easy activity that even kids can participate in, turning breakfast preparation into a family bonding moment.

How to Serve

Serving a Coconut Yogurt Parfait is an opportunity to showcase your creativity. Here are some ideas to make your parfait presentation stand out:

  • In a glass jar: Serve in a mason jar for a rustic and portable option, perfect for on-the-go breakfasts.
  • In a dessert glass: Use a clear dessert glass to highlight the beautiful layers and colors of the parfait.
  • In a bowl: For a more casual presentation, serve in a bowl and mix everything together for a delicious medley of flavors.
  • With a garnish: Add a sprig of fresh mint or a slice of citrus on top for a pop of color and a hint of freshness.
  • Custom toppings: Customize each serving with different toppings to cater to individual preferences, such as adding a dollop of nut butter or a sprinkle of coconut flakes.

Additional Tips

To make your Coconut Yogurt Parfait experience even better, consider these helpful tips:

  1. Choose quality ingredients: Opt for organic coconut yogurt and fresh, seasonal fruits for the best flavor and nutritional benefits.
  2. Customize the sweetness: Adjust the amount of honey or maple syrup based on your taste preferences or dietary needs.
  3. Experiment with flavors: Try adding spices like cinnamon or nutmeg to the yogurt for an extra layer of warmth and complexity.
  4. Make it ahead: Prepare the parfait the night before and store it in the refrigerator for a grab-and-go breakfast option.
  5. Consider dietary restrictions: Use gluten-free granola or nut-free toppings if serving guests with specific allergies or dietary preferences.

FAQ Section

Here are some frequently asked questions about the Coconut Yogurt Parfait:

Q1: Can I use regular yogurt instead of coconut yogurt?

A1: Absolutely! You can substitute coconut yogurt with any yogurt of your choice, such as Greek yogurt or almond milk yogurt, based on your dietary needs and taste preferences.

Q2: How long can I store the parfait in the refrigerator?

A2: The parfait can be stored in the refrigerator for up to 2 days. However, for the best texture and flavor, it’s recommended to consume it within 24 hours.

Q3: What can I use instead of granola?

A3: If you’re looking for a granola substitute, try using crushed nuts, seeds, or even cereal for a similar crunchy texture.

Q4: Can I make this parfait vegan?

A4: Yes, you can make it vegan by using plant-based yogurt, ensuring the granola is vegan-friendly, and substituting honey with maple syrup or agave nectar.

Q5: Is it possible to make this parfait nut-free?

A5: Certainly! Simply omit the nuts and use seeds like pumpkin or sunflower seeds to maintain a crunchy texture without the nuts.

The Coconut Yogurt Parfait is a delightful and nutritious option for any meal or snack. Its simplicity, adaptability, and deliciousness make it a favorite in many households, including mine. Enjoy experimenting with different variations and flavors to find the perfect combination that suits your palate!

Coconut Yogurt Parfait

The moment you dip your spoon into a coconut yogurt parfait, you’re embarking on a tropical journey that tantalizes the taste buds and nourishes the soul. The creamy texture of the coconut yogurt, blended with the natural sweetness of fresh fruits, and topped with crunchy granola, creates an irresistible symphony of flavors and textures. In my household, this parfait has become a breakfast staple, much adored by everyone from the youngest to the oldest. Its vibrant presentation makes it a feast for the eyes as much as it is for the palate, and the ease of preparation ensures that it can be whipped up effortlessly on busy mornings or as a delightful snack anytime.

Ingredients

To create this delectable coconut yogurt parfait, you’ll need the following ingredients:

  • 2 cups of coconut yogurt
  • 1 cup of granola (choose your favorite variety)
  • 1 cup of fresh berries (strawberries, blueberries, raspberries, or a mix)
  • 1/2 cup of sliced almonds or your preferred nuts
  • 2 tablespoons of honey or maple syrup (optional, for additional sweetness)
  • 1 teaspoon of vanilla extract (optional, for enhanced flavor)
  • Mint leaves for garnish (optional)

Instructions

Crafting a coconut yogurt parfait is a simple yet rewarding process. Here’s how to do it:

  1. Start by preparing your ingredients. Wash the berries thoroughly and set them aside to drain.
  2. In a small bowl, mix the coconut yogurt with the vanilla extract and honey or maple syrup, if using, to infuse extra flavor.
  3. In a glass or bowl, begin layering the parfait by adding a generous spoonful of the coconut yogurt as the base layer.
  4. Add a layer of granola over the yogurt, followed by a handful of fresh berries.
  5. Repeat the layering process until all ingredients are used, ending with a layer of berries on top.
  6. Sprinkle sliced almonds or nuts over the berries for a crunchy element.
  7. Garnish with a sprig of mint for a refreshing finish.
  8. Serve immediately and enjoy the burst of flavors!

Nutrition Facts

This recipe serves 4 people, with each serving providing approximately 300 calories. The nutritional content may vary based on the specific brands and varieties of ingredients used.

Preparation Time

One of the greatest advantages of this coconut yogurt parfait is its quick preparation time. You can have it ready in just 10 minutes, making it a perfect option for those rushed mornings or when you need a quick, healthy snack.

How to Serve

Serving your coconut yogurt parfait can be as creative as you want it to be. Here are some ideas:

  • In a tall glass to showcase the beautiful layers.
  • In a small bowl for a more casual presentation.
  • In mason jars for a portable breakfast or snack option.
  • As part of a brunch buffet, allowing guests to customize their parfaits.
  • With a side of additional toppings such as chia seeds, shredded coconut, or dried fruit.

Additional Tips

  1. Customize the Sweetness: Adjust the sweetness to your preference by varying the amount of honey or maple syrup.
  2. Experiment with Flavors: Try different types of yogurt, such as almond or soy, for a unique twist.
  3. Add a Tropical Touch: Incorporate tropical fruits like mango or pineapple for an exotic flavor profile.
  4. Make it Dairy-Free: Ensure all ingredients, including granola, are dairy-free for those with lactose intolerance.
  5. Prepare in Advance: Assemble the parfaits the night before and refrigerate for a ready-to-go breakfast.

FAQ Section

Q1: Can I use regular yogurt instead of coconut yogurt?

A: Absolutely! Regular yogurt can be used as a substitute if you prefer, but the coconut yogurt offers a distinct flavor that enhances the tropical feel of the parfait.

Q2: How long can I store the parfait?

A: It’s best to consume the parfait immediately after preparation to enjoy the crunchy texture of the granola. However, you can store it in the refrigerator for up to 24 hours, but note that the granola may become soggy.

Q3: Can I add protein powder to this parfait?

A: Yes, you can mix a scoop of protein powder into the yogurt to increase the protein content, making it an even more filling option.

Q4: What other toppings can I use?

A: Feel free to get creative with your toppings. Some popular choices include chia seeds, flaxseeds, coconut flakes, and dried fruits like cranberries or raisins.

Q5: Is this parfait suitable for vegans?

A: Yes, the parfait can be made vegan by ensuring all ingredients, including the granola, are vegan-friendly and by using maple syrup instead of honey.

Cashew Cream Pasta

There’s something inherently comforting about a warm bowl of pasta, and when it comes to Cashew Cream Pasta, the experience is elevated to an entirely new level. Having tried this dish with my family, I can vouch for its creamy texture and the delightful nutty flavor that had everyone at the table asking for seconds. The sauce, made from cashews, is a wonderful alternative for those who are lactose intolerant or simply looking to add a twist to the traditional cream-based pasta. It’s a dish that doesn’t just please the palate but also brings a sense of warmth and togetherness, which is what family meals are all about.

Ingredients

Creating the perfect Cashew Cream Pasta begins with gathering high-quality ingredients. Here’s what you’ll need:

  • 1 cup raw cashews, soaked in water for at least 2 hours
  • 3 cloves garlic, minced
  • 2 tablespoons olive oil
  • 1 cup vegetable broth
  • 2 tablespoons nutritional yeast
  • 1 tablespoon lemon juice
  • Salt and pepper to taste
  • 12 ounces of your favorite pasta
  • Fresh basil leaves for garnish
  • Cherry tomatoes, halved (optional)

Instructions

Start by preparing the cashews. Drain and rinse the soaked cashews and add them to a blender with the vegetable broth, nutritional yeast, lemon juice, salt, and pepper. Blend until the mixture is smooth and creamy, scraping down the sides as needed. This will form the base of your sauce.

Next, cook the pasta according to the package instructions until al dente. While the pasta is cooking, heat olive oil in a large skillet over medium heat. Add the minced garlic and sauté until fragrant, being careful not to burn it. Reduce the heat to low and add the cashew cream to the skillet, stirring well to combine with the garlic.

Once the pasta is cooked, reserve about a cup of pasta water and then drain the rest. Add the cooked pasta to the skillet with the cashew cream sauce. Toss everything together, adding reserved pasta water a little at a time until you reach your desired sauce consistency.

Finish by adding a handful of fresh basil leaves and cherry tomatoes, if using. Serve immediately, garnishing with additional basil and a sprinkle of nutritional yeast if desired.

Nutrition Facts

This Cashew Cream Pasta recipe serves four people. Each serving contains approximately 450 calories, making it a hearty meal that doesn’t skimp on flavor. The nutritional yeast provides a good source of B vitamins, while the cashews offer healthy fats and protein, making this dish both satisfying and nutritious.

Preparation Time

From start to finish, this Cashew Cream Pasta can be on your table in about 30 minutes. The longest part of the preparation is soaking the cashews, which can be done ahead of time, making this an ideal choice for a quick weeknight dinner.

How to Serve

  • As a Main Dish: Serve the pasta as is, with a side of crusty bread for a complete meal.
  • With a Salad: Pair with a fresh green salad drizzled with balsamic vinaigrette for added freshness.
  • As a Side Dish: Complement a grilled protein such as chicken or tofu with this creamy pasta.
  • For a Crowd: Double the recipe and serve it family-style for a larger gathering.
  • For Lunch: Pack leftovers in an airtight container for a satisfying lunch the next day.

Additional Tips

Here are some tips to ensure your Cashew Cream Pasta is a success:

  1. Soak Cashews Properly: For a silky-smooth sauce, ensure the cashews are soaked long enough and blended thoroughly.
  2. Adjust Consistency: If the sauce is too thick, add more pasta water; if too thin, let it simmer longer to thicken.
  3. Spice It Up: Add a pinch of red pepper flakes for a bit of heat.
  4. Use Fresh Ingredients: Fresh basil and garlic greatly enhance the flavor profile of the dish.
  5. Experiment with Add-ins: Try adding sautéed mushrooms, spinach, or peas for extra texture and nutrients.

FAQ

Q: Can I use roasted cashews instead of raw?

A: It’s best to use raw cashews as they blend into a creamier sauce. Roasted cashews will alter the flavor and may not blend as smoothly.

Q: How long can I store leftovers?

A: Store leftovers in an airtight container in the refrigerator for up to three days. Reheat gently on the stove, adding a splash of water if needed.

Q: Can I make this dish gluten-free?

A: Absolutely! Simply substitute the pasta with your favorite gluten-free variety for a delicious gluten-free meal.

Q: What can I use instead of nutritional yeast?

A: Nutritional yeast adds a cheesy flavor, but you can omit it or substitute with grated vegan parmesan if preferred.

Q: Can I freeze the cashew cream sauce?

A: Yes, the cashew cream sauce can be frozen for up to three months. Thaw in the refrigerator overnight and reheat gently before use.

Vegan Cheese Sauce

There’s something incredibly comforting about a silky, smooth cheese sauce draped over your favorite dish. But for those who have embraced the vegan lifestyle, finding a plant-based alternative that matches the rich, creamy texture and savory flavor of traditional cheese sauce can be challenging. Fortunately, the culinary world has seen a surge in innovative recipes, one of which is the delightful vegan cheese sauce. My family and I recently tried this recipe, and it’s safe to say it was a hit! Even the most skeptical cheese lovers in the house couldn’t resist its charm. With its nutty undertones and a hint of tang, this sauce is a must-try for anyone looking to explore vegan cooking.

Ingredients

Creating this vegan cheese sauce is a breeze, and it requires just a handful of wholesome ingredients that you likely already have in your pantry. Here’s what you’ll need:

  • 1 cup of raw cashews
  • 1/2 cup of nutritional yeast
  • 1 tablespoon of lemon juice
  • 1 teaspoon of garlic powder
  • 1 teaspoon of onion powder
  • 1 teaspoon of salt
  • 1/2 teaspoon of turmeric (for color)
  • 1 1/2 cups of water
  • Optional: a pinch of cayenne pepper for a spicy kick

Instructions

To make this luscious vegan cheese sauce, follow these simple steps:

  1. Soak the Cashews: Begin by soaking the raw cashews in hot water for at least 30 minutes. This helps to soften them, ensuring a smooth and creamy texture when blended.
  2. Blend the Ingredients: Drain the soaked cashews and add them to a blender along with nutritional yeast, lemon juice, garlic powder, onion powder, salt, turmeric, and water. Blend until the mixture is completely smooth and creamy. This may take a couple of minutes depending on the power of your blender.
  3. Adjust the Seasoning: Taste the sauce and adjust the seasoning to your liking. If you prefer a tangier sauce, add a bit more lemon juice. For extra spice, include a pinch of cayenne pepper.
  4. Heat the Sauce: Transfer the blended mixture to a saucepan and heat over medium heat. Stir continuously until the sauce thickens and becomes gooey, which should take about 3 to 5 minutes.
  5. Serve and Enjoy: Once thickened, remove the sauce from the heat and serve immediately over pasta, vegetables, or as a dip.

Nutrition Facts

This recipe yields approximately 4 servings. Each serving contains around 150 calories, making it a light yet satisfying addition to any meal.

Preparation Time

From start to finish, this vegan cheese sauce takes about 45 minutes to prepare, including soaking time. The active cooking time is around 10 minutes, so it’s perfect for a quick weeknight meal.

How to Serve

Vegan cheese sauce is incredibly versatile and can be served in many ways:

  • Drizzle over steamed vegetables for a nutritious side dish.
  • Use as a creamy sauce for your favorite pasta dish.
  • Serve as a dip with tortilla chips or vegetable sticks.
  • Layer over nachos for a vegan-friendly snack.
  • Spread over baked potatoes for a comforting meal.

Additional Tips

To elevate your vegan cheese sauce experience, consider these additional tips:

  1. Experiment with Spices: Try adding different spices like smoked paprika or cumin to give your sauce a unique flavor profile.
  2. Use a High-Powered Blender: A high-powered blender ensures a smoother texture, which is key for this sauce.
  3. Store Properly: Store any leftover sauce in an airtight container in the refrigerator for up to 5 days. Reheat gently on the stove.
  4. Try Different Nuts: If cashews are not available, almonds or macadamia nuts can be used as an alternative.
  5. Add Vegetables: For added nutrients, consider blending in cooked carrots or roasted red peppers.

FAQ Section

Here are some frequently asked questions about this vegan cheese sauce recipe:

  1. Can I make this sauce ahead of time? Yes, you can make this sauce ahead of time and store it in the refrigerator for up to 5 days. Reheat it gently on the stove before serving.
  2. Is there a nut-free version? Absolutely! You can use sunflower seeds instead of cashews for a nut-free version.
  3. Can I freeze the sauce? While it’s best enjoyed fresh, you can freeze the sauce in a freezer-safe container for up to 2 months. Thaw it in the refrigerator and reheat gently.
  4. What can I use instead of nutritional yeast? Nutritional yeast provides a cheesy flavor, but if unavailable, you can try using chickpea miso for a savory note.
  5. How can I make the sauce thicker? If you prefer a thicker sauce, reduce the amount of water in the recipe or add a tablespoon of cornstarch while heating.

In conclusion, this vegan cheese sauce is not only a healthier alternative to traditional cheese sauce but also a deliciously versatile addition to your culinary repertoire. Whether you’re a seasoned vegan or simply looking to incorporate more plant-based meals into your diet, this recipe is sure to please. Enjoy experimenting with flavors and serving it in various ways to suit your taste and dietary preferences.

Dairy-Free Oatmeal with Berries

I recently tried out a delightful recipe that has quickly become a family favorite: Dairy-Free Oatmeal with Berries. As someone who appreciates both hearty breakfasts and accommodating various dietary needs, I was thrilled with how this dish turned out. My family, notorious for their varied tastes, all gave it a resounding thumbs up. The oatmeal’s creamy texture, despite being dairy-free, coupled with the natural sweetness from the berries, made it an instant hit at our breakfast table. Not only is it delicious, but it’s also a nutritious way to start the day. I found myself looking forward to breakfast every morning just to enjoy this delightful concoction.

Ingredients

Creating this dairy-free oatmeal is a straightforward process, with ingredients easily found in most kitchens or local grocery stores. Here’s what you need to gather:

  • 1 cup of rolled oats
  • 2 cups of almond milk or any other plant-based milk
  • 1 tablespoon of chia seeds
  • 1 tablespoon of maple syrup or honey
  • 1 teaspoon of vanilla extract
  • 1/2 teaspoon of cinnamon
  • 1 cup of mixed berries (such as blueberries, raspberries, and strawberries)
  • A pinch of salt
  • Optional toppings: sliced almonds, coconut flakes, or more fresh berries

Instructions

With your ingredients ready, it’s time to prepare the oatmeal. This process is simple and takes only a few steps. Here’s how you can make this delicious breakfast:

  1. Start by combining the rolled oats, almond milk, chia seeds, maple syrup, vanilla extract, cinnamon, and salt in a medium saucepan.
  2. Place the saucepan over medium heat and bring the mixture to a gentle boil, stirring occasionally.
  3. Once boiling, reduce the heat to low and let the oatmeal simmer for about 10-15 minutes. Stir frequently to prevent sticking and to achieve a creamy consistency.
  4. Once the oatmeal reaches your desired thickness, remove it from the heat.
  5. Fold in the mixed berries, allowing their juices to blend with the oatmeal, enhancing both flavor and color.
  6. Serve the oatmeal warm, garnished with your choice of optional toppings for added texture and flavor.

Nutrition Facts

This recipe makes about four servings, perfect for a family breakfast or for meal prepping. Each serving contains approximately 250 calories, making it a wholesome and satisfying start to your day. The combination of oats and chia seeds provides a healthy dose of fiber, while the berries add antioxidants and essential vitamins.

Preparation Time

The beauty of this dish, aside from its taste and nutritional value, is its quick preparation time. From start to finish, you can have this delicious oatmeal ready in about 20 minutes. This makes it an ideal choice for busy mornings when time is of the essence but a nutritious breakfast is still a priority.

How to Serve

There are several ways you can serve this delightful oatmeal to make it even more enjoyable:

  • Family-Style: Serve it in a large bowl, allowing everyone to scoop their desired amount and customize with their favorite toppings.
  • Individual Bowls: Portion out the oatmeal into individual bowls, each garnished with a unique combination of toppings for a personalized touch.
  • On-the-Go: Prepare the oatmeal in advance and store it in portable containers for a quick and easy breakfast option during busy mornings.
  • Brunch Spread: Include this oatmeal as part of a larger brunch spread, paired with other breakfast favorites like scrambled eggs or avocado toast.
  • Meal Prep: Make a large batch and store portions in the fridge or freezer for easy reheating throughout the week.

Additional Tips

To enhance your oatmeal experience, consider these additional tips:

  1. Experiment with Milk Alternatives: While almond milk is a popular choice, feel free to experiment with other plant-based milks such as coconut, oat, or soy milk to find your preferred flavor.
  2. Use Seasonal Berries: Opt for seasonal berries for the freshest taste. In the summer, fresh strawberries or blueberries are perfect, while in the winter, frozen berries are a convenient and nutritious option.
  3. Add a Protein Boost: For additional protein, consider topping your oatmeal with a dollop of almond butter or a sprinkle of hemp seeds.
  4. Make it Overnight: Prepare the oatmeal mixture the night before and let it sit in the fridge overnight. In the morning, simply heat it up for a quick and effortless breakfast.
  5. Sugar Alternatives: If you’re watching your sugar intake, reduce or omit the maple syrup and rely on the natural sweetness of the berries.

FAQ Section

Here are some frequently asked questions about this dairy-free oatmeal recipe:

Q: Can I use steel-cut oats instead of rolled oats?
A: Yes, but keep in mind that steel-cut oats require a longer cooking time and a bit more liquid. Adjust the cooking time to about 20-30 minutes and add extra almond milk as needed to achieve the desired consistency.

Q: Can I make this oatmeal gluten-free?
A: Absolutely! Just ensure that your oats are labeled gluten-free, as some oats can be cross-contaminated with gluten during processing.

Q: What if I don’t have chia seeds?
A: You can omit the chia seeds if you don’t have them on hand. They add a nice texture and nutritional boost, but the oatmeal will still be delicious without them.

Q: Can I use frozen berries instead of fresh?
A: Yes, frozen berries work just as well and are often more economical. They will thaw as you fold them into the hot oatmeal, releasing their juices and flavor.

Q: How long can I store leftover oatmeal?
A: Leftover oatmeal can be stored in an airtight container in the refrigerator for up to four days. Reheat it on the stovetop or in the microwave, adding a splash of almond milk to restore its creamy texture.

Coconut Flour Waffles

There’s something truly special about waking up to the aroma of freshly cooked waffles. And when those waffles are made with coconut flour, they bring an extra layer of texture and flavor that elevates the breakfast experience to new heights. Recently, I decided to try a recipe for coconut flour waffles that I stumbled upon, and the results were nothing short of delightful. My family, who are usually quite selective when it comes to breakfast items, were pleasantly surprised by the unique taste and light texture of these waffles. The subtle hint of coconut combined with the crispy exterior made for a breakfast dish that quickly became a household favorite. This recipe is perfect for anyone looking to try something different while still savoring the classic comfort of a warm waffle.

Ingredients

To create these delicious coconut flour waffles, you’ll need the following ingredients:

  • 1/2 cup of coconut flour
  • 1/4 teaspoon of baking soda
  • 1/4 teaspoon of salt
  • 4 large eggs
  • 1/4 cup of melted coconut oil or butter
  • 1/4 cup of milk (dairy or non-dairy)
  • 1 tablespoon of honey or maple syrup
  • 1/2 teaspoon of vanilla extract

Instructions

Begin by preheating your waffle iron to the desired setting. In a medium-sized bowl, whisk together the coconut flour, baking soda, and salt. Set this dry mixture aside. In a separate large bowl, beat the eggs until they are frothy. This step is crucial as it helps incorporate air into the batter, ensuring that the waffles remain light and fluffy.

Next, add the melted coconut oil or butter, milk, honey or maple syrup, and vanilla extract to the beaten eggs. Mix until all the ingredients are well combined. Gradually incorporate the dry ingredients into the wet mixture, stirring slowly to avoid lumps. The batter will be thicker than traditional waffle batter due to the absorbent nature of coconut flour, but this is entirely normal.

Spoon the batter onto the preheated waffle iron, using about 1/4 cup per waffle, depending on the size of your waffle maker. Close the lid and cook until the waffles are golden brown and crisp on the outside. This usually takes about 3-5 minutes, but times may vary depending on your waffle iron. Once cooked, carefully remove the waffles and place them on a wire rack to prevent them from becoming soggy.

Nutrition Facts

This recipe yields approximately 4 servings, with each serving consisting of one waffle. Each waffle contains around 240 calories, making this a relatively light breakfast option that doesn’t compromise on flavor or satisfaction.

Preparation Time

The total preparation time for these coconut flour waffles is approximately 15 minutes. This includes 10 minutes for mixing the ingredients and 5 minutes for cooking each batch of waffles. This quick prep time makes it a convenient breakfast option for busy mornings or leisurely weekend brunches.

How to Serve

These coconut flour waffles can be served in a variety of ways to suit your taste preferences:

  • Classic: Top with butter and a drizzle of pure maple syrup for a timeless treat.
  • Fruit-Loaded: Add fresh berries like strawberries, blueberries, or raspberries for a burst of freshness.
  • Nutty Delight: Sprinkle with chopped nuts such as almonds or walnuts for added crunch.
  • Tropical Twist: Garnish with slices of banana and a sprinkle of shredded coconut.
  • Indulgent: Serve with a dollop of whipped cream and a drizzle of chocolate sauce for a decadent dessert-style breakfast.

Additional Tips

To ensure your coconut flour waffles turn out perfectly every time, consider these additional tips:

  • Tip 1: Allow the batter to rest for a few minutes before cooking. This gives the coconut flour time to absorb the liquid, resulting in a better texture.
  • Tip 2: Always preheat your waffle iron. A hot iron ensures crispy edges and prevents the waffles from sticking.
  • Tip 3: If you prefer sweeter waffles, adjust the amount of honey or syrup to taste. However, keep in mind that toppings will add sweetness.
  • Tip 4: For additional flavor, consider adding a pinch of cinnamon or nutmeg to the dry ingredients.
  • Tip 5: Leftover waffles can be stored in an airtight container and reheated in the toaster for a quick breakfast option.

FAQ Section

Q: Can I substitute coconut flour with almond flour?

A: Coconut flour and almond flour have different properties and absorb liquids differently. If substituting, adjustments to the liquid ingredients will be necessary to achieve the correct batter consistency.

Q: Are these waffles gluten-free?

A: Yes, coconut flour is naturally gluten-free, making these waffles a great option for those with gluten sensitivities or celiac disease.

Q: Can I use egg substitutes in this recipe?

A: Coconut flour relies heavily on eggs for structure and moisture. While you can try using a commercial egg replacer, the results may vary in texture and flavor.

Q: How can I make these waffles dairy-free?

A: To make the recipe dairy-free, use a non-dairy milk such as almond or coconut milk and replace butter with coconut oil.

Q: What other toppings go well with coconut flour waffles?

A: In addition to the suggestions above, you can try topping your waffles with yogurt, applesauce, or nut butters for a nutritious twist.

Almond Butter Smoothie

In the realm of smoothies, few concoctions offer the creamy richness and satisfying depth of an almond butter smoothie. This delightful blend not only tantalizes the taste buds but also provides a wholesome nutritional boost that is perfect for any time of the day. As an avid smoothie enthusiast, I was eager to introduce this recipe to my family, and it did not disappoint. The moment I served it at breakfast, the unanimous nods of approval were enough to confirm its place as a family favorite. The creamy texture and nutty flavor were complemented by a hint of sweetness, making it a perfect morning pick-me-up or an afternoon snack. It’s a versatile recipe that has quickly become a staple in our household, offering a delicious way to incorporate healthy fats and proteins into our diet.

Ingredients

To create this delectable almond butter smoothie, you will need the following ingredients:

  • 2 tablespoons of almond butter
  • 1 banana, preferably frozen for a creamier texture
  • 1 cup of almond milk (or your choice of milk)
  • 1 tablespoon of honey or maple syrup for sweetness
  • 1 teaspoon of vanilla extract
  • A pinch of cinnamon for added warmth
  • Ice cubes, as needed for desired consistency

Instructions

Creating an almond butter smoothie is as simple as it is rewarding. Follow these steps to blend up a perfect glass:

  1. Start by adding the almond butter and frozen banana to your blender. The frozen banana helps achieve a thick, creamy texture without the need for ice cream or other dairy products.
  2. Pour in the almond milk. You can adjust the quantity depending on how thick or thin you prefer your smoothie.
  3. Add the honey or maple syrup, vanilla extract, and a pinch of cinnamon. These ingredients add depth to the flavor and enhance the natural sweetness of the banana.
  4. Blend on high speed until all ingredients are thoroughly combined and the mixture is smooth. If you find the smoothie too thick, add a bit more almond milk until you reach your desired consistency.
  5. If you prefer your smoothie cold and refreshing, add a few ice cubes and blend again until smooth.
  6. Pour into a glass and enjoy immediately, or store in the refrigerator for a quick, nutritious meal on the go.

Nutrition Facts

This almond butter smoothie recipe serves 2 and packs a punch with approximately 250 calories per serving. It’s a nutritious option that provides a good balance of healthy fats, proteins, and carbohydrates, making it an ideal choice for a post-workout recovery drink or a satisfying breakfast.

Preparation Time

One of the best aspects of this almond butter smoothie is its quick preparation time. From start to finish, you can whip up this delicious drink in just 10 minutes. It’s a perfect option for those busy mornings when you need a nutritious breakfast but are short on time.

How to Serve

Serving your almond butter smoothie can be as creative as you want it to be. Here are a few ideas to get you started:

  • Classic Style: Pour the smoothie into a tall glass and serve with a straw for easy sipping.
  • Garnished: Top with a sprinkle of chia seeds, sliced almonds, or a dash of cinnamon for added texture and flavor.
  • In a Bowl: Serve in a bowl and add toppings like granola, fresh berries, or coconut flakes for a smoothie bowl experience.
  • Layered: Alternate layers of smoothie and yogurt in a glass for a parfait-style presentation.
  • On the Go: Pour into a travel-friendly cup with a lid and enjoy your smoothie on your commute to work or school.

Additional Tips

Here are some additional tips to help you perfect your almond butter smoothie experience:

  1. Use Ripe Bananas: Ripe bananas are sweeter and blend more easily, giving your smoothie a natural sweetness without the need for added sugar.
  2. Try Different Nut Butters: If you’re not a fan of almond butter, feel free to substitute with peanut butter, cashew butter, or even sunflower seed butter for a different flavor profile.
  3. Add Protein: For an extra protein boost, consider adding a scoop of your favorite protein powder. This can be particularly beneficial if you’re using the smoothie as a meal replacement or post-workout snack.
  4. Experiment with Spices: Besides cinnamon, try adding nutmeg or ginger for a warm, spicy kick that complements the nutty flavor of the almond butter.
  5. Make it Green: Add a handful of spinach or kale for extra nutrients. The mild flavor of these greens won’t overpower the other ingredients, and they’ll add a vibrant color to your smoothie.

FAQ Section

Here are some frequently asked questions about the almond butter smoothie, along with their answers:

  1. Can I use a different type of milk? Yes, you can substitute almond milk with any other type of milk, such as cow’s milk, soy milk, or oat milk. Each will bring a slightly different flavor and texture to the smoothie.
  2. Is it necessary to use a frozen banana? While a frozen banana helps achieve a thicker, creamier consistency, you can use a fresh banana if preferred. Simply add more ice cubes to thicken the smoothie.
  3. How can I make the smoothie sweeter? If you prefer a sweeter smoothie, increase the amount of honey or maple syrup, or add a few pitted dates for natural sweetness.
  4. What if I have nut allergies? If you have nut allergies, you can substitute almond butter with sunflower seed butter and use a nut-free milk alternative like oat milk or rice milk.
  5. Can I prepare the smoothie in advance? While it’s best enjoyed fresh, you can prepare the smoothie in advance and store it in an airtight container in the refrigerator for up to 24 hours. Give it a good shake or stir before drinking.

Coconut Milk Chia Pudding

Recently, I embarked on a culinary adventure that introduced a new favorite to our family’s dessert repertoire: Coconut Milk Chia Pudding. This delightful dish was met with enthusiastic approval from everyone at the table, from the youngest to the oldest. The creamy texture paired with the subtle sweetness of coconut milk creates a perfect harmony of flavors that somehow feels indulgent yet light. My family loved how versatile it was, allowing for a myriad of toppings like fresh fruits, nuts, and honey, which each person could customize to their liking. This pudding not only satiated our sweet tooth but also sparked a conversation about the health benefits of chia seeds, making it a wholesome addition to our meal plan.

Ingredients

To create this delightful Coconut Milk Chia Pudding, you will need the following ingredients:

  • 1 cup of coconut milk
  • 3 tablespoons of chia seeds
  • 1 tablespoon of maple syrup or honey
  • 1 teaspoon of vanilla extract
  • A pinch of salt
  • Fresh fruits, nuts, or coconut flakes for topping

These ingredients come together to create a simple yet flavorful base that can be customized to suit your taste preferences.

Instructions

Making Coconut Milk Chia Pudding is a straightforward process that requires minimal effort but yields delicious results. Follow these steps to create your own batch:

  1. In a mixing bowl, combine the coconut milk, chia seeds, maple syrup, vanilla extract, and a pinch of salt. Stir well to ensure the chia seeds are evenly distributed.
  2. Cover the bowl and refrigerate the mixture for at least 4 hours, or overnight, to allow the chia seeds to absorb the liquid and thicken.
  3. Before serving, give the pudding a good stir to break up any clumps and achieve a smooth consistency.
  4. Serve the pudding in individual bowls or jars, and top with your choice of fresh fruits, nuts, or coconut flakes.
  5. Enjoy your delicious and nutritious Coconut Milk Chia Pudding!

This recipe is not only easy to follow but also encourages creativity with toppings, making it a fun activity for the whole family.

Nutrition Facts

This recipe yields approximately 4 servings. Each serving contains around 150 calories, making it a light yet satisfying dessert option. The main nutritional highlights include:

  • Omega-3 fatty acids from chia seeds
  • Natural sweetness from honey or maple syrup
  • Healthy fats from coconut milk

This pudding is a fantastic choice for those looking to maintain a balanced diet without sacrificing flavor.

Preparation Time

One of the most appealing aspects of Coconut Milk Chia Pudding is its simplicity in preparation. The active preparation time is less than 10 minutes, with the majority of the time spent allowing the pudding to set in the refrigerator. This makes it an ideal choice for busy individuals or families looking for a quick and healthy dessert option that can be prepared in advance.

How to Serve

Coconut Milk Chia Pudding can be served in a variety of ways, making it a versatile dessert that caters to different tastes:

  • Classic Style: Serve in a bowl with a sprinkle of coconut flakes on top.
  • Fruit Parfait: Layer the pudding with fresh berries or sliced bananas for a refreshing treat.
  • Tropical Delight: Top with mango slices and a drizzle of lime juice for a tropical twist.
  • Nutty Crunch: Add a handful of toasted almonds or walnuts for a crunchy texture.
  • Chocolate Lover: Mix in cocoa powder and top with chocolate chips for a rich, chocolatey dessert.

These serving suggestions highlight the versatility of the dish, allowing it to be tailored to fit any occasion or preference.

Additional Tips

To ensure your Coconut Milk Chia Pudding turns out perfectly every time, consider these additional tips:

  1. Consistency Check: If the pudding is too thick, add a bit more coconut milk to achieve your desired consistency.
  2. Sweetness Level: Adjust the amount of maple syrup or honey based on your personal preference for sweetness.
  3. Chia Seed Quality: Use fresh, high-quality chia seeds for the best results.
  4. Flavor Variations: Experiment with different extracts, such as almond or coconut, to add a unique twist.
  5. Batch Preparation: Make a larger batch and store it in the fridge for up to five days for a quick and easy dessert option throughout the week.

These tips will help you customize the pudding to your liking and ensure it remains a staple in your dessert rotation.

FAQ Section

Here are some frequently asked questions about Coconut Milk Chia Pudding:

  1. Can I use a different type of milk? Yes, you can substitute coconut milk with almond milk, cashew milk, or any other plant-based milk of your choice.
  2. How long does the pudding last in the refrigerator? The pudding can be stored in the refrigerator for up to five days, making it a great option for meal prep.
  3. Can I freeze the pudding? While it is possible to freeze the pudding, it may alter the texture slightly. It is best enjoyed fresh or refrigerated.
  4. What can I do if my pudding is too runny? If the pudding is too runny, try adding more chia seeds and letting it sit for an additional hour to thicken.
  5. Is this pudding suitable for a vegan diet? Yes, this pudding is vegan-friendly as long as you use maple syrup instead of honey.

These FAQs address common concerns and provide helpful solutions, making it easier for you to enjoy this delicious dessert.

Dairy-Free Banana Pancakes

Dairy-free banana pancakes have been a delightful addition to our family’s breakfast menu. With a soft, fluffy texture and a naturally sweet flavor, these pancakes have won over even the most discerning taste buds in our household. Not only are they incredibly delicious, but they also cater to those with lactose intolerance or those looking to reduce their dairy intake. The first time we made these pancakes, I was skeptical about how they would compare to traditional pancakes. However, after just one bite, I was convinced that these would become a staple in our home. The simplicity of the ingredients and the ease of preparation make them a winner for busy mornings. My family, particularly my kids, have given them rave reviews, often requesting them on weekends or special occasions.

Ingredients

To create these scrumptious dairy-free banana pancakes, you will need the following ingredients:

  • 2 ripe bananas, mashed
  • 1 cup all-purpose flour
  • 2 teaspoons baking powder
  • 1/2 teaspoon salt
  • 1 tablespoon sugar (optional for added sweetness)
  • 1 cup almond milk (or any non-dairy milk of your choice)
  • 1 tablespoon vegetable oil
  • 1 teaspoon vanilla extract
  • 1/2 teaspoon cinnamon (optional)

Instructions

Making these pancakes is a breeze, and the end result is well worth the effort. Follow these simple steps to whip up a batch of delicious dairy-free banana pancakes:

  1. In a mixing bowl, combine the mashed bananas with the almond milk, vegetable oil, and vanilla extract. Stir until well blended.
  2. In a separate bowl, whisk together the flour, baking powder, salt, sugar, and cinnamon.
  3. Slowly add the dry ingredients to the wet ingredients, mixing until just combined. Be careful not to overmix, as this can result in dense pancakes.
  4. Heat a non-stick skillet or griddle over medium heat. Lightly grease with oil or non-stick spray.
  5. Pour 1/4 cup of batter onto the skillet for each pancake. Cook until bubbles form on the surface, then flip and cook until golden brown on the other side.
  6. Repeat with the remaining batter, keeping the cooked pancakes warm in a low oven if necessary.
  7. Serve warm, topped with your favorite syrup, fresh fruit, or a dollop of dairy-free yogurt.

Nutrition Facts

This recipe yields approximately 8 pancakes, serving 4 people. Each serving contains roughly 150 calories, making it a healthy breakfast option that doesn’t skimp on flavor.

Preparation Time

The total preparation time for these pancakes is around 20 minutes. This includes about 10 minutes for gathering and mixing the ingredients, and another 10 minutes for cooking the pancakes. The quick turnaround time makes them an ideal choice for busy mornings when you want a wholesome, homemade breakfast without a lengthy cooking process.

How to Serve

Here are some serving suggestions to elevate your dairy-free banana pancakes to the next level:

  • Classic: Drizzle with maple syrup and top with a pat of dairy-free butter.
  • Berry Delight: Serve with a medley of fresh berries and a dusting of powdered sugar.
  • Nutty Crunch: Sprinkle with chopped nuts such as walnuts or almonds for added texture.
  • Tropical Twist: Add sliced bananas and a sprinkle of shredded coconut.
  • Chocolate Indulgence: Include a handful of dairy-free chocolate chips in the batter for a sweet surprise.

Additional Tips

Here are some tips to ensure your dairy-free banana pancakes turn out perfectly every time:

  1. Ripeness of Bananas: Use bananas that are ripe but not overly mushy. They should have some brown spots for optimal sweetness.
  2. Consistency of Batter: The batter should be thick but pourable. Adjust with a splash more almond milk if needed.
  3. Cooking Temperature: Keep the skillet at medium heat to ensure pancakes cook evenly without burning.
  4. Resting Batter: Let the batter rest for a few minutes before cooking to allow the baking powder to activate.
  5. Storage: Leftover pancakes can be stored in an airtight container in the fridge for up to 2 days or frozen for longer storage.

FAQ Section

  1. Can I use a different type of flour? Yes, you can substitute whole wheat flour, spelt flour, or a gluten-free blend for a different texture and flavor.
  2. What non-dairy milk works best? Almond milk is a popular choice, but you can also use soy, oat, or coconut milk depending on your preference.
  3. Can I make the batter ahead of time? While it’s best to use the batter fresh, you can prepare it a few hours in advance and store it in the fridge until ready to cook.
  4. How can I make these pancakes more filling? Consider adding a tablespoon of chia seeds or flaxseeds to the batter for extra fiber and nutrients.
  5. Are these pancakes suitable for freezing? Yes, allow the pancakes to cool completely before freezing them in a single layer on a baking sheet. Once frozen, transfer them to a freezer-safe bag or container.

Black Bean Brownies

When I first stumbled upon the idea of black bean brownies, I was admittedly skeptical. The thought of incorporating beans into a dessert seemed unconventional and frankly, a little strange. However, the trend piqued my curiosity, and I decided to give it a try. Much to my surprise, the brownies turned out to be a delightful treat that my family couldn’t get enough of. The rich, fudgy texture combined with a subtle hint of sweetness was a hit at our family gathering. Even the kids, who are notoriously picky eaters, couldn’t resist going back for seconds. The recipe has since become a staple in our household, offering a healthier alternative to traditional brownies without sacrificing taste.

Ingredients

To make these delectable black bean brownies, you’ll need the following ingredients:

  • 1 can (15 oz) of black beans, drained and rinsed
  • 3 large eggs
  • 1/2 cup of unsweetened cocoa powder
  • 3/4 cup of sugar
  • 1 tablespoon of vegetable oil
  • 1 teaspoon of vanilla extract
  • 1/2 teaspoon of baking powder
  • 1/4 teaspoon of salt
  • 1/2 cup of chocolate chips (optional)

Instructions

Start by preheating your oven to 350°F (175°C). While the oven is heating, prepare your baking dish by lining it with parchment paper or lightly greasing it. This will prevent the brownies from sticking and make clean-up easier.

Next, place the black beans, eggs, cocoa powder, sugar, vegetable oil, vanilla extract, baking powder, and salt into a blender or food processor. Blend the ingredients until the mixture is smooth and well combined. This step is crucial to ensure that the black beans are fully pureed, as any chunks could alter the texture of the brownies.

Once blended, pour the batter into your prepared baking dish, spreading it evenly with a spatula. If you’re using chocolate chips, sprinkle them evenly over the top of the batter. This will add pockets of gooey chocolate goodness throughout the brownies as they bake.

Bake the brownies in the preheated oven for 20-25 minutes, or until a toothpick inserted into the center comes out mostly clean. It’s okay if a few crumbs stick to the toothpick, as this indicates the brownies will be fudgy. Be careful not to overbake, as this can result in dry brownies.

Allow the brownies to cool in the pan for about 10 minutes before transferring them to a wire rack to cool completely. This cooling period helps the brownies set and makes them easier to cut into squares.

Nutrition Facts

This recipe yields approximately 12 servings, with each serving containing about 150 calories. These brownies are a healthier alternative to traditional recipes, offering a lower calorie count while still providing a rich and satisfying treat.

Preparation Time

The total preparation time for these black bean brownies is around 40 minutes. This includes about 10 minutes of prep time and 20-25 minutes of baking time. The quick preparation makes this recipe ideal for those who want a delicious dessert without spending hours in the kitchen.

How to Serve

  • As a dessert: Serve the brownies warm with a scoop of vanilla ice cream for an indulgent treat.
  • With coffee: Pair a brownie with your morning coffee for a sweet start to your day.
  • At gatherings: Cut the brownies into bite-sized pieces for a party-friendly dessert option.
  • With a drizzle: Add a drizzle of caramel or chocolate sauce for extra decadence.
  • With fruit: Serve alongside fresh berries for a refreshing contrast.

Additional Tips

  1. Use fresh beans: If you have time, cook your own black beans instead of using canned for a fresher taste.
  2. Experiment with sweeteners: Try substituting sugar with honey or maple syrup for a different flavor profile.
  3. Add nuts: Incorporate chopped walnuts or pecans for added texture and a nutty flavor.
  4. Consider dietary needs: Use gluten-free baking powder to make the recipe gluten-free.
  5. Store properly: Keep brownies in an airtight container to maintain freshness.

FAQ Section

Can I use a different type of bean?

Yes, while black beans are the traditional choice for this recipe, you can experiment with other beans like kidney beans or chickpeas. Each type will bring its unique texture and flavor to the brownies.

Can I make these brownies vegan?

Absolutely! Replace the eggs with flax eggs or a commercial egg replacer. Ensure that your chocolate chips are dairy-free as well.

How should I store leftover brownies?

Store leftover brownies in an airtight container at room temperature for up to 3 days. For longer storage, you can refrigerate them for up to a week or freeze them for up to 3 months.

What if I don’t have a blender?

If you don’t have a blender or food processor, you can mash the beans with a potato masher and mix the ingredients by hand. The texture might be slightly different, but the brownies will still be delicious.

Can I add other flavors?

Yes, feel free to add flavors like cinnamon, espresso powder, or even a splash of rum extract to enhance the taste of your brownies. Adjust the quantities to suit your preference.