Vegan Cheese Sauce

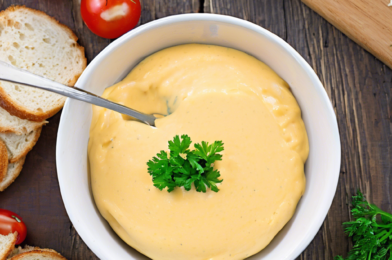
There’s something incredibly comforting about a silky, smooth cheese sauce draped over your favorite dish. But for those who have embraced the vegan lifestyle, finding a plant-based alternative that matches the rich, creamy texture and savory flavor of traditional cheese sauce can be challenging. Fortunately, the culinary world has seen a surge in innovative recipes, one of which is the delightful vegan cheese sauce. My family and I recently tried this recipe, and it’s safe to say it was a hit! Even the most skeptical cheese lovers in the house couldn’t resist its charm. With its nutty undertones and a hint of tang, this sauce is a must-try for anyone looking to explore vegan cooking.

Ingredients

Creating this vegan cheese sauce is a breeze, and it requires just a handful of wholesome ingredients that you likely already have in your pantry. Here’s what you’ll need:

  • 1 cup of raw cashews
  • 1/2 cup of nutritional yeast
  • 1 tablespoon of lemon juice
  • 1 teaspoon of garlic powder
  • 1 teaspoon of onion powder
  • 1 teaspoon of salt
  • 1/2 teaspoon of turmeric (for color)
  • 1 1/2 cups of water
  • Optional: a pinch of cayenne pepper for a spicy kick

Instructions

To make this luscious vegan cheese sauce, follow these simple steps:

  1. Soak the Cashews: Begin by soaking the raw cashews in hot water for at least 30 minutes. This helps to soften them, ensuring a smooth and creamy texture when blended.
  2. Blend the Ingredients: Drain the soaked cashews and add them to a blender along with nutritional yeast, lemon juice, garlic powder, onion powder, salt, turmeric, and water. Blend until the mixture is completely smooth and creamy. This may take a couple of minutes depending on the power of your blender.
  3. Adjust the Seasoning: Taste the sauce and adjust the seasoning to your liking. If you prefer a tangier sauce, add a bit more lemon juice. For extra spice, include a pinch of cayenne pepper.
  4. Heat the Sauce: Transfer the blended mixture to a saucepan and heat over medium heat. Stir continuously until the sauce thickens and becomes gooey, which should take about 3 to 5 minutes.
  5. Serve and Enjoy: Once thickened, remove the sauce from the heat and serve immediately over pasta, vegetables, or as a dip.

Nutrition Facts

This recipe yields approximately 4 servings. Each serving contains around 150 calories, making it a light yet satisfying addition to any meal.

Preparation Time

From start to finish, this vegan cheese sauce takes about 45 minutes to prepare, including soaking time. The active cooking time is around 10 minutes, so it’s perfect for a quick weeknight meal.

How to Serve

Vegan cheese sauce is incredibly versatile and can be served in many ways:

  • Drizzle over steamed vegetables for a nutritious side dish.
  • Use as a creamy sauce for your favorite pasta dish.
  • Serve as a dip with tortilla chips or vegetable sticks.
  • Layer over nachos for a vegan-friendly snack.
  • Spread over baked potatoes for a comforting meal.

Additional Tips

To elevate your vegan cheese sauce experience, consider these additional tips:

  1. Experiment with Spices: Try adding different spices like smoked paprika or cumin to give your sauce a unique flavor profile.
  2. Use a High-Powered Blender: A high-powered blender ensures a smoother texture, which is key for this sauce.
  3. Store Properly: Store any leftover sauce in an airtight container in the refrigerator for up to 5 days. Reheat gently on the stove.
  4. Try Different Nuts: If cashews are not available, almonds or macadamia nuts can be used as an alternative.
  5. Add Vegetables: For added nutrients, consider blending in cooked carrots or roasted red peppers.

FAQ Section

Here are some frequently asked questions about this vegan cheese sauce recipe:

  1. Can I make this sauce ahead of time? Yes, you can make this sauce ahead of time and store it in the refrigerator for up to 5 days. Reheat it gently on the stove before serving.
  2. Is there a nut-free version? Absolutely! You can use sunflower seeds instead of cashews for a nut-free version.
  3. Can I freeze the sauce? While it’s best enjoyed fresh, you can freeze the sauce in a freezer-safe container for up to 2 months. Thaw it in the refrigerator and reheat gently.
  4. What can I use instead of nutritional yeast? Nutritional yeast provides a cheesy flavor, but if unavailable, you can try using chickpea miso for a savory note.
  5. How can I make the sauce thicker? If you prefer a thicker sauce, reduce the amount of water in the recipe or add a tablespoon of cornstarch while heating.

In conclusion, this vegan cheese sauce is not only a healthier alternative to traditional cheese sauce but also a deliciously versatile addition to your culinary repertoire. Whether you’re a seasoned vegan or simply looking to incorporate more plant-based meals into your diet, this recipe is sure to please. Enjoy experimenting with flavors and serving it in various ways to suit your taste and dietary preferences.

Dairy-Free Oatmeal with Berries

I recently tried out a delightful recipe that has quickly become a family favorite: Dairy-Free Oatmeal with Berries. As someone who appreciates both hearty breakfasts and accommodating various dietary needs, I was thrilled with how this dish turned out. My family, notorious for their varied tastes, all gave it a resounding thumbs up. The oatmeal’s creamy texture, despite being dairy-free, coupled with the natural sweetness from the berries, made it an instant hit at our breakfast table. Not only is it delicious, but it’s also a nutritious way to start the day. I found myself looking forward to breakfast every morning just to enjoy this delightful concoction.

Ingredients

Creating this dairy-free oatmeal is a straightforward process, with ingredients easily found in most kitchens or local grocery stores. Here’s what you need to gather:

  • 1 cup of rolled oats
  • 2 cups of almond milk or any other plant-based milk
  • 1 tablespoon of chia seeds
  • 1 tablespoon of maple syrup or honey
  • 1 teaspoon of vanilla extract
  • 1/2 teaspoon of cinnamon
  • 1 cup of mixed berries (such as blueberries, raspberries, and strawberries)
  • A pinch of salt
  • Optional toppings: sliced almonds, coconut flakes, or more fresh berries

Instructions

With your ingredients ready, it’s time to prepare the oatmeal. This process is simple and takes only a few steps. Here’s how you can make this delicious breakfast:

  1. Start by combining the rolled oats, almond milk, chia seeds, maple syrup, vanilla extract, cinnamon, and salt in a medium saucepan.
  2. Place the saucepan over medium heat and bring the mixture to a gentle boil, stirring occasionally.
  3. Once boiling, reduce the heat to low and let the oatmeal simmer for about 10-15 minutes. Stir frequently to prevent sticking and to achieve a creamy consistency.
  4. Once the oatmeal reaches your desired thickness, remove it from the heat.
  5. Fold in the mixed berries, allowing their juices to blend with the oatmeal, enhancing both flavor and color.
  6. Serve the oatmeal warm, garnished with your choice of optional toppings for added texture and flavor.

Nutrition Facts

This recipe makes about four servings, perfect for a family breakfast or for meal prepping. Each serving contains approximately 250 calories, making it a wholesome and satisfying start to your day. The combination of oats and chia seeds provides a healthy dose of fiber, while the berries add antioxidants and essential vitamins.

Preparation Time

The beauty of this dish, aside from its taste and nutritional value, is its quick preparation time. From start to finish, you can have this delicious oatmeal ready in about 20 minutes. This makes it an ideal choice for busy mornings when time is of the essence but a nutritious breakfast is still a priority.

How to Serve

There are several ways you can serve this delightful oatmeal to make it even more enjoyable:

  • Family-Style: Serve it in a large bowl, allowing everyone to scoop their desired amount and customize with their favorite toppings.
  • Individual Bowls: Portion out the oatmeal into individual bowls, each garnished with a unique combination of toppings for a personalized touch.
  • On-the-Go: Prepare the oatmeal in advance and store it in portable containers for a quick and easy breakfast option during busy mornings.
  • Brunch Spread: Include this oatmeal as part of a larger brunch spread, paired with other breakfast favorites like scrambled eggs or avocado toast.
  • Meal Prep: Make a large batch and store portions in the fridge or freezer for easy reheating throughout the week.

Additional Tips

To enhance your oatmeal experience, consider these additional tips:

  1. Experiment with Milk Alternatives: While almond milk is a popular choice, feel free to experiment with other plant-based milks such as coconut, oat, or soy milk to find your preferred flavor.
  2. Use Seasonal Berries: Opt for seasonal berries for the freshest taste. In the summer, fresh strawberries or blueberries are perfect, while in the winter, frozen berries are a convenient and nutritious option.
  3. Add a Protein Boost: For additional protein, consider topping your oatmeal with a dollop of almond butter or a sprinkle of hemp seeds.
  4. Make it Overnight: Prepare the oatmeal mixture the night before and let it sit in the fridge overnight. In the morning, simply heat it up for a quick and effortless breakfast.
  5. Sugar Alternatives: If you’re watching your sugar intake, reduce or omit the maple syrup and rely on the natural sweetness of the berries.

FAQ Section

Here are some frequently asked questions about this dairy-free oatmeal recipe:

Q: Can I use steel-cut oats instead of rolled oats?
A: Yes, but keep in mind that steel-cut oats require a longer cooking time and a bit more liquid. Adjust the cooking time to about 20-30 minutes and add extra almond milk as needed to achieve the desired consistency.

Q: Can I make this oatmeal gluten-free?
A: Absolutely! Just ensure that your oats are labeled gluten-free, as some oats can be cross-contaminated with gluten during processing.

Q: What if I don’t have chia seeds?
A: You can omit the chia seeds if you don’t have them on hand. They add a nice texture and nutritional boost, but the oatmeal will still be delicious without them.

Q: Can I use frozen berries instead of fresh?
A: Yes, frozen berries work just as well and are often more economical. They will thaw as you fold them into the hot oatmeal, releasing their juices and flavor.

Q: How long can I store leftover oatmeal?
A: Leftover oatmeal can be stored in an airtight container in the refrigerator for up to four days. Reheat it on the stovetop or in the microwave, adding a splash of almond milk to restore its creamy texture.

Coconut Flour Waffles

There’s something truly special about waking up to the aroma of freshly cooked waffles. And when those waffles are made with coconut flour, they bring an extra layer of texture and flavor that elevates the breakfast experience to new heights. Recently, I decided to try a recipe for coconut flour waffles that I stumbled upon, and the results were nothing short of delightful. My family, who are usually quite selective when it comes to breakfast items, were pleasantly surprised by the unique taste and light texture of these waffles. The subtle hint of coconut combined with the crispy exterior made for a breakfast dish that quickly became a household favorite. This recipe is perfect for anyone looking to try something different while still savoring the classic comfort of a warm waffle.

Ingredients

To create these delicious coconut flour waffles, you’ll need the following ingredients:

  • 1/2 cup of coconut flour
  • 1/4 teaspoon of baking soda
  • 1/4 teaspoon of salt
  • 4 large eggs
  • 1/4 cup of melted coconut oil or butter
  • 1/4 cup of milk (dairy or non-dairy)
  • 1 tablespoon of honey or maple syrup
  • 1/2 teaspoon of vanilla extract

Instructions

Begin by preheating your waffle iron to the desired setting. In a medium-sized bowl, whisk together the coconut flour, baking soda, and salt. Set this dry mixture aside. In a separate large bowl, beat the eggs until they are frothy. This step is crucial as it helps incorporate air into the batter, ensuring that the waffles remain light and fluffy.

Next, add the melted coconut oil or butter, milk, honey or maple syrup, and vanilla extract to the beaten eggs. Mix until all the ingredients are well combined. Gradually incorporate the dry ingredients into the wet mixture, stirring slowly to avoid lumps. The batter will be thicker than traditional waffle batter due to the absorbent nature of coconut flour, but this is entirely normal.

Spoon the batter onto the preheated waffle iron, using about 1/4 cup per waffle, depending on the size of your waffle maker. Close the lid and cook until the waffles are golden brown and crisp on the outside. This usually takes about 3-5 minutes, but times may vary depending on your waffle iron. Once cooked, carefully remove the waffles and place them on a wire rack to prevent them from becoming soggy.

Nutrition Facts

This recipe yields approximately 4 servings, with each serving consisting of one waffle. Each waffle contains around 240 calories, making this a relatively light breakfast option that doesn’t compromise on flavor or satisfaction.

Preparation Time

The total preparation time for these coconut flour waffles is approximately 15 minutes. This includes 10 minutes for mixing the ingredients and 5 minutes for cooking each batch of waffles. This quick prep time makes it a convenient breakfast option for busy mornings or leisurely weekend brunches.

How to Serve

These coconut flour waffles can be served in a variety of ways to suit your taste preferences:

  • Classic: Top with butter and a drizzle of pure maple syrup for a timeless treat.
  • Fruit-Loaded: Add fresh berries like strawberries, blueberries, or raspberries for a burst of freshness.
  • Nutty Delight: Sprinkle with chopped nuts such as almonds or walnuts for added crunch.
  • Tropical Twist: Garnish with slices of banana and a sprinkle of shredded coconut.
  • Indulgent: Serve with a dollop of whipped cream and a drizzle of chocolate sauce for a decadent dessert-style breakfast.

Additional Tips

To ensure your coconut flour waffles turn out perfectly every time, consider these additional tips:

  • Tip 1: Allow the batter to rest for a few minutes before cooking. This gives the coconut flour time to absorb the liquid, resulting in a better texture.
  • Tip 2: Always preheat your waffle iron. A hot iron ensures crispy edges and prevents the waffles from sticking.
  • Tip 3: If you prefer sweeter waffles, adjust the amount of honey or syrup to taste. However, keep in mind that toppings will add sweetness.
  • Tip 4: For additional flavor, consider adding a pinch of cinnamon or nutmeg to the dry ingredients.
  • Tip 5: Leftover waffles can be stored in an airtight container and reheated in the toaster for a quick breakfast option.

FAQ Section

Q: Can I substitute coconut flour with almond flour?

A: Coconut flour and almond flour have different properties and absorb liquids differently. If substituting, adjustments to the liquid ingredients will be necessary to achieve the correct batter consistency.

Q: Are these waffles gluten-free?

A: Yes, coconut flour is naturally gluten-free, making these waffles a great option for those with gluten sensitivities or celiac disease.

Q: Can I use egg substitutes in this recipe?

A: Coconut flour relies heavily on eggs for structure and moisture. While you can try using a commercial egg replacer, the results may vary in texture and flavor.

Q: How can I make these waffles dairy-free?

A: To make the recipe dairy-free, use a non-dairy milk such as almond or coconut milk and replace butter with coconut oil.

Q: What other toppings go well with coconut flour waffles?

A: In addition to the suggestions above, you can try topping your waffles with yogurt, applesauce, or nut butters for a nutritious twist.

Almond Butter Smoothie

In the realm of smoothies, few concoctions offer the creamy richness and satisfying depth of an almond butter smoothie. This delightful blend not only tantalizes the taste buds but also provides a wholesome nutritional boost that is perfect for any time of the day. As an avid smoothie enthusiast, I was eager to introduce this recipe to my family, and it did not disappoint. The moment I served it at breakfast, the unanimous nods of approval were enough to confirm its place as a family favorite. The creamy texture and nutty flavor were complemented by a hint of sweetness, making it a perfect morning pick-me-up or an afternoon snack. It’s a versatile recipe that has quickly become a staple in our household, offering a delicious way to incorporate healthy fats and proteins into our diet.

Ingredients

To create this delectable almond butter smoothie, you will need the following ingredients:

  • 2 tablespoons of almond butter
  • 1 banana, preferably frozen for a creamier texture
  • 1 cup of almond milk (or your choice of milk)
  • 1 tablespoon of honey or maple syrup for sweetness
  • 1 teaspoon of vanilla extract
  • A pinch of cinnamon for added warmth
  • Ice cubes, as needed for desired consistency

Instructions

Creating an almond butter smoothie is as simple as it is rewarding. Follow these steps to blend up a perfect glass:

  1. Start by adding the almond butter and frozen banana to your blender. The frozen banana helps achieve a thick, creamy texture without the need for ice cream or other dairy products.
  2. Pour in the almond milk. You can adjust the quantity depending on how thick or thin you prefer your smoothie.
  3. Add the honey or maple syrup, vanilla extract, and a pinch of cinnamon. These ingredients add depth to the flavor and enhance the natural sweetness of the banana.
  4. Blend on high speed until all ingredients are thoroughly combined and the mixture is smooth. If you find the smoothie too thick, add a bit more almond milk until you reach your desired consistency.
  5. If you prefer your smoothie cold and refreshing, add a few ice cubes and blend again until smooth.
  6. Pour into a glass and enjoy immediately, or store in the refrigerator for a quick, nutritious meal on the go.

Nutrition Facts

This almond butter smoothie recipe serves 2 and packs a punch with approximately 250 calories per serving. It’s a nutritious option that provides a good balance of healthy fats, proteins, and carbohydrates, making it an ideal choice for a post-workout recovery drink or a satisfying breakfast.

Preparation Time

One of the best aspects of this almond butter smoothie is its quick preparation time. From start to finish, you can whip up this delicious drink in just 10 minutes. It’s a perfect option for those busy mornings when you need a nutritious breakfast but are short on time.

How to Serve

Serving your almond butter smoothie can be as creative as you want it to be. Here are a few ideas to get you started:

  • Classic Style: Pour the smoothie into a tall glass and serve with a straw for easy sipping.
  • Garnished: Top with a sprinkle of chia seeds, sliced almonds, or a dash of cinnamon for added texture and flavor.
  • In a Bowl: Serve in a bowl and add toppings like granola, fresh berries, or coconut flakes for a smoothie bowl experience.
  • Layered: Alternate layers of smoothie and yogurt in a glass for a parfait-style presentation.
  • On the Go: Pour into a travel-friendly cup with a lid and enjoy your smoothie on your commute to work or school.

Additional Tips

Here are some additional tips to help you perfect your almond butter smoothie experience:

  1. Use Ripe Bananas: Ripe bananas are sweeter and blend more easily, giving your smoothie a natural sweetness without the need for added sugar.
  2. Try Different Nut Butters: If you’re not a fan of almond butter, feel free to substitute with peanut butter, cashew butter, or even sunflower seed butter for a different flavor profile.
  3. Add Protein: For an extra protein boost, consider adding a scoop of your favorite protein powder. This can be particularly beneficial if you’re using the smoothie as a meal replacement or post-workout snack.
  4. Experiment with Spices: Besides cinnamon, try adding nutmeg or ginger for a warm, spicy kick that complements the nutty flavor of the almond butter.
  5. Make it Green: Add a handful of spinach or kale for extra nutrients. The mild flavor of these greens won’t overpower the other ingredients, and they’ll add a vibrant color to your smoothie.

FAQ Section

Here are some frequently asked questions about the almond butter smoothie, along with their answers:

  1. Can I use a different type of milk? Yes, you can substitute almond milk with any other type of milk, such as cow’s milk, soy milk, or oat milk. Each will bring a slightly different flavor and texture to the smoothie.
  2. Is it necessary to use a frozen banana? While a frozen banana helps achieve a thicker, creamier consistency, you can use a fresh banana if preferred. Simply add more ice cubes to thicken the smoothie.
  3. How can I make the smoothie sweeter? If you prefer a sweeter smoothie, increase the amount of honey or maple syrup, or add a few pitted dates for natural sweetness.
  4. What if I have nut allergies? If you have nut allergies, you can substitute almond butter with sunflower seed butter and use a nut-free milk alternative like oat milk or rice milk.
  5. Can I prepare the smoothie in advance? While it’s best enjoyed fresh, you can prepare the smoothie in advance and store it in an airtight container in the refrigerator for up to 24 hours. Give it a good shake or stir before drinking.

Coconut Milk Chia Pudding

Recently, I embarked on a culinary adventure that introduced a new favorite to our family’s dessert repertoire: Coconut Milk Chia Pudding. This delightful dish was met with enthusiastic approval from everyone at the table, from the youngest to the oldest. The creamy texture paired with the subtle sweetness of coconut milk creates a perfect harmony of flavors that somehow feels indulgent yet light. My family loved how versatile it was, allowing for a myriad of toppings like fresh fruits, nuts, and honey, which each person could customize to their liking. This pudding not only satiated our sweet tooth but also sparked a conversation about the health benefits of chia seeds, making it a wholesome addition to our meal plan.

Ingredients

To create this delightful Coconut Milk Chia Pudding, you will need the following ingredients:

  • 1 cup of coconut milk
  • 3 tablespoons of chia seeds
  • 1 tablespoon of maple syrup or honey
  • 1 teaspoon of vanilla extract
  • A pinch of salt
  • Fresh fruits, nuts, or coconut flakes for topping

These ingredients come together to create a simple yet flavorful base that can be customized to suit your taste preferences.

Instructions

Making Coconut Milk Chia Pudding is a straightforward process that requires minimal effort but yields delicious results. Follow these steps to create your own batch:

  1. In a mixing bowl, combine the coconut milk, chia seeds, maple syrup, vanilla extract, and a pinch of salt. Stir well to ensure the chia seeds are evenly distributed.
  2. Cover the bowl and refrigerate the mixture for at least 4 hours, or overnight, to allow the chia seeds to absorb the liquid and thicken.
  3. Before serving, give the pudding a good stir to break up any clumps and achieve a smooth consistency.
  4. Serve the pudding in individual bowls or jars, and top with your choice of fresh fruits, nuts, or coconut flakes.
  5. Enjoy your delicious and nutritious Coconut Milk Chia Pudding!

This recipe is not only easy to follow but also encourages creativity with toppings, making it a fun activity for the whole family.

Nutrition Facts

This recipe yields approximately 4 servings. Each serving contains around 150 calories, making it a light yet satisfying dessert option. The main nutritional highlights include:

  • Omega-3 fatty acids from chia seeds
  • Natural sweetness from honey or maple syrup
  • Healthy fats from coconut milk

This pudding is a fantastic choice for those looking to maintain a balanced diet without sacrificing flavor.

Preparation Time

One of the most appealing aspects of Coconut Milk Chia Pudding is its simplicity in preparation. The active preparation time is less than 10 minutes, with the majority of the time spent allowing the pudding to set in the refrigerator. This makes it an ideal choice for busy individuals or families looking for a quick and healthy dessert option that can be prepared in advance.

How to Serve

Coconut Milk Chia Pudding can be served in a variety of ways, making it a versatile dessert that caters to different tastes:

  • Classic Style: Serve in a bowl with a sprinkle of coconut flakes on top.
  • Fruit Parfait: Layer the pudding with fresh berries or sliced bananas for a refreshing treat.
  • Tropical Delight: Top with mango slices and a drizzle of lime juice for a tropical twist.
  • Nutty Crunch: Add a handful of toasted almonds or walnuts for a crunchy texture.
  • Chocolate Lover: Mix in cocoa powder and top with chocolate chips for a rich, chocolatey dessert.

These serving suggestions highlight the versatility of the dish, allowing it to be tailored to fit any occasion or preference.

Additional Tips

To ensure your Coconut Milk Chia Pudding turns out perfectly every time, consider these additional tips:

  1. Consistency Check: If the pudding is too thick, add a bit more coconut milk to achieve your desired consistency.
  2. Sweetness Level: Adjust the amount of maple syrup or honey based on your personal preference for sweetness.
  3. Chia Seed Quality: Use fresh, high-quality chia seeds for the best results.
  4. Flavor Variations: Experiment with different extracts, such as almond or coconut, to add a unique twist.
  5. Batch Preparation: Make a larger batch and store it in the fridge for up to five days for a quick and easy dessert option throughout the week.

These tips will help you customize the pudding to your liking and ensure it remains a staple in your dessert rotation.

FAQ Section

Here are some frequently asked questions about Coconut Milk Chia Pudding:

  1. Can I use a different type of milk? Yes, you can substitute coconut milk with almond milk, cashew milk, or any other plant-based milk of your choice.
  2. How long does the pudding last in the refrigerator? The pudding can be stored in the refrigerator for up to five days, making it a great option for meal prep.
  3. Can I freeze the pudding? While it is possible to freeze the pudding, it may alter the texture slightly. It is best enjoyed fresh or refrigerated.
  4. What can I do if my pudding is too runny? If the pudding is too runny, try adding more chia seeds and letting it sit for an additional hour to thicken.
  5. Is this pudding suitable for a vegan diet? Yes, this pudding is vegan-friendly as long as you use maple syrup instead of honey.

These FAQs address common concerns and provide helpful solutions, making it easier for you to enjoy this delicious dessert.

Dairy-Free Banana Pancakes

Dairy-free banana pancakes have been a delightful addition to our family’s breakfast menu. With a soft, fluffy texture and a naturally sweet flavor, these pancakes have won over even the most discerning taste buds in our household. Not only are they incredibly delicious, but they also cater to those with lactose intolerance or those looking to reduce their dairy intake. The first time we made these pancakes, I was skeptical about how they would compare to traditional pancakes. However, after just one bite, I was convinced that these would become a staple in our home. The simplicity of the ingredients and the ease of preparation make them a winner for busy mornings. My family, particularly my kids, have given them rave reviews, often requesting them on weekends or special occasions.

Ingredients

To create these scrumptious dairy-free banana pancakes, you will need the following ingredients:

  • 2 ripe bananas, mashed
  • 1 cup all-purpose flour
  • 2 teaspoons baking powder
  • 1/2 teaspoon salt
  • 1 tablespoon sugar (optional for added sweetness)
  • 1 cup almond milk (or any non-dairy milk of your choice)
  • 1 tablespoon vegetable oil
  • 1 teaspoon vanilla extract
  • 1/2 teaspoon cinnamon (optional)

Instructions

Making these pancakes is a breeze, and the end result is well worth the effort. Follow these simple steps to whip up a batch of delicious dairy-free banana pancakes:

  1. In a mixing bowl, combine the mashed bananas with the almond milk, vegetable oil, and vanilla extract. Stir until well blended.
  2. In a separate bowl, whisk together the flour, baking powder, salt, sugar, and cinnamon.
  3. Slowly add the dry ingredients to the wet ingredients, mixing until just combined. Be careful not to overmix, as this can result in dense pancakes.
  4. Heat a non-stick skillet or griddle over medium heat. Lightly grease with oil or non-stick spray.
  5. Pour 1/4 cup of batter onto the skillet for each pancake. Cook until bubbles form on the surface, then flip and cook until golden brown on the other side.
  6. Repeat with the remaining batter, keeping the cooked pancakes warm in a low oven if necessary.
  7. Serve warm, topped with your favorite syrup, fresh fruit, or a dollop of dairy-free yogurt.

Nutrition Facts

This recipe yields approximately 8 pancakes, serving 4 people. Each serving contains roughly 150 calories, making it a healthy breakfast option that doesn’t skimp on flavor.

Preparation Time

The total preparation time for these pancakes is around 20 minutes. This includes about 10 minutes for gathering and mixing the ingredients, and another 10 minutes for cooking the pancakes. The quick turnaround time makes them an ideal choice for busy mornings when you want a wholesome, homemade breakfast without a lengthy cooking process.

How to Serve

Here are some serving suggestions to elevate your dairy-free banana pancakes to the next level:

  • Classic: Drizzle with maple syrup and top with a pat of dairy-free butter.
  • Berry Delight: Serve with a medley of fresh berries and a dusting of powdered sugar.
  • Nutty Crunch: Sprinkle with chopped nuts such as walnuts or almonds for added texture.
  • Tropical Twist: Add sliced bananas and a sprinkle of shredded coconut.
  • Chocolate Indulgence: Include a handful of dairy-free chocolate chips in the batter for a sweet surprise.

Additional Tips

Here are some tips to ensure your dairy-free banana pancakes turn out perfectly every time:

  1. Ripeness of Bananas: Use bananas that are ripe but not overly mushy. They should have some brown spots for optimal sweetness.
  2. Consistency of Batter: The batter should be thick but pourable. Adjust with a splash more almond milk if needed.
  3. Cooking Temperature: Keep the skillet at medium heat to ensure pancakes cook evenly without burning.
  4. Resting Batter: Let the batter rest for a few minutes before cooking to allow the baking powder to activate.
  5. Storage: Leftover pancakes can be stored in an airtight container in the fridge for up to 2 days or frozen for longer storage.

FAQ Section

  1. Can I use a different type of flour? Yes, you can substitute whole wheat flour, spelt flour, or a gluten-free blend for a different texture and flavor.
  2. What non-dairy milk works best? Almond milk is a popular choice, but you can also use soy, oat, or coconut milk depending on your preference.
  3. Can I make the batter ahead of time? While it’s best to use the batter fresh, you can prepare it a few hours in advance and store it in the fridge until ready to cook.
  4. How can I make these pancakes more filling? Consider adding a tablespoon of chia seeds or flaxseeds to the batter for extra fiber and nutrients.
  5. Are these pancakes suitable for freezing? Yes, allow the pancakes to cool completely before freezing them in a single layer on a baking sheet. Once frozen, transfer them to a freezer-safe bag or container.

Black Bean Brownies

When I first stumbled upon the idea of black bean brownies, I was admittedly skeptical. The thought of incorporating beans into a dessert seemed unconventional and frankly, a little strange. However, the trend piqued my curiosity, and I decided to give it a try. Much to my surprise, the brownies turned out to be a delightful treat that my family couldn’t get enough of. The rich, fudgy texture combined with a subtle hint of sweetness was a hit at our family gathering. Even the kids, who are notoriously picky eaters, couldn’t resist going back for seconds. The recipe has since become a staple in our household, offering a healthier alternative to traditional brownies without sacrificing taste.

Ingredients

To make these delectable black bean brownies, you’ll need the following ingredients:

  • 1 can (15 oz) of black beans, drained and rinsed
  • 3 large eggs
  • 1/2 cup of unsweetened cocoa powder
  • 3/4 cup of sugar
  • 1 tablespoon of vegetable oil
  • 1 teaspoon of vanilla extract
  • 1/2 teaspoon of baking powder
  • 1/4 teaspoon of salt
  • 1/2 cup of chocolate chips (optional)

Instructions

Start by preheating your oven to 350°F (175°C). While the oven is heating, prepare your baking dish by lining it with parchment paper or lightly greasing it. This will prevent the brownies from sticking and make clean-up easier.

Next, place the black beans, eggs, cocoa powder, sugar, vegetable oil, vanilla extract, baking powder, and salt into a blender or food processor. Blend the ingredients until the mixture is smooth and well combined. This step is crucial to ensure that the black beans are fully pureed, as any chunks could alter the texture of the brownies.

Once blended, pour the batter into your prepared baking dish, spreading it evenly with a spatula. If you’re using chocolate chips, sprinkle them evenly over the top of the batter. This will add pockets of gooey chocolate goodness throughout the brownies as they bake.

Bake the brownies in the preheated oven for 20-25 minutes, or until a toothpick inserted into the center comes out mostly clean. It’s okay if a few crumbs stick to the toothpick, as this indicates the brownies will be fudgy. Be careful not to overbake, as this can result in dry brownies.

Allow the brownies to cool in the pan for about 10 minutes before transferring them to a wire rack to cool completely. This cooling period helps the brownies set and makes them easier to cut into squares.

Nutrition Facts

This recipe yields approximately 12 servings, with each serving containing about 150 calories. These brownies are a healthier alternative to traditional recipes, offering a lower calorie count while still providing a rich and satisfying treat.

Preparation Time

The total preparation time for these black bean brownies is around 40 minutes. This includes about 10 minutes of prep time and 20-25 minutes of baking time. The quick preparation makes this recipe ideal for those who want a delicious dessert without spending hours in the kitchen.

How to Serve

  • As a dessert: Serve the brownies warm with a scoop of vanilla ice cream for an indulgent treat.
  • With coffee: Pair a brownie with your morning coffee for a sweet start to your day.
  • At gatherings: Cut the brownies into bite-sized pieces for a party-friendly dessert option.
  • With a drizzle: Add a drizzle of caramel or chocolate sauce for extra decadence.
  • With fruit: Serve alongside fresh berries for a refreshing contrast.

Additional Tips

  1. Use fresh beans: If you have time, cook your own black beans instead of using canned for a fresher taste.
  2. Experiment with sweeteners: Try substituting sugar with honey or maple syrup for a different flavor profile.
  3. Add nuts: Incorporate chopped walnuts or pecans for added texture and a nutty flavor.
  4. Consider dietary needs: Use gluten-free baking powder to make the recipe gluten-free.
  5. Store properly: Keep brownies in an airtight container to maintain freshness.

FAQ Section

Can I use a different type of bean?

Yes, while black beans are the traditional choice for this recipe, you can experiment with other beans like kidney beans or chickpeas. Each type will bring its unique texture and flavor to the brownies.

Can I make these brownies vegan?

Absolutely! Replace the eggs with flax eggs or a commercial egg replacer. Ensure that your chocolate chips are dairy-free as well.

How should I store leftover brownies?

Store leftover brownies in an airtight container at room temperature for up to 3 days. For longer storage, you can refrigerate them for up to a week or freeze them for up to 3 months.

What if I don’t have a blender?

If you don’t have a blender or food processor, you can mash the beans with a potato masher and mix the ingredients by hand. The texture might be slightly different, but the brownies will still be delicious.

Can I add other flavors?

Yes, feel free to add flavors like cinnamon, espresso powder, or even a splash of rum extract to enhance the taste of your brownies. Adjust the quantities to suit your preference.

Gluten-Free Pumpkin Pancakes

As the autumn leaves turn shades of amber and gold, the comforting aroma of pumpkin spice begins to fill homes across the nation. In my household, the seasonal transition is marked by the warm, inviting scent of gluten-free pumpkin pancakes sizzling on the griddle. This delightful breakfast option has become a family favorite, pleasing even the pickiest of eaters with its fluffy texture and rich, spiced flavor. My family, who usually approaches gluten-free recipes with a hint of skepticism, was pleasantly surprised by how these pancakes not only matched but exceeded their expectations of a traditional pancake breakfast. The ease of preparation combined with the pancakes’ ability to capture the essence of fall made this recipe a cherished staple in our weekend brunch repertoire.

Ingredients

The success of these gluten-free pumpkin pancakes begins with the careful selection of ingredients. Each component is chosen to enhance flavor and ensure the perfect texture. For this recipe, you will need:

  • 1 cup of gluten-free all-purpose flour blend
  • 1 tablespoon of baking powder
  • 1/2 teaspoon of baking soda
  • 1/4 teaspoon of salt
  • 1 teaspoon of ground cinnamon
  • 1/2 teaspoon of ground nutmeg
  • 1/4 teaspoon of ground ginger
  • 1 cup of pumpkin puree
  • 2 tablespoons of melted coconut oil or unsalted butter
  • 1 large egg
  • 3/4 cup of milk (dairy or non-dairy)
  • 2 tablespoons of maple syrup or honey
  • 1 teaspoon of vanilla extract

This blend of ingredients not only guarantees a gluten-free dish but also ensures that the pancakes are every bit as fluffy and flavorful as their gluten-containing counterparts.

Instructions

Creating these pancakes is a straightforward process that even novice chefs can master. Begin by preheating your griddle or a large skillet over medium heat, ensuring it is ready for cooking once the batter is prepared.

In a large mixing bowl, combine the dry ingredients: the gluten-free flour blend, baking powder, baking soda, salt, cinnamon, nutmeg, and ginger. Whisk these together until well mixed.

In a separate bowl, whisk together the wet ingredients: pumpkin puree, melted coconut oil (or butter), egg, milk, maple syrup, and vanilla extract. Stir until smooth and well combined.

Gradually add the dry mixture to the wet ingredients, stirring gently until just combined. Be cautious not to over-mix, as this can lead to dense pancakes.

Lightly grease the griddle or skillet with oil or butter. Pour about 1/4 cup of batter per pancake onto the griddle. Cook for 2-3 minutes until bubbles form on the surface and the edges are set, then flip and cook for an additional 2 minutes until golden brown.

Serve immediately, or keep warm in a low oven until ready to serve.

Nutrition Facts

This recipe yields approximately 4 servings, with each serving comprising about 2 pancakes. Each serving contains around 250 calories, making it a satisfying yet relatively healthy breakfast option. The nutritional composition of these pancakes offers a good balance of carbohydrates, healthy fats, and protein, making them a great start to your day.

Preparation Time

The beauty of this recipe lies in its efficiency. From start to finish, these gluten-free pumpkin pancakes can be prepared in approximately 30 minutes. This quick preparation time makes them an ideal choice for both leisurely weekend brunches and busy weekday mornings when time is of the essence.

How to Serve

  • Top with a dollop of whipped cream and a sprinkle of cinnamon for a decadent touch.
  • Drizzle with pure maple syrup for classic sweetness.
  • Add a handful of toasted pecans or walnuts for a nutty crunch.
  • Serve with a side of fresh fruit, such as sliced bananas or berries, for added freshness.
  • Pair with a warm cup of apple cider or pumpkin spice latte to complement the flavors.

Additional Tips

  1. Use Fresh Ingredients: Ensure your baking powder and baking soda are fresh to achieve the best rise and fluffiness in your pancakes.
  2. Rest the Batter: Allow the batter to rest for a few minutes after mixing. This helps to relax the gluten-free flour and results in a lighter texture.
  3. Adjust Consistency: If the batter is too thick, add a splash more milk. Conversely, if it’s too thin, add a bit more flour.
  4. Temperature Control: Maintain a steady medium heat to ensure even cooking without burning the pancakes.
  5. Experiment with Spices: Feel free to adjust the spices to your taste, adding more cinnamon or a pinch of cloves for a different flavor profile.

FAQ Section

  1. Can I make the batter ahead of time?

    Yes, you can prepare the batter the night before and refrigerate it. Just give it a good stir before cooking, as gluten-free flours can settle.

  2. What can I use instead of pumpkin puree?

    If you’re out of pumpkin puree, sweet potato or butternut squash puree can be a great alternative.

  3. Can these pancakes be frozen?

    Absolutely! Allow the pancakes to cool completely, then layer them with parchment paper and freeze in an airtight container. Reheat in a toaster or oven.

  4. How can I make these vegan?

    To make vegan pumpkin pancakes, use a flax egg (1 tablespoon of flaxseed meal + 2.5 tablespoons of water) instead of the egg, and non-dairy milk.

  5. Is there a substitute for coconut oil?

    If you prefer not to use coconut oil, unsalted butter or a neutral oil like canola or vegetable oil will work just fine.

Baked Sweet Potato Fries

Baked sweet potato fries have been a game-changer in our household, offering a healthier alternative to traditional fried potatoes without sacrificing flavor or texture. When I first introduced this dish to my family, there was a level of skepticism. However, after one bite, their doubts were replaced with delight. The sweet potatoes, roasted to a perfect crisp and seasoned with a blend of aromatic spices, were a hit at the dinner table. The natural sweetness of the potatoes is enhanced by the caramelization that occurs during baking, creating a deliciously savory and sweet combination that is hard to resist. This dish quickly became a staple in our weekly meal rotation, loved by adults and children alike.

Ingredients

The perfect batch of baked sweet potato fries starts with selecting the right ingredients. You’ll need:

  • 3 large sweet potatoes
  • 2 tablespoons of olive oil
  • 1 teaspoon of smoked paprika
  • 1/2 teaspoon of garlic powder
  • 1/2 teaspoon of salt
  • 1/4 teaspoon of black pepper
  • Optional: 1/4 teaspoon of cayenne pepper for a spicy kick

Instructions

Creating these crispy delights is simple and straightforward. Follow these steps for the best results:

  1. Preheat the oven: Set your oven to 425°F (220°C). This high heat is essential for achieving that crispy exterior.
  2. Prepare the sweet potatoes: Peel the sweet potatoes and cut them into even-sized strips. Aim for about 1/4 inch thickness for optimal crispiness.
  3. Season the fries: In a large bowl, toss the sweet potato strips with olive oil, ensuring each piece is lightly coated. Add the smoked paprika, garlic powder, salt, and black pepper. If you prefer a spicier flavor, add cayenne pepper to taste.
  4. Arrange on a baking sheet: Spread the fries out in a single layer on a baking sheet lined with parchment paper. Make sure they are not overlapping, which allows them to cook evenly and become crispy.
  5. Bake: Place the baking sheet in the preheated oven and bake for 25-30 minutes. Halfway through, flip the fries to ensure even cooking. Keep an eye on them during the last few minutes to prevent burning. They are done when they are golden brown and crispy.
  6. Serve: Remove from the oven and let them cool slightly before serving. These fries are best enjoyed fresh and hot.

Nutrition Facts

This recipe serves approximately 4 people, with each serving containing about 180 calories. This makes it a guilt-free indulgence, offering the satisfaction of fries without the excess calories and fat found in traditional versions.

Preparation Time

The preparation time for baked sweet potato fries is relatively quick, making it a convenient option for busy weeknights. You can expect to spend about 10 minutes on preparation and 25-30 minutes on baking, totaling around 40 minutes from start to finish.

How to Serve

Baked sweet potato fries are versatile and can be served in a variety of ways to suit any meal:

  • As a side dish: Pair them with your favorite grilled meats or sandwiches for a wholesome meal.
  • With a dipping sauce: Serve alongside a tangy yogurt dip or spicy ketchup to complement the flavors.
  • As a snack: Enjoy them on their own as a healthy snack option.
  • Topped with cheese: Add a sprinkle of parmesan or cheddar for an extra indulgent treat.
  • In a salad: Toss them into a salad for added texture and flavor.

Additional Tips

To ensure the success of your baked sweet potato fries, keep these tips in mind:

  1. Choose the right sweet potatoes: Look for firm, smooth, and evenly shaped sweet potatoes for easier cutting and uniform cooking.
  2. Cut evenly: Ensure all fries are cut to the same thickness to guarantee they cook at the same rate.
  3. Don’t overcrowd the baking sheet: Overlapping fries can lead to steaming instead of crisping, so use multiple sheets if necessary.
  4. Adjust seasoning to taste: Feel free to experiment with different herbs and spices to suit your preference.
  5. Use parchment paper: This prevents sticking and makes for easy cleanup.

FAQ Section

Below are some frequently asked questions about baked sweet potato fries:

  1. Can I make sweet potato fries in an air fryer? Yes, you can! Adjust the cooking time to about 15-20 minutes, shaking the basket halfway through.
  2. How do I store leftovers? Store any leftovers in an airtight container in the refrigerator for up to 3 days. Reheat them in the oven to retain their crispiness.
  3. Can I freeze sweet potato fries? Yes, you can freeze them. After baking, let them cool completely, then freeze in a single layer on a baking sheet. Once frozen, transfer to a freezer-safe bag or container. Reheat in the oven directly from frozen.
  4. What if my fries aren’t crispy? Ensure your oven is hot enough and that the fries are spread out in a single layer. Also, try increasing the baking time slightly and flipping them more often.
  5. Are sweet potato fries healthier than regular fries? Sweet potato fries are generally considered healthier due to their higher fiber content and lower glycemic index, but the healthiness also depends on the preparation method.

Flourless Peanut Butter Cookies

The aroma of freshly baked cookies wafting through the kitchen is a simple pleasure that brings everyone together. Among the myriad of cookie recipes, flourless peanut butter cookies stand out for their simplicity and rich flavor. Recently, I decided to try this recipe on a family gathering, and it was an absolute hit. The cookies were delightfully chewy, with a perfect balance of sweet and salty that made everyone reach for seconds. The absence of flour not only made them gluten-free but also intensified the peanut butter flavor, which was a big win for the peanut butter lovers in my family. This recipe has quickly become a staple in our household, cherished for both its ease and the joy it brings.

Ingredients

To create these delicious flourless peanut butter cookies, you will need the following ingredients:

  • 1 cup of creamy peanut butter (natural or regular)
  • 3/4 cup of granulated sugar or brown sugar
  • 1 large egg
  • 1 teaspoon of baking soda
  • 1 teaspoon of vanilla extract
  • A pinch of salt (optional, to taste)

These simple ingredients come together to create a cookie that is both rich in flavor and satisfying in texture. The use of natural peanut butter can enhance the nutty taste, while regular peanut butter adds a touch of creaminess. Adjust the sugar according to your sweetness preference, and consider adding a pinch of salt if you want to balance the flavors even further.

Instructions

Follow these steps to make your own batch of flourless peanut butter cookies:

  1. Preheat your oven to 350°F (175°C) and line a baking sheet with parchment paper.
  2. In a large mixing bowl, combine the peanut butter, sugar, egg, baking soda, and vanilla extract. Stir the ingredients together until the mixture is smooth and well combined.
  3. Using a spoon or a cookie scoop, drop tablespoon-sized portions of the dough onto the prepared baking sheet. Leave at least 2 inches of space between each cookie to allow for spreading.
  4. For a classic peanut butter cookie appearance, use a fork to gently press down on each ball of dough, creating a crisscross pattern.
  5. Bake in the preheated oven for 10-12 minutes, or until the edges are lightly golden. Be careful not to overbake, as the cookies will continue to firm up as they cool.
  6. Remove the cookies from the oven and let them cool on the baking sheet for about 5 minutes before transferring them to a wire rack to cool completely.

These cookies are best enjoyed once they have cooled, allowing their chewy texture to fully develop. Store any leftovers in an airtight container at room temperature for up to a week.

Nutrition Facts

This recipe yields approximately 12 cookies, with each serving containing around 150 calories. The calorie count is a rough estimate and can vary based on the specific brands of ingredients used. These cookies are a great option for those looking for a gluten-free dessert or a simple treat without the fuss of traditional baking.

Preparation Time

The total preparation time for these flourless peanut butter cookies is about 20-25 minutes. This includes around 5-10 minutes of prep time to mix the ingredients and 10-12 minutes of baking time. The simplicity of the recipe makes it perfect for quick, last-minute dessert cravings or when you’re short on time but still want to enjoy a homemade treat.

How to Serve

These cookies are versatile and can be served in various delightful ways:

  • Enjoy them warm with a glass of cold milk for a classic pairing.
  • Top them with a scoop of vanilla ice cream for a decadent dessert.
  • Serve them alongside a cup of coffee or tea for a delightful afternoon snack.
  • Crumble them over a bowl of yogurt or oatmeal for a crunchy topping.
  • Gift them in a decorative tin for a homemade present.

Additional Tips

  1. Use room temperature ingredients: Ensuring your peanut butter and egg are at room temperature can help the dough come together more smoothly.
  2. Experiment with add-ins: Try adding chocolate chips or chopped nuts to the dough for extra texture and flavor.
  3. Adjust sweetness: If you prefer your cookies less sweet, reduce the sugar by a couple of tablespoons without compromising the texture.
  4. Use parchment paper: Lining your baking sheet with parchment paper helps prevent the cookies from sticking and makes cleanup easier.
  5. Cooling is key: Allow the cookies to cool on the baking sheet before transferring them to a wire rack, as they can be fragile when hot.

FAQ Section

Q: Can I use a different nut butter instead of peanut butter?

A: Yes, you can substitute peanut butter with almond butter, cashew butter, or sunflower seed butter. Keep in mind that this may alter the flavor and texture slightly.

Q: How can I make these cookies dairy-free?

A: This recipe is already dairy-free as long as you use a dairy-free brand of peanut butter. Check the label to ensure no dairy ingredients are added.

Q: Can I freeze the dough?

A: Yes, you can freeze the cookie dough. Scoop the dough into portions, place them on a baking sheet, and freeze until solid. Transfer to a freezer bag and store for up to 3 months. Bake from frozen, adding a couple of minutes to the baking time.

Q: Is it possible to make this recipe vegan?

A: To make vegan cookies, you can try replacing the egg with a flax egg (1 tablespoon of ground flaxseed mixed with 2.5 tablespoons of water and allowed to sit for a few minutes).

Q: Can I reduce the sugar in the recipe?

A: Yes, you can reduce the sugar, but keep in mind that this may affect the sweetness and texture of the cookies. Start by reducing it by a quarter and adjust to your taste preference.