Flourless Peanut Butter Cookies

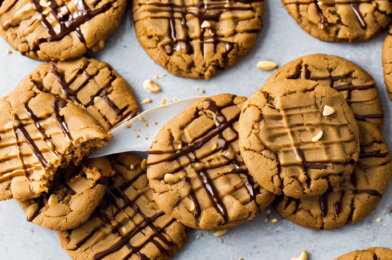
Have you ever stumbled upon a recipe that instantly becomes a family favorite? That’s exactly how I felt when I discovered the delightful world of flourless peanut butter cookies. As a self-proclaimed cookie enthusiast, I was drawn to this recipe not only for its simplicity but also for its promise of rich peanut butter flavor packed into every bite. These cookies quickly became a staple in my household, winning over even the most skeptical eaters with their chewy texture and intense nutty taste. My family couldn’t get enough of them, and now, I can’t wait to share this gem with you.

Ingredients

To begin your journey into the world of flourless peanut butter cookies, you’ll need a handful of simple ingredients that you likely already have in your kitchen. This recipe is a testament to the fact that deliciousness doesn’t have to be complicated:

  • 1 cup of creamy or chunky peanut butter
  • 1 cup of granulated sugar
  • 1 large egg
  • 1 teaspoon of vanilla extract
  • 1/2 teaspoon of baking soda
  • A pinch of salt (optional)

These ingredients come together to create a magical cookie dough that requires no flour, making it perfect for those following a gluten-free diet or anyone looking to cut back on refined carbohydrates. The simplicity of this ingredient list is part of what makes these cookies so appealing, allowing the peanut butter to truly shine.

Instructions

Making flourless peanut butter cookies is as easy as it gets. Here’s how you can whip up a batch in no time:

  1. Preheat your oven: Start by preheating your oven to 350°F (175°C). Line a baking sheet with parchment paper for easy cleanup.
  2. Mix the ingredients: In a medium bowl, combine the peanut butter, sugar, egg, vanilla extract, baking soda, and salt if using. Stir until the mixture is smooth and well combined.
  3. Shape the cookies: Using a tablespoon or cookie scoop, portion out the dough onto the prepared baking sheet, leaving about 2 inches of space between each cookie. Use a fork to gently press down on each ball of dough, creating a crisscross pattern.
  4. Bake: Place the baking sheet in the preheated oven and bake for 10-12 minutes or until the edges are golden brown. Keep an eye on them to ensure they don’t overbake.
  5. Cool: Remove the cookies from the oven and allow them to cool on the baking sheet for a few minutes before transferring them to a wire rack to cool completely.

And there you have it! In just a few simple steps, you’ve created a batch of irresistible flourless peanut butter cookies that are sure to disappear quickly.

Nutrition Facts

When indulging in these flourless peanut butter cookies, it’s helpful to know what you’re consuming. This recipe yields approximately 12 cookies, with each cookie containing around 150 calories. Keep in mind that these numbers can vary slightly based on the specific brands of peanut butter and sugar you use. However, the nutritional value remains relatively consistent, offering a tasty treat that can fit into a balanced diet when enjoyed in moderation.

Preparation Time

One of the many advantages of this recipe is its quick preparation time. From start to finish, you can have a batch of cookies ready in just about 20 minutes. With only a few minutes needed for mixing the ingredients and forming the cookies, followed by a short baking time, these cookies are perfect for those moments when you crave something sweet but don’t want to spend hours in the kitchen. The simplicity and speed of this recipe make it an ideal choice for last-minute gatherings or a spontaneous treat.

How to Serve

Flourless peanut butter cookies are incredibly versatile when it comes to serving. Here are a few ways you can enjoy them:

  • Classic Style: Enjoy them on their own as a satisfying snack or dessert.
  • With Ice Cream: Serve them warm with a scoop of vanilla ice cream for a decadent treat.
  • Sandwich Cookies: Spread a layer of your favorite jam or chocolate spread between two cookies for a delicious sandwich.
  • Crumbled Topping: Crumble the cookies over yogurt or oatmeal for added texture and flavor.
  • Gift-Worthy: Package them in a decorative tin or box for a thoughtful homemade gift.

Additional Tips

To elevate your flourless peanut butter cookie experience, consider these tips:

  1. Choose Quality Peanut Butter: Opt for natural peanut butter without added sugars or oils for the best flavor and texture.
  2. Chill the Dough: For thicker cookies, chill the dough in the refrigerator for 30 minutes before baking.
  3. Experiment with Add-ins: Try adding chocolate chips, chopped nuts, or dried fruit to the dough for extra flavor.
  4. Use a Cookie Scoop: A cookie scoop ensures uniform cookies, which bake more evenly.
  5. Store Properly: Keep cookies in an airtight container at room temperature for up to a week, or freeze them for longer storage.

FAQ Section

Here are some common questions about flourless peanut butter cookies:

1. Can I use a sugar substitute in this recipe? Yes, you can use sugar substitutes like erythritol or stevia, but keep in mind that this might affect the texture and taste slightly.

2. Are these cookies suitable for someone with a peanut allergy? Unfortunately, this recipe is not suitable for those with peanut allergies. Consider using a different nut or seed butter as an alternative.

3. Can I make these cookies vegan? To make these cookies vegan, replace the egg with a flax egg (1 tablespoon of flaxseed meal mixed with 2.5 tablespoons of water) and ensure your sugar is vegan-friendly.

4. Why are my cookies falling apart? If your cookies are too crumbly, it may be due to overbaking. Ensure they are just golden around the edges and allow them to cool before handling.

5. How can I make the cookies chewier? For chewier cookies, slightly underbake them or add a tablespoon of honey or molasses to the dough for added moisture.

With this comprehensive guide, you’re well-equipped to make and enjoy the perfect batch of flourless peanut butter cookies. Happy baking!

Greek Yogurt Parfait with Nuts

Greek yogurt parfaits have become a staple in my household, and it’s not just because they’re incredibly easy to make. The combination of creamy Greek yogurt, crunchy nuts, and a hint of sweetness is a hit with everyone, from the youngest to the oldest in the family. Each spoonful brings a delightful mix of textures and flavors that makes breakfast or snack time something to look forward to. Whether we’re rushing out the door in the morning or need a quick afternoon pick-me-up, this parfait is our go-to choice. The kids love assembling their own, adding a personal touch with their favorite toppings, while the adults appreciate the balanced nutrition it offers.

Ingredients

The beauty of a Greek yogurt parfait lies in its simplicity and versatility. To make a basic version, you’ll need the following ingredients:

  • 1 cup of Greek yogurt: Choose your preferred thickness and fat content. Full-fat yogurt provides a richer taste, while low-fat versions offer a lighter option.
  • 2 tablespoons of honey: This adds a natural sweetness to the parfait. You can adjust the amount based on your taste preference.
  • 1/2 cup of granola: For crunch and texture. Opt for a granola that complements your favorite flavors, whether it’s nutty, fruity, or chocolatey.
  • 1/4 cup of mixed nuts: Almonds, walnuts, and pecans work wonderfully. They add healthy fats and a satisfying crunch.
  • 1/2 cup of fresh berries: Strawberries, blueberries, or raspberries add a burst of color and freshness.
  • 1 teaspoon of chia seeds (optional): These tiny seeds add an extra boost of fiber and Omega-3s.

Instructions

Creating a Greek yogurt parfait is as straightforward as layering your favorite ingredients. Here’s how you can make your own parfait:

  1. Prepare your ingredients: Wash and dry the berries, chop the nuts if they’re not already in small pieces, and have everything measured out and ready to go.
  2. Layer the yogurt: Start by spooning half of the Greek yogurt into the bottom of a glass or bowl.
  3. Add the sweetener: Drizzle one tablespoon of honey over the yogurt layer. Adjust the sweetness to your liking.
  4. Include the crunch: Sprinkle half of the granola and nuts over the yogurt and honey.
  5. Add berries: Layer half of the fresh berries on top of the granola.
  6. Repeat the layers: Add another layer of yogurt, honey, granola, nuts, and berries.
  7. Finish with toppings: Sprinkle chia seeds on top for an extra nutritional boost.
  8. Serve immediately: Enjoy your parfait right away to keep the granola crunchy.

Nutrition Facts

Understanding the nutritional content of your meals is essential for maintaining a balanced diet. Here’s a breakdown of the nutrition facts for this Greek yogurt parfait recipe:

  • Servings: This recipe serves 1, but you can easily double or triple the ingredients to serve more people.
  • Calories per serving: Approximately 350 calories, depending on the specific brands and types of ingredients used.
  • Protein: Packed with around 20 grams of protein, this parfait is an excellent choice for a post-workout snack.
  • Carbohydrates: The parfait contains about 40 grams of carbohydrates, providing energy to power through your day.
  • Fats: With healthy fats from the nuts and yogurt, it totals around 15 grams of fat per serving.
  • Fiber: Adding chia seeds and berries boosts the fiber content to approximately 8 grams.

Preparation Time

One of the best things about this Greek yogurt parfait is how quickly it comes together. You can have a nutritious and satisfying meal ready in just a few minutes:

  • Prep time: 5 minutes
  • Total time: 5 minutes

This makes it perfect for busy mornings or when you need a quick snack. Plus, you can prepare the ingredients ahead of time, so all that’s left to do is assemble and enjoy.

How to Serve

Serving a Greek yogurt parfait can be as creative or as simple as you’d like. Here are some ideas to make your parfait special:

  • In a glass tumbler: Layer the ingredients in a clear glass to show off the beautiful layers.
  • In a mason jar: Perfect for a grab-and-go breakfast. Just screw on the lid and take it with you.
  • In a bowl: If you prefer to mix everything together, serving in a bowl allows you to stir and enjoy all the flavors in each bite.
  • With a spoon: Use a long spoon for easy access to every layer in a tall glass or mason jar.
  • As a dessert: Add a dollop of whipped cream or a sprinkle of dark chocolate shavings for a decadent finishing touch.

Additional Tips

To elevate your Greek yogurt parfait experience, consider these additional tips:

  • Experiment with flavors: Try different types of yogurt, such as vanilla or honey-flavored, for a unique twist.
  • Use seasonal fruits: Take advantage of fresh, in-season fruits to add natural sweetness and vibrant color.
  • Make it vegan: Substitute Greek yogurt with coconut or almond yogurt and use maple syrup instead of honey.
  • Prepare ahead: Pre-portion your ingredients in separate containers to make assembly even faster in the morning.
  • Get creative with toppings: Add shredded coconut, dried fruits, or seeds to tailor the parfait to your liking.

FAQ Section

Here are some frequently asked questions about Greek yogurt parfaits:

  1. Can I make Greek yogurt parfaits ahead of time?

    Yes, you can prepare parfaits the night before and store them in the refrigerator. However, to keep the granola crunchy, add it just before serving.

  2. What is the best type of yogurt to use?

    Any Greek yogurt will work, but full-fat yogurt will give you a creamier texture. Choose a brand with minimal added sugars for a healthier option.

  3. Can I use frozen berries?

    Yes, frozen berries can be used in place of fresh ones. They may release some juice as they thaw, adding flavor to the yogurt.

  4. How can I make my parfait more filling?

    Add a spoonful of nut butter or a sliced banana to increase the protein and fiber content, making the parfait more satiating.

  5. Are there any nut-free options?

    Absolutely! Replace nuts with seeds like sunflower or pumpkin seeds for a nut-free version.

Spaghetti Squash Carbonara

When I first stumbled upon the concept of Spaghetti Squash Carbonara, I was both intrigued and skeptical. Known for its classic creaminess and decadence, traditional carbonara is a dish I’ve cherished for years. However, the idea of substituting pasta with spaghetti squash piqued my curiosity. One chilly Friday evening, I decided to prepare this dish for my family, who are ardent pasta lovers. To my delight, the response was overwhelmingly positive. Each forkful delivered the same comforting flavors that we adore in a classic carbonara, but with a lighter twist. The spaghetti squash brought a subtle sweetness to the dish, balancing out the richness of the sauce. It was a hit, and requests for this version of carbonara have since become a regular occurrence in our household.

Ingredients

The ingredients for Spaghetti Squash Carbonara are straightforward and mostly pantry staples. You will need:

  • 1 large spaghetti squash
  • 2 tablespoons of olive oil
  • Salt and freshly ground black pepper, to taste
  • 4 ounces of pancetta or bacon, diced
  • 2 large eggs
  • 1 cup of grated Parmesan cheese
  • 2 cloves of garlic, minced
  • 1/4 cup of heavy cream (optional, for extra creaminess)
  • Fresh parsley, chopped, for garnish

Instructions

Begin by preheating your oven to 400°F (200°C). Cut the spaghetti squash in half lengthwise and scoop out the seeds. Drizzle the insides with olive oil and season with salt and pepper. Place the squash halves cut-side down on a baking sheet and roast in the oven for about 40 minutes, or until the squash is tender and easily pierced with a fork.

While the squash is roasting, prepare the carbonara sauce. In a large skillet, cook the diced pancetta over medium heat until it is crispy. Remove the pancetta from the skillet and set it aside on a paper towel to drain excess fat. In the same skillet, add the minced garlic and sauté until fragrant.

In a mixing bowl, whisk together the eggs, Parmesan cheese, and heavy cream, if using. Slowly add the egg mixture to the skillet with the garlic, stirring constantly to create a creamy sauce. Return the pancetta to the skillet and combine. Season with salt and pepper to taste. Keep the sauce warm over low heat while you prepare the squash.

Once the spaghetti squash is done roasting, use a fork to scrape out the strands into the skillet with the carbonara sauce. Toss everything together gently, ensuring the squash is well coated with the sauce. Serve immediately, garnished with fresh parsley and additional Parmesan if desired.

Nutrition Facts

This recipe serves approximately four people, with each serving containing approximately 300 calories. The nutritional content is a rough estimate and can vary based on the specific ingredients used.

Preparation Time

The total preparation time for Spaghetti Squash Carbonara is around 60 minutes. This includes 15 minutes for ingredient preparation and 45 minutes for cooking, which allows for the full roasting of the squash and assembly of the dish.

How to Serve

  • As a Main Dish: Spaghetti Squash Carbonara is filling enough to be served on its own as a main course. Pair it with a light side salad for a balanced meal.
  • With Garlic Bread: Serve with a side of garlic bread to soak up the creamy sauce. The crunch of the bread complements the softness of the spaghetti squash.
  • With a Protein: Add grilled chicken or shrimp on top for an extra boost of protein.
  • With Wine: A crisp white wine, such as Pinot Grigio or Sauvignon Blanc, pairs wonderfully with this dish.
  • For Brunch: This dish can also be served as a hearty brunch option, accompanied by poached eggs.

Additional Tips

  1. Choosing the Right Squash: Select a spaghetti squash that feels firm and heavy for its size, with a golden yellow color.
  2. Cooking Time: Adjust the roasting time of the squash depending on its size. Larger squashes may require additional time in the oven.
  3. Flavor Enhancements: Feel free to add herbs like thyme or sage to the sauce for added flavor depth.
  4. Vegan Option: Replace the pancetta with smoked tofu and use nutritional yeast instead of Parmesan for a vegan version.
  5. Storing Leftovers: Store any leftovers in an airtight container in the refrigerator for up to three days. Reheat gently on the stovetop to avoid scrambling the eggs.

FAQ Section

Q: Can I use other types of squash for this recipe?

A: While spaghetti squash is ideal due to its unique texture, you can experiment with other hard squashes. However, be aware that the texture and flavor may differ significantly.

Q: Is it necessary to include heavy cream in the sauce?

A: No, heavy cream is optional. The eggs and Parmesan cheese provide enough creaminess. The cream can be added for an extra luxurious texture if desired.

Q: Can I prepare this dish in advance?

A: It’s best to prepare Spaghetti Squash Carbonara fresh to enjoy the optimal texture. However, you can roast the squash in advance and store it in the fridge, then assemble the dish when ready to serve.

Q: How do I prevent the spaghetti squash from becoming too watery?

A: To avoid watery squash, ensure you roast the squash until it’s just tender and avoid overcooking it. Let it cool slightly before scraping out the strands, which can help reduce moisture.

Q: Can I use a different type of cheese?

A: Yes, you can substitute Parmesan with Pecorino Romano for a sharper flavor, or use a mix of both to complement the dish.

Homemade Energy Balls

There’s something truly delightful about crafting a snack that is not only delicious but also packed with energy-boosting nutrients. Homemade energy balls are the epitome of such a snack, offering a convenient and healthy option for those on the go. These little powerhouses have gained popularity over the years due to their versatility, ease of preparation, and the endless variety of flavors that can be created. Whether you’re a fitness enthusiast, a busy parent, or someone simply looking for a nutritious snack, energy balls might just become your new favorite treat.

The concept of energy balls is simple: combine a mixture of wholesome ingredients that are rich in proteins, healthy fats, and carbohydrates, all rolled into a bite-sized ball that is both portable and satisfying. Common ingredients include oats, nuts, seeds, dried fruits, and natural sweeteners like honey or maple syrup. The beauty of making these at home is the ability to customize them to your taste preferences and dietary needs, whether you’re vegan, gluten-free, or have specific allergies.

One of the key reasons for the popularity of energy balls is their nutritional profile. They can provide a quick energy boost, making them an ideal pre or post-workout snack. The combination of protein and fiber helps to satiate hunger, while the natural sugars offer a quick release of energy. For those conscious of their sugar intake, using natural sweeteners and incorporating ingredients like chia seeds or flaxseeds can enhance the nutritional value without compromising on taste. Additionally, the simplicity of the recipe means that they can be whipped up in a matter of minutes, stored in the fridge, and enjoyed throughout the week.

In the realm of busy lifestyles, convenience is key, and energy balls check all the boxes. They require no baking, meaning you can avoid the hassle of preheating ovens and monitoring cooking times. Instead, all it takes is a food processor or a strong pair of hands to mix the ingredients, shape them into balls, and they’re ready to go. This no-fuss approach means that even those with minimal cooking skills can easily partake in the joy of making their own snacks. Plus, the absence of preservatives and additives found in many store-bought energy bars makes homemade energy balls a more wholesome choice.

Furthermore, the creative aspect of making energy balls cannot be overlooked. From classic chocolate and peanut butter combinations to exotic blends like matcha and coconut, the possibilities are endless. Families can involve their children in the process, turning snack preparation into a fun and educational activity about nutrition. For those craving a little indulgence, adding a sprinkle of dark chocolate chips or a dusting of cocoa powder can transform these healthy bites into a decadent treat. In a world where health-conscious choices are becoming increasingly important, homemade energy balls provide a perfect balance of nutrition, taste, and convenience.

Avocado Chocolate Mousse

Avocado chocolate mousse is a delightful culinary creation that combines the rich, creamy texture of avocados with the decadent taste of chocolate. Not only is it a delicious treat, but it also offers a healthier alternative to traditional chocolate mousse. The first time I made this recipe, my family was a bit skeptical. Avocados in dessert? The idea seemed unusual, yet intriguing. However, their apprehension quickly turned to delight as they savored each spoonful of the mousse. The smooth consistency, along with the intense chocolate flavor, won them over instantly. This recipe has now become a staple at our family gatherings, enjoyed by both young and old.

Ingredients

To create this luscious avocado chocolate mousse, you will need the following ingredients:

  • 2 ripe avocados, peeled and pitted
  • 1/4 cup unsweetened cocoa powder
  • 1/4 cup honey or maple syrup
  • 1/4 cup unsweetened almond milk (or any milk of your choice)
  • 1 teaspoon vanilla extract
  • A pinch of salt
  • Optional toppings: fresh berries, whipped cream, or grated chocolate

Instructions

Creating this avocado chocolate mousse is a breeze, making it perfect for both novice and experienced home cooks. Follow these simple steps:

  1. Start by placing the ripe avocados into a food processor or blender. It’s important to use ripe avocados to ensure the mousse is creamy and not chunky.
  2. Add the unsweetened cocoa powder, honey (or maple syrup for a vegan option), almond milk, vanilla extract, and a pinch of salt to the blender with the avocados.
  3. Blend the mixture on high speed until it becomes smooth and creamy. You may need to stop and scrape down the sides of the blender a few times to ensure everything is well combined.
  4. Taste the mousse and adjust sweetness if necessary, adding a little more honey or maple syrup as desired.
  5. Spoon the mousse into individual serving dishes or a large bowl. Cover with plastic wrap and refrigerate for at least 30 minutes to allow the flavors to meld and the mousse to set.
  6. Before serving, garnish with your choice of toppings like fresh berries, a dollop of whipped cream, or a sprinkle of grated chocolate for added flair.

Nutrition Facts

This recipe makes approximately 4 servings. Each serving contains about 200 calories. The calorie count may vary slightly depending on the exact ingredients used and the portion size. Avocados are rich in healthy fats, while cocoa provides antioxidants, making this dessert not only tasty but also nutritious.

Preparation Time

The preparation time for this avocado chocolate mousse is approximately 10 minutes. This quick and easy recipe is ideal for those who want to enjoy a delectable dessert without spending hours in the kitchen. Including refrigeration time, you can have this dessert ready to serve in under an hour.

How to Serve

Serving avocado chocolate mousse can be a creative and enjoyable experience. Here are some ideas to enhance your presentation:

  • In individual ramekins: Serving the mousse in small ramekins or cups makes for an elegant presentation at dinner parties.
  • With fruit: Pair the mousse with fresh berries or sliced bananas to add a burst of color and flavor.
  • Layered in a trifle: Create a layered dessert by alternating mousse with crushed cookies or granola.
  • As a cake filling: Use the mousse as a filling for cakes or cupcakes for a rich, moist dessert.
  • In edible bowls: Serve the mousse in chocolate cups for a fun and edible presentation.

Additional Tips

To ensure your avocado chocolate mousse turns out perfectly every time, consider these additional tips:

  1. Choose the right avocados: Make sure to select avocados that are ripe and soft to the touch for the creamiest texture.
  2. Chill your ingredients: For a smoother blend, chill the almond milk and avocados before preparing the mousse.
  3. Experiment with flavors: Add a dash of cinnamon or a few drops of peppermint extract for a unique twist.
  4. Adjust sweetness to taste: The sweetness of the mousse can be modified by adjusting the amount of honey or maple syrup used.
  5. Store properly: Keep any leftovers refrigerated in an airtight container to maintain freshness.

FAQ Section

Here are some frequently asked questions about avocado chocolate mousse:

Q: Can I use a different sweetener instead of honey or maple syrup?

A: Yes, you can substitute with agave syrup, coconut sugar, or any sweetener of your choice. Adjust the quantity to taste.

Q: How long can I store the mousse in the refrigerator?

A: The mousse can be stored in an airtight container in the refrigerator for up to 3 days.

Q: What can I do if my mousse is too thick?

A: If the mousse is too thick, simply add a little more almond milk or your preferred milk until you reach the desired consistency.

Q: Is it possible to make this dessert ahead of time?

A: Yes, you can prepare the mousse a day in advance. Just make sure to cover it well and store it in the refrigerator until you are ready to serve.

Q: Can I use this mousse as a frosting for cakes?

A: Absolutely! This mousse makes for a delicious and healthy frosting option, perfect for cakes, cupcakes, or as a filling.

Coconut Macaroons

On a lazy Sunday afternoon, as I watched the golden rays of the sun filter through my kitchen window, the idea of baking something sweet and delightful struck me. I had recently come across a recipe for coconut macaroons, and it seemed like the perfect treat to indulge in. With a few simple ingredients and minimal preparation, these little morsels promised to deliver a burst of flavor and texture that would please any palate. As the macaroons baked, the aroma of toasted coconut filled the air, drawing my family from their various corners of the house to the kitchen. Their anticipation was palpable, and I was hopeful that this recipe would become a new family favorite.

Ingredients

Creating the perfect coconut macaroons requires just a handful of ingredients, most of which you might already have in your pantry. Here’s what you’ll need:

  • 14 ounces of sweetened shredded coconut
  • 14 ounces of sweetened condensed milk
  • 1 teaspoon of pure vanilla extract
  • 2 large egg whites, at room temperature
  • A pinch of salt

These ingredients combine to form the quintessential coconut macaroon, characterized by its chewy texture and rich, nutty flavor. The sweetened shredded coconut is the star of the show, providing not only flavor but also a delightful texture that is both chewy and crisp at the edges. The sweetened condensed milk acts as a binding agent, ensuring that each macaroon holds together perfectly. The vanilla extract adds a touch of warmth and depth, while the egg whites and salt bring balance and structure to the mix.

Instructions

Making coconut macaroons is a straightforward process that even novice bakers can master with ease. Here’s a step-by-step guide to help you create these delicious treats:

  1. Preheat your oven: Start by preheating your oven to 325°F (163°C). Line two baking sheets with parchment paper to prevent the macaroons from sticking.
  2. Mix the coconut and sweetened condensed milk: In a large mixing bowl, combine the sweetened shredded coconut and sweetened condensed milk. Stir until the coconut is evenly coated.
  3. Add vanilla extract: Stir in the vanilla extract, ensuring it is well-distributed throughout the mixture.
  4. Beat the egg whites: In a separate bowl, beat the egg whites with a pinch of salt until stiff peaks form. This step is crucial for achieving the right texture in your macaroons.
  5. Fold in the egg whites: Gently fold the beaten egg whites into the coconut mixture. Be careful not to deflate the egg whites, as they provide the macaroons with their light and airy texture.
  6. Shape the macaroons: Using a small ice cream scoop or a tablespoon, drop mounds of the mixture onto the prepared baking sheets, spacing them about an inch apart.
  7. Bake the macaroons: Place the baking sheets in the preheated oven and bake for 20-25 minutes, or until the macaroons are golden brown and set.
  8. Cool and enjoy: Allow the macaroons to cool on the baking sheets for a few minutes before transferring them to a wire rack to cool completely. Enjoy them as a delightful snack or dessert.

The process of making these macaroons is as enjoyable as eating them. The transformation of simple ingredients into a delicious treat is a rewarding experience, and the aroma that fills your kitchen is just an added bonus.

Nutrition Facts

It’s always good to know what you’re consuming, especially when it comes to sweet treats. Here are the nutrition facts for these coconut macaroons:

  • Servings: Approximately 24 macaroons
  • Calories per serving: 110 calories

Each macaroon is a small indulgence, offering a delightful sweetness without overwhelming your caloric intake for the day. Of course, moderation is key with any treat, and these macaroons are perfect for satisfying a sweet tooth without going overboard.

Preparation Time

The beauty of coconut macaroons lies not only in their taste but also in their simplicity and quick preparation time. Here’s a breakdown of the time required to make these delicious treats:

  • Preparation time: 15 minutes
  • Cooking time: 20-25 minutes
  • Total time: 35-40 minutes

In just under an hour, you can have a batch of freshly baked coconut macaroons ready to serve. This makes them an ideal option for last-minute gatherings or when you simply want to whip up something special without spending too much time in the kitchen.

How to Serve

Coconut macaroons are incredibly versatile and can be served in a variety of ways to suit any occasion. Here are a few ideas to consider:

  • Serve them with a cup of tea or coffee for a delightful afternoon treat.
  • Pair them with fresh fruit or berries for a light and refreshing dessert.
  • Drizzle them with melted chocolate for an extra touch of decadence.
  • Include them in a dessert platter alongside other sweet treats.
  • Gift them in a decorative box for a thoughtful and delicious present.

No matter how you choose to serve them, coconut macaroons are sure to be a hit with anyone who tries them. Their combination of chewy and crispy textures, along with their rich coconut flavor, makes them irresistible.

Additional Tips

To ensure your coconut macaroons turn out perfectly every time, consider the following tips:

  1. Use room temperature ingredients: Allow your egg whites to come to room temperature before beating them. This helps achieve the desired stiff peaks.
  2. Be gentle when folding in the egg whites: Take care not to deflate the egg whites when folding them into the coconut mixture, as they provide the light texture characteristic of macaroons.
  3. Keep an eye on the baking time: Oven temperatures can vary, so check your macaroons a few minutes before the recommended baking time to avoid over-browning.
  4. Store them properly: Keep the macaroons in an airtight container at room temperature to maintain their freshness for up to a week.
  5. Experiment with flavors: Add a touch of almond extract or a sprinkle of cinnamon for a unique twist on the classic recipe.

These tips will help you perfect your coconut macaroons, ensuring they are always a delightful treat to enjoy and share.

FAQ Section

Here are some frequently asked questions about coconut macaroons:

  1. Can I use unsweetened coconut? Yes, you can use unsweetened coconut if you prefer a less sweet macaroon. However, you may want to increase the amount of sweetened condensed milk to ensure the mixture binds well.
  2. How do I prevent macaroons from spreading too much during baking? Ensure that your egg whites are beaten to stiff peaks and that you don’t overmix the batter when folding them in.
  3. Can I freeze coconut macaroons? Yes, coconut macaroons freeze well. Place them in a single layer on a baking sheet to freeze initially, then transfer them to an airtight container or freezer bag for long-term storage.
  4. What should I do if my macaroons are too dry? If your macaroons turn out dry, try reducing the baking time slightly or ensuring your ingredients are fresh and properly measured.
  5. Can I add other ingredients to the macaroons? Absolutely! You can add ingredients like chocolate chips, nuts, or dried fruit to customize your macaroons to your taste.

Coconut macaroons are a delightful treat that can be enjoyed in many ways, and with these tips and answers to common questions, you’ll be well on your way to mastering this classic dessert.

Chickpea Flour Flatbread

Chickpea Flour Flatbread, often known as Socca, Besan Chilla, or Farinata, is a versatile and delicious dish celebrated in various cultures around the world. This gluten-free flatbread is not only easy to make but also a nutritious option for those looking to diversify their culinary repertoire. In this article, we will explore the rich history and diverse applications of chickpea flour flatbread, delve into its nutritional benefits, and provide a step-by-step guide to making this delightful dish at home. Whether you’re a seasoned cook or a beginner in the kitchen, chickpea flour flatbread is a rewarding recipe to try.

Chickpea flour, the star ingredient in this flatbread, is derived from ground chickpeas, also known as garbanzo beans. It has been a staple in Middle Eastern, Indian, and Mediterranean cuisines for centuries. The versatility of chickpea flour makes it a popular choice for various dishes, including pancakes, fritters, and, of course, flatbreads. Its nutty flavor and slightly earthy undertones add depth to any dish, making it a favorite among chefs and home cooks alike. The origins of chickpea flour flatbread can be traced to different regions, with each culture adding its unique twist. In Southern France, it’s known as Socca, while in Italy, it’s called Farinata. In India, Besan Chilla is a popular street food, often enjoyed as a savory breakfast or snack.

Nutritionally, chickpea flour is a powerhouse. It is a rich source of protein, fiber, and essential vitamins and minerals. For those following a gluten-free diet, chickpea flour serves as an excellent alternative to wheat flour. The high protein content makes it a valuable addition to vegetarian and vegan diets, providing essential amino acids that are often lacking in plant-based foods. Additionally, chickpea flour is low in carbohydrates, making it a suitable option for those managing their blood sugar levels. The presence of fiber aids in digestion and promotes a feeling of fullness, which can be beneficial for weight management. With such impressive nutritional credentials, it’s no wonder chickpea flour flatbread is gaining popularity among health-conscious individuals.

The process of making chickpea flour flatbread is simple and requires just a few ingredients. To start, you’ll need chickpea flour, water, olive oil, and a pinch of salt. First, mix the flour and water to form a smooth batter, then let it rest for about 30 minutes to allow the flour to hydrate fully. Preheat your oven to a high temperature, as the key to a crispy flatbread is a hot cooking environment. Once the oven is ready, pour the batter onto a preheated skillet or baking sheet, ensuring an even spread. Drizzle olive oil over the top for added flavor and bake until the edges are golden and crisp. The result is a beautifully rustic flatbread with a slightly chewy texture and a deliciously nutty taste.

Chickpea flour flatbread can be enjoyed in numerous ways. Its adaptability allows it to pair well with a variety of toppings and accompaniments. For a simple yet satisfying meal, serve it warm with a drizzle of olive oil and a sprinkle of sea salt. Alternatively, top it with fresh vegetables, cheese, or your favorite protein for a more substantial dish. It can also be used as a base for pizza or as an accompaniment to soups and stews. The possibilities are endless, making it a valuable addition to any recipe collection. As more people discover the benefits and flavors of chickpea flour flatbread, its popularity is sure to grow, bringing this ancient culinary tradition into modern kitchens worldwide.

Gluten-Free Blueberry Muffins

Gluten-free blueberry muffins have emerged as a delightful option for those seeking to indulge in a sweet treat without compromising their dietary restrictions. With the rise in awareness about gluten sensitivity and celiac disease, many people are turning to gluten-free alternatives to enjoy their favorite foods without discomfort. These muffins are not only gluten-free but are also packed with juicy blueberries, offering a burst of flavor in every bite. The combination of almond flour and coconut flour in the recipe ensures a moist and fluffy texture, which is often a challenge in gluten-free baking. Furthermore, the natural sweetness of the blueberries reduces the need for excessive sugar, making these muffins a healthier option for those watching their sugar intake. The balance of flavors and the tender crumb make these muffins a hit among both gluten-sensitive individuals and those simply looking to explore new culinary adventures.

Incorporating gluten-free baking into daily life can be daunting for beginners, but these blueberry muffins are a perfect starting point. The recipe is straightforward, requiring only a few key ingredients that are easily available in most supermarkets or health food stores. Almond flour and coconut flour serve as the base, offering a nutty flavor that complements the sweetness of the blueberries. Eggs, baking powder, and a pinch of salt help the muffins rise and maintain their structure. For those who prefer added sweetness, a touch of honey or maple syrup can be included. The preparation process is simple: mix the dry ingredients, fold in the wet ones, and gently incorporate the blueberries before spooning the batter into muffin tins. In about half an hour, the kitchen is filled with the inviting aroma of freshly baked muffins, ready to enjoy.

For many, gluten-free blueberry muffins are more than just a dietary necessity; they are a testament to the creativity and adaptability required in modern cooking. These muffins cater to a growing segment of the population that values both health and taste. They are perfect for breakfast, a midday snack, or even as a dessert when paired with a dollop of whipped cream or a scoop of vanilla ice cream. Their versatility makes them a staple in many households, proving that gluten-free baking doesn’t mean compromising on flavor or enjoyment. Whether you’re serving them at a family brunch or bringing them to a potluck, these muffins are sure to impress and satisfy. As more people discover the joys of gluten-free eating, recipes like these blueberry muffins pave the way for a more inclusive and delicious culinary landscape.

Baked Salmon with Garlic Butter

There’s something universally delightful about the aroma of baked salmon wafting through the kitchen. Recently, I decided to try a recipe for Baked Salmon with Garlic Butter, and let me tell you, it was an instant hit with my family. The tender, flaky texture of the salmon contrasted beautifully with the rich, buttery garlic sauce, creating a dish that felt both luxurious and comforting. My family couldn’t get enough, and even my pickiest eater asked for seconds. The simplicity of the preparation belies the depth of flavor in every bite, making it the perfect dish for both special occasions and simple weeknight dinners.

Ingredients

For this delightful Baked Salmon with Garlic Butter, you’ll need the following ingredients:

  • 4 salmon fillets (about 6 ounces each)
  • 1/4 cup unsalted butter, melted
  • 4 garlic cloves, minced
  • 1 tablespoon lemon juice
  • Salt and freshly ground black pepper, to taste
  • 2 tablespoons fresh parsley, chopped
  • 1 lemon, sliced for garnish

Instructions

Baking salmon with garlic butter is a straightforward process, but it yields an exceptionally flavorful result. Here’s how to do it:

  1. Preheat your oven to 375°F (190°C). Line a baking sheet with aluminum foil or parchment paper for easy cleanup.
  2. Place the salmon fillets skin-side down on the prepared baking sheet. Season each fillet with salt and pepper to taste.
  3. In a small bowl, combine the melted butter, minced garlic, and lemon juice. Stir to blend the ingredients well.
  4. Pour the garlic butter mixture evenly over the salmon fillets, ensuring that each piece is well coated.
  5. Bake the salmon in the preheated oven for 12-15 minutes, or until the fish flakes easily with a fork. Cooking time may vary slightly depending on the thickness of the fillets.
  6. Remove the salmon from the oven and let it rest for a few minutes. Garnish with chopped parsley and lemon slices before serving.

Nutrition Facts

This recipe serves 4, with each serving containing approximately 350 calories. The nutritional benefits of salmon, combined with the healthy fats from butter, make this a wholesome choice for anyone looking to enjoy a nutritious meal without compromising on taste.

Preparation Time

One of the best parts about this recipe is its efficiency. From start to finish, the preparation and cooking time total around 30 minutes. This makes it an excellent option for busy weeknights when you want to serve something delicious without spending hours in the kitchen.

How to Serve

While the Baked Salmon with Garlic Butter is exquisite on its own, here are some serving suggestions to complete your meal:

  • Serve with a side of steamed vegetables such as asparagus or broccoli to add a pop of color and freshness.
  • Pair with a simple green salad dressed with olive oil and balsamic vinegar for a light, complementary side.
  • Add a serving of buttery mashed potatoes or quinoa for a more filling meal.
  • Top the salmon with additional lemon slices or fresh herbs for extra flavor.
  • For a touch of elegance, consider serving the salmon on a bed of creamy risotto.

Additional Tips

To ensure your Baked Salmon with Garlic Butter is perfect every time, consider these tips:

  • Choose Fresh Salmon: Whenever possible, select fresh salmon fillets for the best flavor and texture. Look for fillets with vibrant color and a clean, mild scent.
  • Don’t Overcook: Salmon is best when it is slightly undercooked. It will continue to cook after being removed from the oven, ensuring it remains moist and tender.
  • Customize the Butter Sauce: Feel free to add other herbs such as dill or thyme to the garlic butter mixture for a different flavor profile.
  • Use a Meat Thermometer: For precision, use a meat thermometer to check that the internal temperature of the salmon reaches 145°F (63°C).
  • Experiment with Citrus: Besides lemon, you can try using orange or lime juice for a different citrus twist.

FAQ Section

Here are some frequently asked questions about Baked Salmon with Garlic Butter:

  1. Can I use frozen salmon fillets? Yes, you can use frozen salmon, but make sure to thaw them completely before cooking to ensure even cooking.
  2. Is it necessary to use unsalted butter? While unsalted butter is preferred to control the saltiness of the dish, you can use salted butter and reduce the amount of added salt.
  3. Can I substitute the butter with olive oil? Absolutely! Olive oil is a great alternative for those looking to reduce dairy or saturated fat in the recipe.
  4. What other herbs can I use? In addition to parsley, dill, thyme, or basil can be used to complement the flavors of the garlic butter sauce.
  5. How do I store leftovers? Store leftover salmon in an airtight container in the refrigerator for up to 2 days. Reheat gently in the oven or microwave to prevent drying out.

Grilled Lemon Herb Chicken

There’s something undeniably satisfying about the sizzle and aroma of grilled chicken wafting through the air, a beacon of culinary delight that heralds the arrival of a delicious meal. Recently, I prepared the Grilled Lemon Herb Chicken for a family dinner, and it was met with resounding approval. The delicate balance of citrus and herbs paired with the smoky notes from the grill made it an instant hit at our dining table. My family, who are often honest to a fault about their preferences, couldn’t stop praising the juiciness and flavor of the chicken. Even the pickiest eaters asked for seconds, a testament to the universal appeal of this dish. The recipe is so simple yet remarkably flavorful, making it a perfect choice for both casual family dinners and more formal gatherings.

Ingredients

The key to the irresistible taste of Grilled Lemon Herb Chicken lies in its thoughtfully selected ingredients. Here’s what you’ll need for this recipe:

  • 4 boneless, skinless chicken breasts
  • 1/3 cup olive oil
  • 1/4 cup freshly squeezed lemon juice (about 2 lemons)
  • 3 cloves garlic, minced
  • 1 tablespoon fresh thyme leaves
  • 1 tablespoon chopped fresh rosemary
  • 1 teaspoon salt
  • 1/2 teaspoon black pepper
  • Lemon slices and fresh herbs for garnish (optional)

These ingredients work harmoniously to create a marinade that infuses the chicken with vibrant flavors, transforming a simple piece of poultry into a gourmet delight.

Instructions

Creating Grilled Lemon Herb Chicken is a straightforward process, yet the results are nothing short of spectacular. Follow these detailed steps to achieve the best results:

  1. In a small mixing bowl, whisk together the olive oil, lemon juice, garlic, thyme, rosemary, salt, and pepper until well combined. This mixture serves as your marinade, a critical component that imparts flavor and moisture to the chicken.
  2. Place the chicken breasts in a shallow dish or a resealable plastic bag. Pour the marinade over the chicken, ensuring each piece is well-coated. Seal the bag or cover the dish, and refrigerate for at least 30 minutes, or up to 4 hours for maximum flavor infusion.
  3. Preheat your grill to medium-high heat. Lightly oil the grill grates to prevent sticking. Remove the chicken from the marinade, letting any excess drip off, and discard the marinade.
  4. Grill the chicken for about 6-7 minutes per side, or until the internal temperature reaches 165°F (75°C). During grilling, avoid pressing down on the chicken, as this can force out juices and result in a drier texture.
  5. Once cooked, remove the chicken from the grill and let it rest for a few minutes. This resting period allows the juices to redistribute, ensuring each bite is juicy and flavorful.
  6. Garnish with lemon slices and fresh herbs if desired, and serve immediately.

Nutrition Facts

Understanding the nutritional value of the dishes we prepare is crucial, especially for those mindful of their dietary intake. Here’s a breakdown of the nutrition facts for Grilled Lemon Herb Chicken:

  • Servings: 4
  • Calories per serving: 280

This recipe is not only delicious but also offers a healthy dose of protein without excessive calories, making it an excellent choice for those seeking a balanced meal.

Preparation Time

Time is of the essence in our busy lives, and this recipe respects that by offering a quick yet flavorful meal option. Here’s the time breakdown for Grilled Lemon Herb Chicken:

  • Preparation Time: 10 minutes
  • Marinating Time: 30 minutes to 4 hours (depending on your schedule)
  • Cooking Time: 15 minutes
  • Total Time: 55 minutes to 4 hours 25 minutes

With a minimal active cooking period, this dish allows you to multitask while the chicken absorbs the marinade’s robust flavors.

How to Serve

The versatility of Grilled Lemon Herb Chicken means it can be paired with a variety of sides to create a complete meal. Here are some serving suggestions:

  • Over a bed of greens: Serve the chicken atop a fresh salad with arugula, cherry tomatoes, and a light vinaigrette for a refreshing meal.
  • With roasted vegetables: Pair with a medley of roasted seasonal vegetables like zucchini, bell peppers, and asparagus for a colorful plate.
  • Alongside rice or quinoa: Serve with a side of fluffy rice or quinoa to soak up the flavorful juices from the chicken.
  • In a wrap: Slice the chicken and wrap it in a tortilla with lettuce, avocado, and a drizzle of tzatziki sauce for a portable meal.
  • With pasta: Combine with a light lemon and herb pasta for a satisfying and cohesive dish.

Additional Tips

To ensure your Grilled Lemon Herb Chicken turns out perfectly every time, consider the following tips:

  1. Use fresh herbs: Fresh herbs impart a more vibrant flavor than dried ones, enhancing the overall taste of the dish.
  2. Marinate in advance: For maximum flavor, allow the chicken to marinate for at least a couple of hours, or even overnight, if time permits.
  3. Check grill temperature: Ensure your grill is preheated to the right temperature to avoid overcooking or undercooking the chicken.
  4. Use a meat thermometer: To avoid guessing, use a meat thermometer to check that the chicken reaches an internal temperature of 165°F (75°C).
  5. Let it rest: Allow the chicken to rest for a few minutes after grilling to let the juices redistribute for a juicy bite.

FAQ Section

Here are some frequently asked questions about Grilled Lemon Herb Chicken:

  1. Can I use chicken thighs instead of breasts?

    Absolutely! Chicken thighs are more forgiving in terms of cooking time and remain juicy, making them a great alternative to breasts.

  2. Can I bake this chicken instead of grilling?

    Yes, you can bake it in the oven at 375°F (190°C) for about 25-30 minutes or until the internal temperature reaches 165°F (75°C).

  3. Is it possible to freeze the marinated chicken?

    Yes, you can freeze the chicken in the marinade for up to 3 months. Thaw in the refrigerator before grilling.

  4. What if I don’t have fresh herbs?

    You can substitute with dried herbs, but use about one-third of the amount as dried herbs are more potent.

  5. How do I prevent the chicken from drying out?

    A well-marinated chicken and not overcooking are key. Use a meat thermometer to ensure precise cooking.

Grilled Lemon Herb Chicken is not only a feast for the taste buds but also a versatile and healthy choice for any meal. Its ease of preparation and delightful flavor profile make it a go-to recipe for any home cook looking to impress family and friends alike. Whether served at a casual backyard barbecue or a formal dinner, this dish is sure to become a staple in your culinary repertoire.