Turmeric Quinoa Salad

“`html

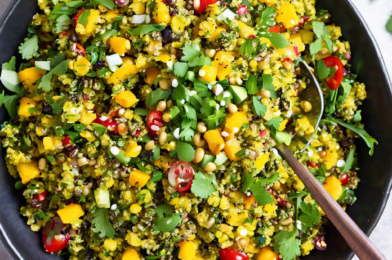
This Turmeric Quinoa Salad quickly became a favorite in our household, and I can’t wait to share it with you. The vibrant colors and flavors make it a feast for the senses, and it’s packed with nutrients that leave you feeling satisfied and energized. My family loved it so much that we ended up making it twice in one week! The turmeric gives the quinoa a beautiful golden hue, and when paired with fresh vegetables and a tangy dressing, it’s truly a dish that delights both the eyes and the palate. If you’re looking for a healthy, delicious, and easy-to-make salad, this recipe is a must-try.

Ingredients

The success of this Turmeric Quinoa Salad lies in its fresh and wholesome ingredients. Here’s what you’ll need to gather before starting:

  • 1 cup quinoa, rinsed
  • 2 cups water
  • 1 teaspoon ground turmeric
  • 1/2 teaspoon sea salt
  • 1 cup cherry tomatoes, halved
  • 1 cucumber, diced
  • 1 red bell pepper, diced
  • 1/4 cup red onion, finely chopped
  • 1/4 cup fresh parsley, chopped
  • 1/4 cup fresh mint, chopped
  • 1/4 cup lemon juice
  • 2 tablespoons olive oil
  • Salt and pepper to taste

Instructions

Creating this Turmeric Quinoa Salad is a straightforward process that even beginners can tackle with ease. Follow these steps to ensure your salad turns out perfectly every time:

  1. Start by cooking the quinoa. In a medium saucepan, combine the rinsed quinoa, water, turmeric, and sea salt. Bring to a boil over medium-high heat.
  2. Once boiling, reduce the heat to low, cover, and let it simmer for about 15 minutes, or until all the water is absorbed and the quinoa is fluffy.
  3. Remove from heat and let the quinoa cool to room temperature.
  4. In a large salad bowl, combine the cooked quinoa with cherry tomatoes, cucumber, red bell pepper, red onion, parsley, and mint.
  5. In a small bowl, whisk together the lemon juice, olive oil, salt, and pepper. Pour the dressing over the salad and toss gently to combine.
  6. Taste and adjust the seasoning as needed, then serve immediately or refrigerate for later.

Nutrition Facts

The Turmeric Quinoa Salad is not only delicious but also nutritious. Here’s a breakdown of the nutrition facts:

  • Servings: 4
  • Calories per serving: Approximately 220

Preparation Time

One of the best aspects of this recipe is how quickly it comes together. From start to finish, you can have this salad ready in under 30 minutes:

  • Preparation time: 10 minutes
  • Cooking time: 15 minutes
  • Total time: 25 minutes

How to Serve

This salad is versatile and pairs well with a variety of dishes. Here are a few serving suggestions:

  • As a main dish for a light lunch or dinner
  • As a side dish with grilled chicken or fish
  • In a wrap with hummus for a quick meal
  • As a part of a buffet or potluck spread
  • With a dollop of Greek yogurt on top for extra creaminess

Additional Tips

To make the most out of this recipe, consider the following tips:

  1. Rinse the quinoa: Rinsing removes the saponin coating, which can make quinoa taste bitter.
  2. Use fresh herbs: Fresh parsley and mint add a bright flavor that dried herbs can’t replicate.
  3. Customize the vegetables: Feel free to add or substitute your favorite veggies based on what’s in season.
  4. Make ahead: This salad can be prepared a day in advance, allowing the flavors to meld together.
  5. Store correctly: Keep leftovers in an airtight container in the fridge for up to three days.

FAQ Section

Here are some frequently asked questions about the Turmeric Quinoa Salad:

Q: Can I use a different grain instead of quinoa?

A: Yes, you can substitute quinoa with couscous or farro, but keep in mind that cooking times may vary.

Q: Is this salad gluten-free?

A: Yes, quinoa is naturally gluten-free, making this salad suitable for those with gluten sensitivities.

Q: Can I add protein to this salad?

A: Absolutely! Grilled chicken, chickpeas, or feta cheese are excellent additions for added protein.

Q: How can I make this salad spicier?

A: Add a pinch of red pepper flakes or diced jalapeño for some heat.

Q: What can I do if my salad is too dry?

A: Simply drizzle a bit more olive oil or lemon juice to bring back moisture and enhance the flavor.

“`

The above HTML content is formatted for easy integration into a WordPress post, offering an engaging and detailed presentation of the Turmeric Quinoa Salad recipe.

Lentil & Spinach Soup

The aroma of a warm, freshly cooked pot of lentil and spinach soup wafting through the kitchen is nothing short of heavenly, particularly on a chilly evening. This hearty and nutritious dish has become a staple in our household, cherished by family members of all ages. The blend of earthy lentils and vibrant spinach creates a symphony of flavors that is both comforting and invigorating. Each spoonful is a testament to the beauty of simple, wholesome ingredients coming together to create something truly special. It’s not just about sustenance; it’s about the joy of sharing a meal that nurtures the body and soul. Over countless dinners, this soup has sparked conversations, warmed hearts, and brought smiles to our faces, making it a permanent fixture in our culinary repertoire.

Ingredients

To craft this delightful lentil and spinach soup, you’ll need the following ingredients:

  • 1 cup of dried lentils, rinsed and sorted
  • 2 tablespoons of olive oil
  • 1 onion, finely chopped
  • 2 cloves of garlic, minced
  • 1 carrot, diced
  • 1 celery stalk, diced
  • 4 cups of vegetable broth
  • 2 cups of fresh spinach leaves, washed and chopped
  • 1 teaspoon of cumin
  • 1 teaspoon of paprika
  • Salt and pepper to taste
  • Juice of half a lemon
  • Fresh parsley for garnish (optional)

Instructions

Creating this soup is a straightforward process that even novice cooks can master with ease. Begin by heating the olive oil in a large pot over medium heat. Add the chopped onion and sauté until it becomes translucent, which should take about five minutes. Introduce the minced garlic, diced carrot, and celery to the pot, cooking for an additional five minutes until the vegetables soften.

Next, stir in the cumin and paprika, allowing the spices to release their flavors for about a minute. Add the rinsed lentils to the pot, followed by the vegetable broth. Bring the mixture to a boil, then reduce the heat and let it simmer for about 25-30 minutes, or until the lentils are tender.

Once the lentils are cooked, add the chopped spinach, stirring until the leaves wilt into the soup. Season with salt, pepper, and a squeeze of lemon juice to enhance the flavors. Allow the soup to simmer for an additional five minutes before removing it from the heat. Serve hot, garnished with fresh parsley if desired.

Nutrition Facts

This recipe yields approximately four servings, with each serving containing around 250 calories. It’s a low-calorie, nutrient-dense meal that provides a hefty dose of protein, fiber, and iron, making it an excellent choice for those seeking a healthy and satisfying dish.

Preparation Time

The total preparation time for this lentil and spinach soup is about 45 minutes. This includes the time needed to chop the vegetables and rinse the lentils, as well as the cooking time. It’s a relatively quick recipe that can be whipped up on a busy weeknight or prepared ahead of time for an easy meal option.

How to Serve

This versatile soup can be served in a variety of ways to suit different tastes and occasions:

  • As a starter: Serve a small bowl as an appetizer to whet the appetite before a larger meal.
  • As a main course: Pair with a crusty loaf of bread for a complete and satisfying meal.
  • With toppings: Add a dollop of Greek yogurt or a sprinkle of grated Parmesan cheese for added richness.
  • With sides: Serve alongside a fresh garden salad for a balanced and nutritious meal.
  • For lunch: Pack in a thermos for a warm, portable lunch option.

Additional Tips

To elevate your lentil and spinach soup, consider these additional tips:

  1. Use different lentils: Experiment with different types of lentils, such as red or French green, to vary the texture and flavor.
  2. Make it spicy: Add a pinch of red pepper flakes or a splash of hot sauce for a spicy kick.
  3. Include more vegetables: Enhance the nutritional value by adding additional vegetables like zucchini or bell peppers.
  4. Use homemade broth: For an even richer flavor, use homemade vegetable or chicken broth instead of store-bought.
  5. Prepare in advance: This soup freezes well, so make a large batch and store portions in the freezer for quick and easy future meals.

FAQ Section

Q: Can I use canned lentils instead of dried?

A: Yes, you can use canned lentils. Be sure to drain and rinse them before adding to the soup, and reduce the cooking time to 10 minutes since canned lentils are already cooked.

Q: Can I make this soup vegan?

A: Absolutely! This recipe is naturally vegan as long as you use vegetable broth and avoid any non-vegan toppings like cheese or yogurt.

Q: What can I substitute for spinach?

A: If you don’t have spinach on hand, you can substitute it with other leafy greens such as kale, Swiss chard, or even collard greens.

Q: How can I thicken the soup?

A: For a thicker consistency, you can blend a portion of the soup with an immersion blender or add a small amount of cooked potatoes or rice.

Q: How long will leftovers keep?

A: Leftover soup can be stored in an airtight container in the refrigerator for up to five days, or frozen for up to three months.

Stuffed Bell Peppers

Stuffed bell peppers have long captivated the culinary world with their vibrant colors, enticing aromas, and delightful flavors. As a food journalist who has explored countless recipes, I can confidently say that stuffed bell peppers offer a comforting and versatile meal option that caters to diverse palates. The beauty of this dish lies in its adaptability; whether you prefer a meaty filling, a vegetarian option, or a blend of grains and legumes, stuffed bell peppers can be tailored to suit any dietary preference. My family and I have relished this dish numerous times, often experimenting with different ingredients to keep the experience fresh and exciting. It’s a meal that brings people together, inviting everyone to gather around the table to enjoy a wholesome and satisfying culinary experience.

Ingredients

The ingredients for stuffed bell peppers vary according to personal preference and dietary requirements. A classic stuffed bell pepper recipe typically includes fresh bell peppers, ground meat, rice, tomato sauce, onions, and a variety of spices. However, vegetarian versions might forgo meat in favor of black beans, quinoa, or lentils. Here’s a comprehensive list for a traditional recipe:

  • 6 large bell peppers (any color)
  • 1 pound ground beef or turkey
  • 1 cup cooked rice (white or brown)
  • 1 small onion, chopped
  • 2 cloves garlic, minced
  • 1 can (14.5 ounces) diced tomatoes
  • 1 cup tomato sauce
  • 1 teaspoon Italian seasoning
  • 1 cup shredded cheese (cheddar or mozzarella)
  • Salt and pepper to taste
  • Olive oil

Instructions

Preparing stuffed bell peppers is a straightforward process that yields impressive results. Begin by preheating your oven to 375°F (190°C). While the oven is warming up, cut the tops off the bell peppers and remove the seeds and membranes. Lightly brush the peppers with olive oil, place them in a baking dish, and set aside.

In a skillet, heat a tablespoon of olive oil over medium heat. Add the chopped onion and minced garlic, sautéing until the onion becomes translucent. Next, add the ground beef or turkey to the skillet, cooking until browned and fully cooked. Drain any excess fat.

Stir in the cooked rice, diced tomatoes, tomato sauce, and Italian seasoning. Allow the mixture to simmer for about 10 minutes, allowing the flavors to meld. Season with salt and pepper to taste.

Spoon the filling into each prepared bell pepper, packing it tightly. Top each pepper with a generous sprinkle of shredded cheese. Cover the baking dish with foil and bake for 30 minutes. Remove the foil and bake for an additional 15 minutes, or until the peppers are tender and the cheese is bubbly and golden.

Nutrition Facts

Stuffed bell peppers are not only a feast for the senses but also a nutritious meal choice. Depending on the ingredients used, they can offer a balanced mix of protein, carbohydrates, and healthy fats. For a standard serving of one stuffed pepper, the nutritional information is approximately as follows:

  • Servings: 6 stuffed peppers
  • Calories per serving: 350
  • Protein: 20 grams
  • Carbohydrates: 25 grams
  • Fat: 15 grams
  • Fiber: 5 grams

Preparation Time

The preparation time for stuffed bell peppers can vary depending on the complexity of the filling and personal experience in the kitchen. However, on average, expect to spend about 20 minutes on preparation and an additional 45 minutes on cooking. The entire process, from start to finish, will take approximately 1 hour and 15 minutes. This makes stuffed bell peppers an excellent choice for a hearty weeknight dinner without demanding an excessive amount of time in the kitchen.

How to Serve

Stuffed bell peppers are a versatile dish that can be served in a variety of ways to enhance the dining experience. Here are some ideas for serving:

  • **With a Side Salad:** Pair the peppers with a fresh green salad for a light and refreshing contrast.
  • **With Crusty Bread:** Serve alongside a slice of warm, crusty bread to soak up any delicious juices.
  • **With a Dollop of Sour Cream:** Add a creamy element by topping the peppers with a spoonful of sour cream or Greek yogurt.
  • **With Avocado:** Slice some ripe avocado for a healthy and flavorful garnish.
  • **With a Sprinkle of Fresh Herbs:** Garnish with fresh parsley, cilantro, or basil for an aromatic finish.

Additional Tips

Creating the perfect stuffed bell peppers can be enhanced with a few expert tips. Here are five tips to ensure your dish turns out perfectly every time:

  1. Choose the Right Peppers: Look for firm, evenly shaped peppers that can stand upright in your baking dish.
  2. Pre-cook the Peppers: For a softer texture, consider parboiling the peppers for a few minutes before stuffing them.
  3. Experiment with Fillings: Feel free to get creative with your fillings. Try mixing in different grains, beans, or vegetables.
  4. Adjust Seasonings: Taste your filling before stuffing the peppers and adjust the seasonings to your liking.
  5. Make Ahead: Prepare the filling a day in advance to save time on the day of cooking.

FAQ Section

Curious about making stuffed bell peppers? Here are some frequently asked questions to guide you:

1. Can I freeze stuffed bell peppers?
Yes, stuffed bell peppers freeze well. Allow them to cool completely, then wrap individually in foil or plastic wrap before storing in a freezer-safe container for up to 3 months.

2. What type of rice works best?
You can use any type of rice you prefer, including white, brown, or wild rice. For a healthier option, consider using quinoa or cauliflower rice.

3. How can I make them vegetarian?
To make vegetarian stuffed peppers, substitute the ground meat with black beans, chickpeas, or lentils and add more vegetables like mushrooms or zucchini.

4. Can I use other types of cheese?
Absolutely! Feel free to experiment with different cheeses such as feta, goat cheese, or Monterey Jack for varied flavors.

5. How do I prevent the peppers from tipping over?
Choose peppers with flat bottoms that can stand on their own, or slice a small piece off the bottom to create a stable base.

Gluten-Free Banana Bread

There’s something incredibly comforting about the aroma of freshly baked banana bread wafting through the house. It’s a scent that welcomes you with warmth and nostalgia, evoking memories of cozy kitchens and family gatherings. Recently, I decided to try my hand at a gluten-free version of this classic treat, and the results were nothing short of delightful. My family, skeptical at first about any ‘gluten-free’ baked goods, were pleasantly surprised by how moist and flavorful it turned out. This gluten-free banana bread has now become a staple in our household, enjoyed equally by those with dietary restrictions and those without.

Ingredients

Creating a delicious gluten-free banana bread requires a careful selection of ingredients that complement each other while maintaining the bread’s classic texture and flavor. Here’s what you’ll need:

  • 3 ripe bananas, mashed
  • 1/3 cup melted coconut oil
  • 1 teaspoon vanilla extract
  • 1 teaspoon baking soda
  • Pinch of salt
  • 3/4 cup sugar
  • 1 large egg, lightly beaten
  • 1 1/2 cups gluten-free all-purpose flour
  • 1 teaspoon cinnamon (optional)
  • 1/2 cup chopped walnuts or chocolate chips (optional)

Instructions

Baking banana bread is a straightforward process, even when making it gluten-free. Here’s a step-by-step guide to help you through:

  1. Preheat your oven to 350°F (175°C) and grease a 9×5-inch loaf pan.
  2. In a large mixing bowl, combine the mashed bananas with the melted coconut oil, stirring until blended.
  3. Add the vanilla extract, baking soda, salt, and sugar. Mix well to combine all the ingredients.
  4. Stir in the beaten egg, ensuring it is fully incorporated into the banana mixture.
  5. Gradually add the gluten-free flour, stirring until the batter is smooth and no lumps remain.
  6. If desired, fold in the cinnamon and any additional mix-ins, such as walnuts or chocolate chips.
  7. Pour the batter into the prepared loaf pan, smoothing the top with a spatula.
  8. Bake for 50 to 60 minutes, or until a toothpick inserted into the center comes out clean.
  9. Allow the bread to cool in the pan for about 10 minutes before transferring it to a wire rack to cool completely.

Nutrition Facts

Understanding the nutritional content of what we eat is crucial, especially for those with dietary restrictions. This gluten-free banana bread makes approximately 8 servings, with each serving providing around 200 calories. It’s a wholesome treat that fits well into a balanced diet.

Preparation Time

One of the joys of making banana bread is its simplicity and the relatively short time it takes from start to finish. The preparation time for this recipe is about 15 minutes, while baking will take approximately 50 to 60 minutes. In just over an hour, you’ll have a delicious loaf ready to enjoy.

How to Serve

Banana bread is versatile and can be enjoyed in various ways:

  • Warm and Fresh: Serve slices warm from the oven for a comforting snack.
  • With a Spread: Top with butter or cream cheese for an extra layer of flavor.
  • As a Dessert: Pair with a scoop of vanilla ice cream for a sweet treat.
  • Breakfast Delight: Enjoy with a cup of coffee or tea to start your day.
  • On the Go: Pack slices for a quick and easy snack or lunchbox addition.

Additional Tips

Baking gluten-free can sometimes be tricky, but these tips should help ensure your banana bread turns out perfectly:

  1. Use Ripe Bananas: The riper the bananas, the sweeter and more flavorful your bread will be.
  2. Check Your Flour: Not all gluten-free flours are created equal; a blend that includes xanthan gum helps mimic the texture of regular flour.
  3. Don’t Overmix: Overmixing the batter can lead to a dense loaf, so stir just until the ingredients are combined.
  4. Adjust Baking Time: Oven temperatures can vary, so start checking your bread at the 50-minute mark.
  5. Storage: Store the bread in an airtight container to keep it fresh for up to a week.

FAQ Section

Here are some common questions about gluten-free banana bread:

  1. Can I make this recipe vegan? Yes, substitute the egg with a flax egg (1 tablespoon ground flaxseed mixed with 3 tablespoons water) and use a plant-based sweetener.
  2. What if I don’t have coconut oil? You can use melted butter or any neutral oil like vegetable oil instead.
  3. Can I add other ingredients? Absolutely! Feel free to experiment with add-ins like dried fruit, seeds, or spices.
  4. How do I know if my bananas are ripe enough? Look for bananas with lots of brown spots on the skin; they should be soft to the touch.
  5. Can I freeze banana bread? Yes, slice the bread and wrap each piece in plastic wrap, then store in a freezer bag for up to 3 months.

Cauliflower Crust Pizza

In recent years, cauliflower crust pizza has emerged as a popular alternative to traditional pizza, captivating health enthusiasts and culinary adventurers alike. With its promise of being a lower-carb, gluten-free substitute, it’s no wonder that this innovative dish has found its way into kitchens and restaurants across the globe. As someone who enjoys experimenting with healthier versions of classic dishes, I decided to give cauliflower crust pizza a try. The results were surprisingly delightful, and even my family, who are staunch traditionalists when it comes to pizza, appreciated the unique flavor and texture. The crust, with its subtle nutty taste and satisfying crunch, paired beautifully with our favorite toppings. This experience opened my eyes to the versatility of cauliflower and the potential it holds in transforming familiar recipes into healthier options.

Ingredients

Creating a delicious cauliflower crust pizza starts with gathering the right ingredients. To make a crust that is both flavorful and holds together well, you will need:

  • 1 medium-sized head of cauliflower (about 2 pounds)
  • 1 large egg
  • 1 cup shredded mozzarella cheese
  • 1/4 cup grated Parmesan cheese
  • 1/2 teaspoon dried oregano
  • 1/4 teaspoon garlic powder
  • 1/4 teaspoon salt
  • Your choice of pizza sauce and toppings (such as pepperoni, mushrooms, bell peppers, etc.)

Instructions

Begin by preheating your oven to 425°F (220°C) and lining a baking sheet with parchment paper. This will prevent the crust from sticking and ensure an even bake. Next, wash and thoroughly dry the cauliflower. Cut it into florets and pulse in a food processor until it reaches a rice-like consistency. This step is crucial as it forms the base of the crust.

Transfer the cauliflower rice to a microwave-safe bowl and microwave on high for about 4 minutes. Once it has cooled slightly, place the cooked cauliflower in a clean kitchen towel and squeeze out as much moisture as possible. This step is essential to achieving a crispy crust, as excess moisture will result in a soggy base.

In a large bowl, combine the cauliflower, egg, mozzarella, Parmesan, oregano, garlic powder, and salt. Mix until well incorporated. Spread the mixture onto the prepared baking sheet, shaping it into a thin, even circle or rectangle. Bake in the preheated oven for 20-25 minutes or until the crust is golden brown and firm to the touch.

Remove the crust from the oven and add your choice of pizza sauce and toppings. Return the pizza to the oven and bake for an additional 10 minutes, or until the cheese is melted and bubbly. Allow the pizza to cool for a few minutes before slicing and serving.

Nutrition Facts

One of the appealing aspects of cauliflower crust pizza is its nutritional profile. This recipe yields approximately 8 servings, with each serving containing about 120 calories. It’s a lighter option compared to traditional pizza crusts, making it suitable for those monitoring their calorie intake.

Preparation Time

The preparation time for cauliflower crust pizza is relatively short, making it a convenient option for busy weeknights. Expect to spend about 20 minutes preparing the ingredients and forming the crust, with an additional 30-35 minutes of baking time. In total, this meal can be ready to enjoy in under an hour.

How to Serve

  • Serve the pizza with a fresh green salad on the side for a balanced meal.
  • Pair with a glass of crisp white wine for a delightful dining experience.
  • Consider adding a sprinkle of fresh herbs, such as basil or parsley, for added flavor.
  • For a heartier meal, serve with a side of roasted vegetables.
  • Enjoy as a light lunch, or prepare a double batch for a more substantial dinner.

Additional Tips

  • Squeeze the cauliflower: Ensuring that all excess moisture is removed from the cauliflower is crucial for a crispy crust.
  • Experiment with herbs: Adding fresh or dried herbs can enhance the flavor of your crust.
  • Use parchment paper: This prevents sticking and makes transferring the crust easier.
  • Don’t overload with toppings: Too many toppings can weigh down the crust, making it soggy.
  • Customize your sauce: Try pesto or white sauce as an alternative to traditional tomato sauce for a unique twist.

FAQ Section

Q: Can I freeze cauliflower crust pizza?

A: Yes, you can freeze the baked crust. Allow it to cool completely, then wrap it tightly in plastic wrap and foil. It can be stored in the freezer for up to 3 months. Add toppings and bake directly from frozen when ready to eat.

Q: Is cauliflower crust pizza suitable for a keto diet?

A: Cauliflower crust pizza is lower in carbs than traditional crusts, making it a popular choice for those following a keto diet. However, be mindful of the toppings you choose to keep it keto-friendly.

Q: How can I make the crust firmer?

A: To achieve a firmer crust, ensure that you thoroughly squeeze out all moisture from the cauliflower and consider adding an extra tablespoon of Parmesan cheese.

Q: Can I use frozen cauliflower rice?

A: Yes, you can use frozen cauliflower rice. Thaw it completely and drain any excess water before proceeding with the recipe.

Q: What can I do if my crust is too soft?

A: If your crust is too soft, try baking it a bit longer or reducing the amount of sauce used on top. Ensuring all moisture is removed from the cauliflower is also key.

Zucchini Noodle Stir-Fry

When I first stumbled upon the Zucchini Noodle Stir-Fry recipe, I was a bit skeptical. Could zucchini noodles really hold their own against traditional pasta? However, one bite was all it took to win me over. The dish is a delightful blend of flavors and textures, and it quickly became a family favorite. The zucchini noodles offer a light, fresh base that perfectly complements the array of vegetables and sauces. My family, who are not always the biggest fans of vegetables, couldn’t get enough of it. It’s a meal that feels indulgent while still being incredibly healthy, making it perfect for weeknight dinners or even special occasions.

Ingredients

To create the perfect Zucchini Noodle Stir-Fry, you will need the following ingredients:

  • 3 medium zucchinis, spiralized
  • 1 tablespoon olive oil
  • 2 cloves garlic, minced
  • 1 red bell pepper, sliced
  • 1 cup broccoli florets
  • 1 cup sliced mushrooms
  • 1 cup snap peas
  • 1 carrot, julienned
  • 2 tablespoons soy sauce
  • 1 tablespoon sesame oil
  • 1 tablespoon oyster sauce
  • 1 teaspoon grated ginger
  • Salt and pepper to taste
  • Sesame seeds and chopped scallions for garnish

Instructions

Follow these steps to make the Zucchini Noodle Stir-Fry:

  1. Prepare the zucchini noodles: Use a spiralizer to cut the zucchinis into noodles. If you don’t have a spiralizer, you can use a julienne peeler or buy pre-spiralized zucchini.
  2. Cook the vegetables: Heat olive oil in a large pan over medium heat. Add the garlic and sauté for about 30 seconds until fragrant. Add the red bell pepper, broccoli, mushrooms, snap peas, and carrot. Stir-fry the vegetables for 5-7 minutes until they are tender-crisp.
  3. Mix the sauce: In a small bowl, combine soy sauce, sesame oil, oyster sauce, and grated ginger. Stir well to blend the flavors.
  4. Add the zucchini noodles: Add the zucchini noodles to the pan with the vegetables. Pour the sauce over the noodles and vegetables, tossing everything together to coat evenly. Cook for another 2-3 minutes until the zucchini noodles are just tender but not mushy.
  5. Season and serve: Taste and adjust seasoning with salt and pepper as needed. Transfer the stir-fry to serving plates and garnish with sesame seeds and chopped scallions. Serve immediately and enjoy!

Nutrition Facts

This recipe serves 4 people, with each serving containing approximately 180 calories. It’s a nutrient-dense meal that offers a good amount of vitamins and minerals without being too heavy on calories.

Preparation Time

The Zucchini Noodle Stir-Fry is a quick and easy meal to prepare, taking about 15 minutes for preparation and another 15 minutes for cooking, totaling around 30 minutes from start to finish.

How to Serve

Here are some ideas on how to serve this delicious stir-fry:

  • Serve it as a main dish, adding some grilled chicken or tofu for extra protein.
  • Pair it with a side of steamed rice or quinoa to make the meal more filling.
  • Enjoy it with a light salad for a refreshing and balanced meal.
  • Top it with a sprinkle of crushed peanuts for a crunchy texture.
  • Serve it with a side of miso soup for a complete Asian-inspired meal.

Additional Tips

Follow these tips to enhance your Zucchini Noodle Stir-Fry experience:

  • Tip 1: Make sure not to overcook the zucchini noodles. They should be tender but still have a bit of a bite to them.
  • Tip 2: Feel free to experiment with different vegetables based on what you have on hand or what’s in season.
  • Tip 3: For added heat, consider adding a dash of chili flakes or a splash of sriracha to the sauce.
  • Tip 4: If you prefer a thicker sauce, add a teaspoon of cornstarch mixed with water to the sauce before adding it to the stir-fry.
  • Tip 5: For a richer flavor, try using toasted sesame oil instead of regular sesame oil.

FAQ Section

Here are some frequently asked questions about the Zucchini Noodle Stir-Fry:

  • Q: Can I make the zucchini noodles in advance?
  • A: Yes, you can spiralize the zucchini up to a day in advance. Store them in an airtight container in the refrigerator until ready to use.

  • Q: What if I don’t have oyster sauce?
  • A: You can substitute oyster sauce with hoisin sauce or leave it out entirely if you prefer a lighter dish.

  • Q: How can I prevent the zucchini noodles from getting watery?
  • A: After spiralizing, lightly salt the zucchini noodles and let them sit for 10 minutes, then pat dry with a paper towel to remove excess moisture.

  • Q: Is this recipe gluten-free?
  • A: To make it gluten-free, use tamari or a gluten-free soy sauce instead of regular soy sauce, and ensure that your other sauces are also gluten-free.

  • Q: Can I add protein to this dish?
  • A: Absolutely! Add cooked chicken, beef, shrimp, or tofu to increase the protein content and make it a more satisfying meal.

Sweet Potato Hash with Eggs

Sweet Potato Hash with Eggs has become a beloved staple in my household, offering the perfect balance of flavors, textures, and nutrition. I first stumbled upon this delightful recipe during a weekend brunch experiment, and it quickly became a family favorite. The combination of sweet potatoes, bell peppers, and onions, all topped with perfectly cooked eggs, creates a dish that is both comforting and satisfying. My family loves the way the natural sweetness of the potatoes complements the savory spices, while the eggs add a creamy richness that ties everything together. It’s become our go-to meal not only for brunch but also for those evenings when we crave something hearty yet healthy.

Ingredients

To bring this delicious Sweet Potato Hash with Eggs to life, you will need the following ingredients. Each component plays a crucial role in creating the harmonious blend of flavors you’re sure to love. Here’s what you’ll need:

  • 2 large sweet potatoes, peeled and diced
  • 1 red bell pepper, diced
  • 1 green bell pepper, diced
  • 1 medium onion, chopped
  • 2 tablespoons olive oil
  • 1 teaspoon smoked paprika
  • 1/2 teaspoon ground cumin
  • Salt and pepper to taste
  • 4 large eggs
  • Fresh parsley, chopped (for garnish)

Instructions

Creating this delicious Sweet Potato Hash with Eggs is straightforward and rewarding. Follow these instructions to ensure a perfect dish every time:

Step 1: Start by heating the olive oil in a large skillet over medium heat. Once the oil is shimmering, add the diced sweet potatoes. Cook them for about 10 minutes, stirring occasionally, until they begin to soften and develop a slight golden brown color.

Step 2: Add the chopped onions, red bell pepper, and green bell pepper to the skillet. Stir the vegetables together, ensuring they are evenly coated with the olive oil. Continue to cook for another 5-7 minutes, or until the onions become translucent and the peppers have softened.

Step 3: Sprinkle the smoked paprika, ground cumin, salt, and pepper over the vegetable mixture. Stir well to distribute the spices evenly. Allow the hash to cook for an additional 2-3 minutes, letting the spices infuse the vegetables with their flavors.

Step 4: Using a spoon, create four small wells in the hash mixture for the eggs. Crack one egg into each well, taking care not to break the yolks. Cover the skillet with a lid and let the eggs cook for about 5 minutes, or until the whites are set but the yolks remain runny.

Step 5: Once the eggs are cooked to your liking, remove the skillet from the heat. Garnish the dish with freshly chopped parsley before serving. Enjoy your Sweet Potato Hash with Eggs hot, straight from the skillet!

Nutrition Facts

This recipe serves four people, with each serving providing a balanced dose of nutrients. Here’s a breakdown of the nutritional information per serving:

  • Calories: 250
  • Protein: 9g
  • Carbohydrates: 30g
  • Fat: 12g
  • Fiber: 5g

Preparation Time

One of the great advantages of this Sweet Potato Hash with Eggs recipe is its simplicity and speed. From start to finish, you can expect to spend approximately 30-40 minutes preparing this dish. It’s perfect for a quick brunch or a weeknight dinner when time is of the essence, yet you still want something homemade and nutritious.

How to Serve

Serving Sweet Potato Hash with Eggs can be a delightful experience. Here are a few ideas to enhance your dining experience:

  • Serve with a side of crusty bread to soak up the delicious egg yolk and juices.
  • Add a dollop of sour cream or Greek yogurt for a tangy contrast.
  • Top with avocado slices for an added creamy texture and flavor.
  • Sprinkle with feta cheese for a salty, savory punch.
  • Pair with a simple green salad to create a well-rounded meal.

Additional Tips

To ensure your Sweet Potato Hash with Eggs turns out perfectly every time, consider these additional tips:

  1. Cut the sweet potatoes evenly: Uniform pieces ensure even cooking, preventing some pieces from becoming too mushy while others remain undercooked.
  2. Pre-cook the sweet potatoes: If you’re short on time, consider microwaving the diced sweet potatoes for a few minutes before adding them to the skillet.
  3. Use a non-stick skillet: A non-stick surface helps prevent sticking and makes cleaning up a breeze.
  4. Adjust the spices: Feel free to increase or decrease the amount of smoked paprika and cumin to suit your taste preferences.
  5. Make it spicy: For a bit of heat, add a pinch of cayenne pepper or crushed red pepper flakes.

FAQ Section

Here are some frequently asked questions about Sweet Potato Hash with Eggs:

Q: Can I make this dish vegan?
A: Absolutely! Simply omit the eggs and add extra vegetables or tofu for protein.

Q: Can I prepare this dish in advance?
A: Yes, you can prepare the hash portion in advance and reheat it in a skillet before adding fresh eggs when ready to serve.

Q: What other vegetables can I add?
A: Feel free to add your favorite vegetables such as zucchini, mushrooms, or spinach for added nutrition and flavor.

Q: Can I use regular potatoes instead of sweet potatoes?
A: Yes, you can substitute regular potatoes, but keep in mind the cooking time may vary slightly.

Q: How can I store leftovers?
A: Store any leftovers in an airtight container in the refrigerator for up to three days. Reheat gently on the stovetop before serving.

Chia Seed Pudding

Chia seed pudding has emerged as a modern-day superfood sensation, seamlessly blending health benefits with culinary versatility. This delightful pudding, made primarily from the tiny chia seed, has become a staple for those seeking a convenient yet nutritious snack or breakfast option. The beauty of chia seed pudding lies in its simplicity and adaptability, allowing it to fit into various dietary preferences and lifestyles. Its texture, reminiscent of tapioca, coupled with its mild flavor, makes it an ideal canvas for a myriad of flavor combinations. Whether you’re a health enthusiast or someone just looking to diversify your meal options, chia seed pudding offers a nutritious and delicious solution.

At its core, chia seed pudding requires just a few basic ingredients: chia seeds, a liquid of choice (commonly almond or coconut milk), and a sweetener if desired. The magic happens when chia seeds are combined with liquid, as they expand and form a gel-like consistency due to their high soluble fiber content. This transformation not only creates the pudding’s unique texture but also contributes to its impressive health benefits. Chia seeds are packed with omega-3 fatty acids, essential for heart health, and are a rich source of antioxidants and minerals such as calcium and magnesium. This makes chia seed pudding not just a treat for the taste buds but also a boon for the body.

One of the most appealing aspects of chia seed pudding is its versatility. With a basic recipe as a foundation, the possibilities for customization are endless. Fresh fruits, nuts, and spices can be added to tailor the flavor profile to individual preferences. For a tropical twist, one might incorporate mango or pineapple, while a chocolate lover might mix in cocoa powder and a dash of vanilla. The pudding can also serve as a base for more elaborate desserts or breakfast bowls, adorned with granola, berries, or a drizzle of honey. This adaptability has made chia seed pudding a favorite among those following vegan, gluten-free, or low-sugar diets, as it can be easily modified to meet specific dietary needs.

The ease of preparation is another factor that contributes to the pudding’s popularity. Made with minimal effort, chia seed pudding can be prepared in advance, making it an ideal choice for meal prepping. Simply mix the ingredients, refrigerate overnight, and wake up to a ready-to-eat, nutritious breakfast. This convenience, combined with its long shelf life when stored properly, makes chia seed pudding a practical option for busy lifestyles. Moreover, its compact nature means it can be easily transported, providing a quick and healthy option for those on the go. This combination of convenience and health benefits has led to chia seed pudding being embraced by a wide audience, from busy professionals to health-conscious families.

As chia seed pudding continues to gain popularity, it also invites a broader conversation about the importance of incorporating nutrient-dense foods into our diets. It serves as a reminder that healthy eating doesn’t have to be complicated or time-consuming. With a simple ingredient like chia seeds, one can create a dish that is not only enjoyable but also supports overall well-being. As more people discover the benefits and versatility of chia seed pudding, it stands as a testament to the idea that nourishing our bodies can be both delicious and convenient. Whether enjoyed as a breakfast staple, a midday snack, or a guilt-free dessert, chia seed pudding is a delightful way to embrace a healthier lifestyle.

Quinoa Breakfast Bowl

There’s something truly magical about starting your day with a meal that’s not only nutritious but also incredibly satisfying. The quinoa breakfast bowl has become a staple in my household, transforming our mornings into a delightful culinary experience. My family’s love for this dish is palpable, and it’s not uncommon to hear the clinking of spoons against bowls first thing in the morning as everyone eagerly digs in. The combination of warm quinoa, fresh fruits, nuts, and a drizzle of honey or maple syrup creates a harmony of flavors and textures that is simply irresistible. It’s a breakfast option that leaves us feeling energized and ready to tackle the day ahead, and I’m excited to share this recipe with you.

Ingredients

The beauty of the quinoa breakfast bowl lies in its versatility and the ability to customize it according to your preferences. Here’s what you’ll need:

  • 1 cup of quinoa – Rinsed and drained to remove any bitterness.
  • 2 cups of water or milk – For a creamier texture, opt for almond or coconut milk.
  • 1/4 teaspoon of salt – To enhance the flavor.
  • 1 tablespoon of honey or maple syrup – For natural sweetness.
  • 1/2 teaspoon of cinnamon – To add warmth and depth.
  • Fresh fruits – Such as sliced bananas, berries, or apple slices.
  • Nuts and seeds – Such as almonds, walnuts, or chia seeds for a crunchy texture.
  • Optional toppings: Yogurt, shredded coconut, or dark chocolate shavings.

Instructions

Creating a quinoa breakfast bowl is a straightforward process that requires minimal preparation. Follow these steps to craft your perfect morning meal:

  1. Start by bringing the water or milk to a gentle boil in a medium saucepan over medium heat.
  2. Add the rinsed quinoa and salt, then reduce the heat to low. Cover the saucepan and let it simmer for 15 minutes, or until the quinoa is tender and has absorbed the liquid.
  3. Once cooked, remove the saucepan from the heat and let it sit, covered, for an additional 5 minutes to allow the quinoa to fluff up perfectly.
  4. Fluff the quinoa with a fork and stir in the honey or maple syrup and cinnamon, ensuring the flavors are evenly distributed.
  5. Spoon the quinoa into bowls and top with your choice of fresh fruits, nuts, and seeds. Add any optional toppings you desire.
  6. Serve immediately and enjoy your nutritious and delicious breakfast.

Nutrition Facts

This recipe makes approximately four servings, with each serving containing around 300 calories. The exact nutritional value will vary depending on the toppings you choose to add.

Preparation Time

One of the many advantages of the quinoa breakfast bowl is its quick and easy preparation. You can have this delightful breakfast ready in just 25 minutes, making it an ideal choice for busy mornings.

How to Serve

Here’s how you can serve your quinoa breakfast bowl to maximize both taste and presentation:

  • Serve the quinoa warm for a comforting start to your day.
  • Arrange the fruit in a visually appealing pattern for an Instagram-worthy presentation.
  • Offer a variety of toppings in small bowls so everyone can customize their own bowl.
  • Pair with a hot beverage, such as coffee or tea, for a complete breakfast experience.
  • For a protein boost, add a spoonful of Greek yogurt or a poached egg on top.

Additional Tips

To ensure your quinoa breakfast bowl is always a hit, consider these tips:

  1. Pre-cook Quinoa: Prepare quinoa in advance and store it in the fridge for up to five days to save time on busy mornings.
  2. Experiment with Flavors: Try adding spices like nutmeg or cardamom for a unique twist on traditional flavors.
  3. Boost Protein: Incorporate protein powder or nut butter into your bowl for a more filling meal.
  4. Seasonal Fruits: Utilize seasonal fruits to keep the bowl fresh and exciting throughout the year.
  5. Texture Variety: Include a mix of crunchy and soft ingredients for a dynamic eating experience.

FAQ Section

  1. Can I make the quinoa breakfast bowl the night before?

    Yes, you can prepare the quinoa portion ahead of time and store it in the refrigerator. Simply reheat it in the morning and add your fresh toppings.

  2. Is quinoa gluten-free?

    Absolutely, quinoa is naturally gluten-free, making it a great option for those with gluten sensitivities or celiac disease.

  3. Can I use frozen fruits?

    Frozen fruits can be used and are a convenient option. Just be sure to thaw them before adding to your bowl for the best texture.

  4. What can I use as a sweetener alternative?

    If you prefer not to use honey or maple syrup, consider agave nectar, stevia, or a mashed banana for natural sweetness.

  5. How can I make this vegan?

    To make the quinoa breakfast bowl vegan, use plant-based milk and opt for maple syrup instead of honey.

Almond Flour Pancakes

The aroma of almond flour pancakes wafting through the house is enough to make anyone’s morning extra special. Recently, I decided to try my hand at this gluten-free alternative, and the results were nothing short of delightful. My family, usually staunch supporters of the traditional pancake, were pleasantly surprised by the light, nutty flavor and fluffy texture that these almond flour pancakes offered. It was a unanimous hit at the breakfast table, with requests for seconds and a newfound appreciation for this wholesome twist on a classic dish. The experience was not just about the taste but also about discovering a healthier option that didn’t compromise on flavor or satisfaction.

Ingredients

The beauty of almond flour pancakes lies in their simplicity and the quality of ingredients used. Here’s what you’ll need to whip up a batch of these delightful pancakes:

  • 1 cup of almond flour
  • 2 large eggs
  • 1/4 cup of almond milk (or any milk of your choice)
  • 1 tablespoon of honey (or maple syrup for a vegan option)
  • 1 teaspoon of vanilla extract
  • 1/2 teaspoon of baking powder
  • A pinch of salt
  • Butter or oil for cooking

These ingredients come together to create a batter that’s not only easy to make but also packed with flavor and nutrition. Almond flour, being the star ingredient, is rich in protein and healthy fats, making these pancakes a nutritious start to your day.

Instructions

Making almond flour pancakes is a straightforward process that even novice cooks can master. Follow these steps to create a stack of golden-brown pancakes that are sure to impress:

  1. Mix the wet ingredients: In a large bowl, whisk together the eggs, almond milk, honey, and vanilla extract until well combined.
  2. Add the dry ingredients: Gradually add the almond flour, baking powder, and salt to the wet mixture. Stir until you have a smooth batter without lumps.
  3. Heat the skillet: Place a non-stick skillet or griddle over medium heat. Add a small amount of butter or oil to the pan.
  4. Cook the pancakes: Pour 1/4 cup of batter onto the skillet for each pancake. Cook for about 2-3 minutes on one side or until bubbles form on the surface. Flip the pancake and cook for another 2 minutes until golden brown.
  5. Serve: Once all pancakes are cooked, serve them warm with your favorite toppings.

With these simple steps, you’ll have a delicious breakfast ready in no time, perfect for leisurely weekends or a quick weekday meal.

Nutrition Facts

Understanding the nutritional value of your meals is essential for maintaining a balanced diet. Here’s the breakdown for almond flour pancakes:

  • Servings: 4
  • Calories per serving: Approximately 200

These pancakes are not only delicious but also a healthier alternative to traditional wheat-based pancakes. Almond flour contributes to a lower glycemic index, which is beneficial for blood sugar management. The addition of eggs and almond milk provides a good source of protein and essential vitamins, making this breakfast option both tasty and nutrient-rich.

Preparation Time

One of the many advantages of almond flour pancakes is their quick preparation time, making them ideal for busy mornings:

  • Total preparation time: Approximately 20 minutes
  • Active cooking time: 10 minutes

This efficient cooking process allows you to enjoy a fresh, homemade meal without spending hours in the kitchen. The minimal preparation and cooking time ensure that you can savor these pancakes without the stress of a lengthy cleanup.

How to Serve

Pancakes are incredibly versatile and can be enjoyed in numerous ways. Here are some creative serving ideas to elevate your almond flour pancakes:

  • Classic: Drizzle with maple syrup and top with fresh berries for a traditional touch.
  • Nutty Delight: Sprinkle chopped nuts such as almonds or walnuts for added crunch and flavor.
  • Fruity Twist: Add sliced bananas or apples with a dollop of yogurt for a refreshing combination.
  • Indulgent: Spread a thin layer of chocolate hazelnut spread and top with whipped cream for a decadent treat.
  • Savory Option: Top with smoked salmon and cream cheese for a unique and savory breakfast experience.

These serving suggestions highlight the versatility of almond flour pancakes, allowing you to tailor your breakfast to suit your taste preferences.

Additional Tips

To ensure your almond flour pancakes turn out perfectly every time, here are some helpful tips to keep in mind:

  1. Use fresh almond flour: The quality of your almond flour affects the texture and flavor of the pancakes. Always use fresh, finely ground almond flour for the best results.
  2. Don’t overmix the batter: Mixing the batter too vigorously can lead to dense pancakes. Stir until just combined to maintain a light and fluffy texture.
  3. Adjust the heat: If the pancakes are browning too quickly, reduce the heat to ensure they cook evenly without burning.
  4. Experiment with flavors: Consider adding spices such as cinnamon or nutmeg for an extra layer of flavor.
  5. Prepare ahead of time: Make the batter the night before and store it in the fridge for a quick breakfast option in the morning.

These tips are designed to enhance your cooking experience and help you achieve pancake perfection with every batch.

FAQ Section

Here are some frequently asked questions about almond flour pancakes, along with detailed answers to guide you:

  1. Can I substitute almond flour with another type of flour? While almond flour is the star of this recipe, you can substitute it with other nut flours like cashew or hazelnut flour. However, keep in mind that each flour has unique properties that may alter the texture and flavor.
  2. Are these pancakes suitable for a keto diet? Yes, almond flour pancakes are generally suitable for a keto diet due to their low carbohydrate content. To make them fully keto-friendly, ensure all ingredients align with keto guidelines, particularly the sweeteners.
  3. Can I make these pancakes vegan? To make vegan almond flour pancakes, replace eggs with flaxseed meal mixed with water as an egg substitute, and use a plant-based milk option.
  4. How should I store leftover pancakes? Store any leftover pancakes in an airtight container in the refrigerator for up to 3 days. To reheat, simply warm them in a skillet or microwave until heated through.
  5. Can I freeze almond flour pancakes? Yes, you can freeze these pancakes. Place them in a single layer on a baking sheet, freeze until solid, then transfer to a freezer-safe bag. They can be stored for up to 2 months. Reheat directly from frozen in a toaster or oven.

These FAQs aim to address common queries and provide further assistance in making the most out of your almond flour pancake experience.