Cookies & Cream Trifle

The first time I prepared the Cookies & Cream Trifle, I knew it was going to become a family favorite. The layers of creamy, velvety goodness combined with crunchy cookie bits make this dessert irresistible. When I presented the trifle at a family gathering, it was met with rave reviews from everyone, including the kids who often have a reputation for being picky eaters. The blend of textures and flavors is exquisite, and it’s a treat that satisfies both the sweet tooth and the need for something a bit more decadent. This trifle is not just a dessert; it’s an experience that brings people together, creating moments of joy and indulgence. Its aesthetic appeal also makes it a showstopper at any event, as its layers are as delightful to the eyes as they are to the taste buds.

Ingredients

Creating a Cookies & Cream Trifle requires a handful of simple yet delicious ingredients. Each component plays a crucial role in building the trifle’s unique flavor profile. Here’s what you’ll need:

  • 1 package of chocolate sandwich cookies (such as Oreos)
  • 2 cups of heavy whipping cream
  • 1/4 cup of powdered sugar
  • 1 teaspoon of vanilla extract
  • 1 package (8 ounces) of cream cheese, softened
  • 1 cup of confectioners’ sugar
  • 1 teaspoon of vanilla extract
  • 2 cups of milk
  • 1 package (3.4 ounces) of instant vanilla pudding mix
  • 1 package (3.4 ounces) of instant chocolate pudding mix

Instructions

To achieve the perfect Cookies & Cream Trifle, follow these step-by-step instructions:

  1. Prepare the Cookie Layer: Begin by crushing the chocolate sandwich cookies. You can do this by placing them in a sealed plastic bag and using a rolling pin or by pulsing them in a food processor. Aim for a mix of small chunks and fine crumbs to provide a nice texture.
  2. Whip the Cream: In a large bowl, beat the heavy whipping cream, powdered sugar, and vanilla extract until stiff peaks form. Set this aside as it will be used to layer the trifle.
  3. Mix the Cream Cheese: In another bowl, beat the softened cream cheese with confectioners’ sugar and vanilla extract until smooth and creamy.
  4. Prepare the Pudding Layers: Using two separate bowls, prepare the vanilla and chocolate pudding mixes according to the package instructions, using the milk. Allow them to set in the fridge for about 5 minutes.
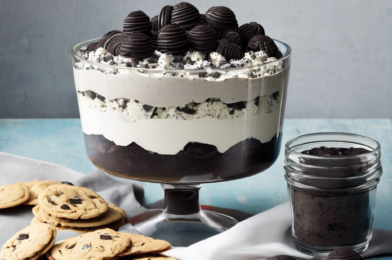
  5. Layer the Trifle: In a large trifle dish or individual serving glasses, start by adding a layer of crushed cookies. Follow with a layer of cream cheese mixture, then a layer of chocolate pudding, a layer of whipped cream, and finally a layer of vanilla pudding. Repeat the layers until all ingredients are used, finishing with a layer of whipped cream and a sprinkle of crushed cookies on top.
  6. Chill and Serve: Refrigerate the trifle for at least 2 hours before serving to allow the layers to set and the flavors to meld together beautifully.

Nutrition Facts

This dessert serves approximately 8 people, with each serving containing about 450 calories. The calorie count may vary slightly depending on the specific brands of ingredients used. Despite being a decadent treat, it can fit well into your diet if consumed in moderation.

Preparation Time

The preparation time for a Cookies & Cream Trifle is quite manageable. From start to finish, you can expect to spend around 30 minutes assembling the trifle. The chilling time, however, is crucial for achieving the desired texture and flavor, so plan for at least 2 hours in the refrigerator before serving. This makes it an excellent make-ahead dessert for parties and gatherings.

How to Serve

Serving the Cookies & Cream Trifle can be as creative as you like. Here are some suggestions:

  • Serve in a large, clear trifle dish to showcase the beautiful layers.
  • Use individual glass cups for personal servings, making them easier to distribute and manage.
  • Add a dollop of whipped cream and a whole chocolate sandwich cookie on top for garnish.
  • Pair with a cup of coffee or a glass of milk for a perfect dessert experience.
  • Consider adding some fresh berries on top for a pop of color and a hint of freshness.

Additional Tips

To ensure your Cookies & Cream Trifle is a success, consider these tips:

  1. Use Fresh Ingredients: Always use fresh cream and high-quality cookies to enhance the flavor and texture of the trifle.
  2. Adjust Sweetness: You can adjust the sweetness of the whipped cream and cream cheese layers according to your taste preferences.
  3. Chill Thoroughly: Allowing the trifle to chill well ensures that the flavors meld together and the layers set properly.
  4. Experiment with Layers: Feel free to experiment with different pudding flavors or add layers of fruit for a unique twist.
  5. Make Ahead: This trifle can be made a day in advance, making it a hassle-free option for entertaining.

FAQ Section

Q: Can I use a different type of cookie?

A: Absolutely! While chocolate sandwich cookies are traditional, you can use any cookie you prefer, such as shortbread or chocolate chip cookies.

Q: Can I make this dessert ahead of time?

A: Yes, the trifle can be made up to a day in advance. Just be sure to keep it refrigerated until you’re ready to serve.

Q: What can I use as a substitute for cream cheese?

A: Mascarpone cheese can be a great substitute for cream cheese, providing a similar creamy texture with a slightly different flavor profile.

Q: Is it possible to make this trifle gluten-free?

A: Yes, simply use gluten-free cookies and check that all other ingredients are certified gluten-free.

Q: How can I store leftovers?

A: Store any leftovers in an airtight container in the refrigerator. It’s best consumed within 2-3 days for optimal freshness.

Peanut Butter Fudge Bars

There’s something truly magical about the combination of peanut butter and chocolate. This iconic duo has transcended generations, delighting taste buds with their sweet and salty harmony. Recently, I decided to try a recipe that promised to bring these flavors together in the most decadent way possible: Peanut Butter Fudge Bars. As a food enthusiast, I was eager to see if these bars would live up to their promise of indulgence. After spending a cozy afternoon in the kitchen, I was not disappointed. The rich, gooey texture of the fudge, paired with the creamy peanut butter and a touch of crunch, made for a dessert that quickly became a family favorite. Each bite seemed to melt in the mouth, leaving behind a lingering sweetness that was simply irresistible. My family devoured them in no time, and I knew this recipe was a keeper.

Ingredients

Creating the perfect batch of Peanut Butter Fudge Bars requires a careful selection of ingredients that complement each other to bring out the rich flavors. Here’s what you’ll need:

  • 1 cup of unsalted butter
  • 1 1/2 cups of granulated sugar
  • 1 cup of brown sugar, packed
  • 1 cup of creamy peanut butter
  • 2 teaspoons of vanilla extract
  • 3 large eggs
  • 2 1/2 cups of all-purpose flour
  • 1 teaspoon of baking powder
  • 1/2 teaspoon of salt
  • 1 1/2 cups of chocolate chips
  • 1/2 cup of chopped peanuts (optional for added crunch)

These ingredients work together to create layers of flavor and texture, making each bar a delightful treat.

Instructions

Making Peanut Butter Fudge Bars is a straightforward process, but it requires attention to detail to achieve the perfect consistency and flavor. Follow these steps carefully:

  1. Preheat your oven to 350°F (175°C) and line a 9×13 inch baking pan with parchment paper.
  2. In a medium saucepan, melt the butter over medium heat. Once melted, remove from heat and stir in granulated sugar, brown sugar, and peanut butter until smooth.
  3. Add the vanilla extract and eggs, one at a time, beating well after each addition.
  4. In a separate bowl, whisk together the flour, baking powder, and salt. Gradually add this dry mixture to the wet ingredients, stirring until just combined.
  5. Fold in the chocolate chips and chopped peanuts, if using.
  6. Pour the batter into the prepared baking pan, spreading it evenly with a spatula.
  7. Bake in the preheated oven for 25-30 minutes, or until the edges are golden brown and a toothpick inserted into the center comes out with a few moist crumbs.
  8. Allow the bars to cool completely in the pan before slicing into squares.

These steps will guide you in creating a batch of bars that are both delicious and visually appealing, perfect for any occasion.

Nutrition Facts

It’s always helpful to know the nutritional value of what we consume, especially when indulging in sweet treats like Peanut Butter Fudge Bars. Here’s a breakdown of the nutrition facts for this recipe:

Servings: 16 bars

Calories per serving: Approximately 280

Each serving provides a delightful balance of carbohydrates, fats, and proteins, making these bars a satisfying treat that can fit into most diets when enjoyed in moderation.

Preparation Time

Time is of the essence when it comes to baking, and knowing how long you’ll spend in the kitchen can help with planning. Here’s a rough estimate of the preparation time for Peanut Butter Fudge Bars:

  • Preparation time: 15 minutes
  • Cooking time: 30 minutes
  • Total time: 45 minutes

This quick and easy recipe is perfect for those who want to whip up a delicious dessert without spending hours in the kitchen.

How to Serve

Serving Peanut Butter Fudge Bars can be as creative as you’d like. Here are some serving suggestions to enhance your experience:

  • Serve warm with a scoop of vanilla ice cream for a dreamy dessert.
  • Dust with powdered sugar for an elegant presentation.
  • Pair with a hot cup of coffee or tea for an afternoon treat.
  • Wrap individually in parchment paper for a grab-and-go snack.
  • Top with a dollop of whipped cream and a drizzle of chocolate sauce for added decadence.

These serving ideas will help you turn a simple treat into a memorable experience for you and your guests.

Additional Tips

Creating the perfect Peanut Butter Fudge Bars can be an art form. Here are some additional tips to ensure success:

  1. Use quality peanut butter: Opt for creamy, natural peanut butter for the best flavor and texture.
  2. Don’t overmix: Be careful not to overmix the batter to maintain a tender texture.
  3. Check for doneness: Use a toothpick to check if the bars are done; it should come out with moist crumbs, not wet batter.
  4. Cool completely: Allow the bars to cool fully in the pan before slicing to prevent them from falling apart.
  5. Store properly: Keep the bars in an airtight container at room temperature for up to a week.

Following these tips will help you achieve the perfect balance of flavors and textures in your bars.

FAQ Section

Here are some frequently asked questions about Peanut Butter Fudge Bars to help you better understand this delightful dessert:

  1. Can I use crunchy peanut butter instead of creamy? Yes, you can use crunchy peanut butter for added texture and a nutty bite.
  2. Can I substitute almond butter for peanut butter? Absolutely! Almond butter can be used as a substitute for a different flavor profile.
  3. What is the best way to melt the butter? You can melt the butter in a saucepan over low heat or in the microwave in short intervals until fully melted.
  4. Can I freeze these bars? Yes, you can freeze the bars for up to three months. Wrap them tightly in plastic wrap and store in a freezer-safe container.
  5. How can I make these bars gluten-free? Substitute the all-purpose flour with a gluten-free flour blend to make the bars gluten-free.

These FAQs aim to address common concerns and help you customize the recipe to your liking. Enjoy creating and savoring your Peanut Butter Fudge Bars!

Dark Chocolate Mousse

Dark chocolate mousse is a decadent dessert that manages to strike the perfect balance between indulgence and sophistication. Its silky texture and rich flavor make it an irresistible treat for chocolate lovers. This dessert not only satisfies a sweet tooth but also provides the distinct pleasure of savoring something that feels both luxurious and comforting. The allure of dark chocolate mousse lies in its simplicity; with just a few ingredients, it delivers a dessert experience that feels like a reward. Whether enjoyed after a special dinner or as a treat to brighten a regular day, dark chocolate mousse has a way of elevating any occasion. The whipped texture and intense chocolate flavor create a harmony that is both satisfying and delightful.

The process of making dark chocolate mousse can be as enjoyable as eating it. Watching the transformation of chocolate and cream into a light, airy mousse is a kind of culinary magic. The ingredients typically include dark chocolate, cream, sugar, and eggs, each playing a vital role in achieving the perfect consistency. The dark chocolate provides depth and a slight bitterness that balances the sweetness of the sugar, while the cream adds a luxurious feel. Whipping the cream to the right consistency and folding it into the chocolate mixture allows air to be incorporated, resulting in the mousse’s characteristic lightness. Despite its rich flavor, dark chocolate mousse is surprisingly light, making it an excellent choice for a dessert that won’t overwhelm the palate.

Dark chocolate mousse also offers a canvas for creativity and personalization. It can be served in various ways to suit different tastes and occasions. For a classic presentation, it can be piped into elegant glasses and topped with a dollop of whipped cream or a sprinkle of grated chocolate. For those looking to add a twist, consider infusing the mousse with flavors like orange zest, coffee, or a hint of chili for a surprising kick. Garnishing with fresh berries, mint leaves, or nuts can add color and texture, enhancing the visual appeal and flavor profile. Whether you stick to tradition or experiment with new combinations, dark chocolate mousse remains a timeless dessert that delights the senses and brings a touch of elegance to any gathering.

Raspberry Macaron Bliss

Raspberry macarons are a delightful fusion of delicate sweetness and vibrant fruitiness, offering a true taste of bliss in every bite. The very essence of these French confections lies in their exquisite texture and flavor, which can transport anyone to a world of culinary delight. My family recently indulged in these raspberry macarons, and the verdict was unanimous—they were a hit! The gentle crunch of the outer shell, followed by the soft, chewy center, was perfectly complemented by the tartness of the raspberry filling. These macarons didn’t just capture our taste buds; they also brought us together, as we savored each bite and shared moments of joy and laughter. The experience reminded me that sometimes, the simplest pleasures—like a well-crafted macaron—can create the most cherished memories.

Ingredients

To create the perfect batch of raspberry macarons, you’ll need a precise list of ingredients. The base of the macaron shell is made from almond flour, powdered sugar, and egg whites. It’s crucial to use superfine almond flour to achieve that smooth, glossy surface. The powdered sugar adds sweetness and helps bind the mixture together, while the egg whites provide the necessary airiness and structure. For the raspberry filling, fresh or frozen raspberries work beautifully, along with granulated sugar to balance out the natural tartness. A touch of lemon juice enhances the raspberry flavor, making it pop with a refreshing zing.

Here’s the complete list of ingredients you’ll need:

  • Macaron Shells:
    • 1 cup almond flour
    • 1 3/4 cups powdered sugar
    • 3 large egg whites
    • 1/4 cup granulated sugar
    • 1/4 teaspoon cream of tartar
    • Red or pink gel food coloring
  • Raspberry Filling:
    • 1 cup raspberries (fresh or frozen)
    • 1/4 cup granulated sugar
    • 1 tablespoon lemon juice
    • 1 tablespoon cornstarch

Instructions

Creating raspberry macarons is both an art and a science, requiring care and precision at every step. Start by preheating your oven to 300°F (150°C) and lining two baking sheets with parchment paper. Next, sift the almond flour and powdered sugar together in a bowl to ensure there are no lumps. In a separate bowl, whisk the egg whites until they’re foamy, then add the cream of tartar. Gradually add the granulated sugar while continuing to whisk, until the mixture forms stiff peaks. This part is crucial, as the stiffness of the meringue will determine the rise and texture of your macarons.

Gently fold the dry ingredients into the meringue, adding the gel food coloring until you achieve your desired shade of pink. The folding process, known as “macaronage,” is critical; too much mixing can deflate the meringue, while too little can result in a lumpy batter. The batter should be smooth and flow like lava. Transfer it to a piping bag and pipe small circles onto the prepared baking sheets. Tap the sheets firmly on the counter to release any air bubbles, then let the piped macarons sit at room temperature for 30 minutes to an hour, or until they form a skin.

Bake the macarons for 15-18 minutes, rotating the sheets halfway through to ensure even baking. They should have a smooth top and a characteristic “foot” at the base. Let them cool completely before removing them from the parchment paper. For the filling, heat the raspberries, sugar, and lemon juice in a saucepan over medium heat. Stir in the cornstarch until the mixture thickens. Allow it to cool before piping onto the macaron shells. Sandwich together, and voila! You have made raspberry macarons.

Nutrition Facts

This recipe yields approximately 24 macarons, with each serving containing around 150 calories. The exact calorie count may vary depending on the specific brands of ingredients used, but these macarons are a delightful treat that can fit into a balanced diet when enjoyed in moderation. They provide a sweet indulgence with a touch of fruitiness, making them a perfect dessert for family gatherings or special occasions. Remember, savoring even a small dessert like this can bring immense satisfaction without compromising your dietary goals.

Preparation Time

The preparation time for raspberry macarons is about 45 minutes, with an additional 30 to 60 minutes of resting time for the macaron shells before baking. This allows the shells to develop their characteristic “feet” and ensures a smooth, glossy finish. Baking time is approximately 15-18 minutes, and the filling takes just about 10 minutes to prepare. Overall, the entire process can be completed in about two hours, making it a feasible project for a leisurely afternoon of baking.

How to Serve

Raspberry macarons are versatile and can be served in various ways, depending on the occasion and your personal preferences. Here are a few suggestions:

  • As a dessert centerpiece at a dinner party, arranged elegantly on a tiered serving platter.
  • Accompanied by a cup of tea or coffee for a delightful afternoon snack.
  • Wrapped in a decorative box or bag as a gift for friends and family.
  • Incorporated into a dessert buffet, alongside other bite-sized treats.
  • Paired with a glass of champagne for a luxurious treat at a special celebration.

Additional Tips

Making macarons can be a challenging yet rewarding experience. Here are some tips to help ensure success:

  1. Use aged egg whites: Letting egg whites age for 24 to 48 hours in the refrigerator can improve their stability when whipped.
  2. Measure ingredients precisely: Use a kitchen scale for accuracy, as even small deviations can affect the outcome.
  3. Practice patience: Allow the piped macarons to rest long enough to form a proper “skin” before baking.
  4. Invest in a good oven thermometer: Oven temperatures can vary, so an accurate thermometer is essential for consistent results.
  5. Experiment with flavors: Once you’ve mastered the basic recipe, try different fillings or add flavor extracts to the shells for variety.

FAQ Section

Here are some frequently asked questions about raspberry macarons:

  1. Why do my macarons have cracks?

    Cracks can occur if the oven temperature is too high or if the macarons haven’t rested long enough before baking. Ensure your oven is properly calibrated and let the macarons develop a good skin before baking.

  2. Can I use liquid food coloring?

    It’s best to use gel food coloring, as liquid can alter the consistency of the batter. Gel coloring provides vibrant color without affecting texture.

  3. How long do macarons last?

    Stored in an airtight container in the refrigerator, macarons can last up to a week. Allow them to come to room temperature before serving for the best flavor and texture.

  4. Can I freeze macarons?

    Yes, macarons freeze well. Place them in an airtight container with parchment paper between layers to prevent sticking. They can be frozen for up to three months.

  5. What if I don’t have almond flour?

    You can make your own by grinding blanched almonds into a fine powder. Be sure to sift the flour to remove any larger pieces.

Lemon Meringue Pie

When it comes to desserts that delight the taste buds and evoke a sense of nostalgia, Lemon Meringue Pie holds a special place in many hearts. This classic dessert, with its tangy lemon filling and fluffy meringue topping, has been a favorite in households around the world for generations. Personally, my family absolutely adores it. I remember the first time I made Lemon Meringue Pie; the kitchen was filled with the zesty aroma of fresh lemons, and the pie’s vibrant yellow hue was a feast for the eyes. When I served it, the meringue was perfectly golden and had a delightful balance of sweetness that complemented the tart lemon filling beautifully. Everyone went back for seconds, a sure sign that this pie was a hit!

Ingredients

To create this delectable Lemon Meringue Pie, you will need the following ingredients:

  • 1 pre-made pie crust (or homemade, if you prefer)
  • 1 cup of granulated sugar
  • 1/4 cup of cornstarch
  • 1/4 teaspoon of salt
  • 1 1/2 cups of water
  • 3 egg yolks, beaten
  • 2 tablespoons of unsalted butter
  • 1/3 cup of fresh lemon juice
  • 1 tablespoon of grated lemon zest
  • 4 egg whites
  • 1/4 teaspoon of cream of tartar
  • 1/2 cup of granulated sugar (for meringue)

Instructions

Begin by preheating your oven to 350°F (175°C). Line your pie pan with the prepared crust and bake it according to the package instructions until it’s lightly golden. Set aside to cool.

In a medium saucepan, combine the 1 cup of sugar, cornstarch, and salt. Gradually stir in the water until smooth. Cook over medium heat, stirring constantly, until the mixture thickens and comes to a boil. Boil for 1 minute and remove from heat.

Whisk a small amount of the hot mixture into the egg yolks, then return all to the pan, stirring constantly. Bring to a gentle boil; cook and stir for 2 minutes. Remove from heat and stir in butter, lemon juice, and lemon zest. Pour the hot filling into the cooled crust.

For the meringue, beat egg whites and cream of tartar on medium speed until soft peaks form. Gradually add the sugar, 1 tablespoon at a time, on high until stiff peaks form. Spread evenly over hot filling, sealing edges to crust.

Bake at 350°F for 10-12 minutes or until meringue is golden. Cool for 1 hour, then refrigerate for at least 3 hours before serving. Enjoy your homemade Lemon Meringue Pie!

Nutrition Facts

This recipe yields approximately 8 servings. Each serving contains about 320 calories. It’s a delightful treat that can be enjoyed in moderation as part of a balanced diet.

Preparation Time

The total preparation time for this Lemon Meringue Pie is about 45 minutes, with an additional 3 hours for cooling and setting. It’s a perfect dessert to prepare ahead of time for gatherings.

How to Serve

  • Serve chilled for a refreshing treat on a warm day.
  • Pair with a dollop of whipped cream for extra indulgence.
  • Garnish with lemon slices or zest for a decorative touch.
  • Enjoy with a cup of tea or coffee for a comforting snack.
  • Perfect as a light dessert following a hearty meal.

Additional Tips

  1. Use fresh lemons: Freshly squeezed lemon juice and zest will give your pie the best flavor.
  2. Room temperature ingredients: Ensure eggs and butter are at room temperature for better consistency.
  3. Prevent meringue weeping: Spread meringue over hot filling to help it adhere and reduce weeping.
  4. Seal the meringue: Make sure the meringue touches the crust to prevent shrinking.
  5. Cooling time: Allow the pie to cool completely before refrigerating to set properly.

FAQ Section

Q: Can I use bottled lemon juice instead of fresh?

A: While you can use bottled lemon juice, fresh lemon juice is recommended for the best flavor and aroma.

Q: How do I store leftover pie?

A: Store leftovers in an airtight container in the refrigerator for up to 3 days.

Q: Can I make the pie crust from scratch?

A: Absolutely! A homemade pie crust can add a wonderful homemade touch to the pie.

Q: How do I know when the meringue is ready?

A: The meringue is ready when it forms stiff peaks and is glossy. It should hold its shape when lifted.

Q: Is there a way to make this pie dairy-free?

A: Yes, you can substitute the butter with a dairy-free alternative to make the pie dairy-free.

Cinnamon Sugar Churros

There’s something universally delightful about the crispy, golden allure of a freshly made churro. With their roots tracing back to Spain, these elongated pastries have traveled across continents and cultures, finding a place in the hearts (and stomachs) of food enthusiasts everywhere. Recently, I decided to whip up a batch of Cinnamon Sugar Churros for my family, and the experience was nothing short of magical. As the aroma of cinnamon and sugar wafted through the air, it was as if the kitchen transformed into a cozy corner of a bustling Spanish market. The churros emerged from the oil with a satisfying crunch, their exterior perfectly crisp while the inside remained soft and slightly chewy. My family gathered around, each bite accompanied by delighted murmurs and the inevitable question: “Is there more?” This recipe has now become a staple in our home, a testament to its irresistible charm and the joy it brings to those who indulge in it.

Ingredients

Crafting the perfect churro begins with quality ingredients that come together to create this beloved treat. Here’s what you’ll need for a batch that serves six:

  • 1 cup of water
  • 2 1/2 tablespoons of white sugar
  • 1/2 teaspoon of salt
  • 2 tablespoons of vegetable oil
  • 1 cup of all-purpose flour
  • 2 quarts of oil for frying
  • 1/2 cup of white sugar, or to taste
  • 1 teaspoon of ground cinnamon

Instructions

Creating churros at home is a rewarding process that combines simple steps with a bit of culinary magic. Follow these instructions for a delightful result:

  1. In a small saucepan over medium heat, combine water, 2 1/2 tablespoons of sugar, salt, and 2 tablespoons of vegetable oil. Bring to a boil and remove from heat. Stir in flour until the mixture forms a ball.
  2. Heat oil for frying in a deep-fryer or deep skillet to 375°F (190°C). Pipe strips of dough into hot oil using a pastry bag. Fry until golden, about 2 minutes on each side.
  3. Remove churros from hot oil and drain on paper towels.
  4. Combine 1/2 cup sugar and cinnamon in a small bowl. Roll drained churros in sugar mixture.

Nutrition Facts

These churros serve six people, making it a great option for a family dessert or a small gathering. Each serving comes in at approximately 150 calories. While the sweetness of cinnamon and sugar is undeniable, it’s important to enjoy these treats in moderation, given their fried nature. However, the occasional indulgence can be a delightful escape from the routine diet, adding a bit of sweetness to your day.

Preparation Time

Making churros at home is a relatively quick affair, perfect for a spontaneous dessert craving or a planned culinary adventure. From start to finish, the entire process takes about 45 minutes. This includes the time needed for preparation, cooking, and a few moments to let the churros cool slightly before serving. The efficiency of this recipe makes it an ideal choice for both novice cooks and experienced chefs looking for a quick yet impressive treat.

How to Serve

Churros are a versatile treat that can be served in various delightful ways. Here are some serving suggestions to elevate your churro experience:

  • Classic Style: Serve warm churros dusted with cinnamon sugar alongside a cup of hot chocolate for dipping.
  • Ice Cream Dream: Pair churros with a scoop of vanilla or chocolate ice cream, allowing the warmth of the churros to slightly melt the ice cream.
  • Fruit and Churros: Add a fresh twist by serving churros with a side of berries or sliced fruits.
  • Nutty Delight: Drizzle churros with a bit of melted chocolate and sprinkle with crushed nuts for a crunchy texture.
  • Spicy Kick: For those who enjoy a hint of spice, add a dash of cayenne pepper to the cinnamon sugar mixture.

Additional Tips

To ensure your churros turn out perfectly every time, consider these helpful tips:

  1. Use a Sturdy Pastry Bag: The dough can be quite thick, so opt for a robust pastry bag or a churrera to pipe the churros with ease.
  2. Maintain the Oil Temperature: Keep the oil at a consistent 375°F (190°C) to ensure even cooking and a golden brown crust.
  3. Don’t Overcrowd the Fryer: Fry the churros in small batches to prevent the oil temperature from dropping and to avoid sticking.
  4. Experiment with Flavors: Feel free to add a touch of vanilla or a sprinkle of nutmeg to the dough for a unique twist.
  5. Store Properly: If you have leftovers, store them in an airtight container and reheat in the oven to restore their crispiness.

FAQ Section

Here are some frequently asked questions about making churros at home:

  1. Can I make churros without a deep fryer? Yes, you can use a deep skillet or a pot with enough oil to submerge the churros. Ensure the oil is deep enough for even cooking.
  2. What can I use instead of a pastry bag? If you don’t have a pastry bag, you can use a plastic zip-top bag and cut a corner to pipe the dough.
  3. Can churros be baked instead of fried? While traditional churros are fried, you can bake them at 400°F (200°C) until golden brown, though they may lack the signature crispiness.
  4. How do I prevent churros from becoming soggy? Ensure the oil is at the correct temperature and avoid overcrowding the fryer. Drain churros on paper towels immediately after frying.
  5. Can I prepare the dough in advance? Yes, you can prepare the dough a day ahead and store it in the refrigerator. Bring it to room temperature before frying.

Mango Mousse Magic

There’s something enchanting about the tropical allure of mangoes, a fruit that embodies the essence of summer with its vibrant hue and luscious sweetness. This charm multiplies when transformed into a delightful dessert like Mango Mousse. As a food enthusiast, I’ve always gravitated towards recipes that not only taste heavenly but also capture the spirit of the season, and this mango mousse does just that. Upon serving this to my family, the smiles on their faces were enough to convince me that this dessert is more than just a sweet treat; it’s a slice of happiness in a bowl. The lightness of the mousse combined with the rich flavor of ripe mangoes creates a symphony of taste that dances on the palate, making it a new favorite in our household.

Ingredients

Creating the perfect mango mousse requires a few key ingredients that come together to create a smooth and airy texture. Here’s what you’ll need:

  • 2 ripe mangoes, peeled and cubed
  • 1 cup heavy cream
  • 1/2 cup sugar
  • 1 tablespoon lemon juice
  • 1 packet (about 2 teaspoons) unflavored gelatin
  • 1/4 cup water
  • Fresh mint leaves for garnish (optional)

Instructions

Making mango mousse can be a rewarding experience, and with this step-by-step guide, you’ll find it’s easier than you might think.

Step 1: Begin by puréeing the mango cubes in a blender until smooth. Set aside a few tablespoons of this purée for garnish. In a small bowl, sprinkle the gelatin over water and let it bloom for about 5 minutes.

Step 2: In a saucepan, combine the mango purée, sugar, and lemon juice. Heat on medium until the sugar dissolves completely. Remove from heat and stir in the bloomed gelatin until fully incorporated. Allow this mixture to cool to room temperature.

Step 3: In a separate bowl, whip the heavy cream until it forms soft peaks. Gently fold the cooled mango mixture into the whipped cream, ensuring that you maintain the airy texture.

Step 4: Spoon the mousse into individual serving glasses and chill in the refrigerator for at least 2 hours or until set.

Step 5: Before serving, top with a dollop of reserved mango purée and a sprig of mint for a refreshing finish.

Nutrition Facts

This delicious mango mousse recipe serves four and contains approximately 250 calories per serving. It’s a light and refreshing dessert that can fit into many dietary preferences while providing a taste of tropical delight.

Preparation Time

Preparing this delectable dessert is quick and straightforward. The active preparation time is about 20 minutes, while the mousse requires at least 2 hours to set in the refrigerator. This makes it a perfect make-ahead dessert for dinner parties or gatherings.

How to Serve

Serving mango mousse can be as creative as you like. Here are a few presentation ideas:

  • Serve in elegant martini glasses for a sophisticated touch.
  • Layer with ladyfingers for a tropical twist on tiramisu.
  • Add a scoop of vanilla ice cream for an indulgent treat.
  • Top with fresh berries for a burst of color and flavor.
  • Garnish with edible flowers for a stunning visual appeal.

Additional Tips

Here are some tips to enhance your mango mousse experience:

  1. Choose Ripe Mangoes: The sweetness and flavor of the mousse depend heavily on the quality of the mangoes. Ensure they are ripe and fragrant.
  2. Chill Your Tools: For best results, chill your mixing bowl and beaters before whipping the cream to achieve a stable, airy texture.
  3. Adjust Sweetness: Taste the mango purée before adding sugar. Depending on the sweetness of the mangoes, you might want to adjust the sugar quantity.
  4. Room Temperature Mixing: Make sure the mango-gelatin mixture is at room temperature before folding it into the whipped cream to prevent the cream from deflating.
  5. Experiment with Flavors: Add a splash of coconut rum or a pinch of cardamom for an exotic twist to the traditional recipe.

FAQ Section

Here are some common questions and their answers about making mango mousse:

  1. Can I use canned mangoes? Yes, canned mangoes can be used if fresh ones are not available, but ensure they are unsweetened to control the sugar content.
  2. How can I make it vegan? Substitute heavy cream with coconut cream and use agar-agar instead of gelatin for a vegan version.
  3. What if my mousse doesn’t set? Ensure the gelatin is fully dissolved and properly incorporated. Chilling for a longer time can also help.
  4. Can I freeze mango mousse? Freezing is not recommended as it can alter the texture, making the mousse lose its creamy consistency.
  5. What other fruits can I use? Papaya, passion fruit, or even berries can be delightful alternatives, each bringing its unique flavor profile to the mousse.

Honey Almond Baklava

Honey Almond Baklava is a dessert that transcends cultural boundaries, a sweet indulgence that has captured the hearts of many worldwide. Its layers of flaky phyllo dough, combined with the rich, nutty flavor of almonds and the sticky sweetness of honey, create a symphony of textures and tastes that are nothing short of addictive. This dessert, with roots tracing back centuries in Middle Eastern and Mediterranean cuisines, has found its way into bakeries and kitchens around the globe. In my own family, the introduction of Honey Almond Baklava was met with resounding enthusiasm. Each bite was savored, and the pan was emptied faster than I anticipated, a clear testament to its universal appeal and the joy it brings to those who indulge in it.

Ingredients

Creating the perfect Honey Almond Baklava requires a thoughtfully curated selection of ingredients that come together to form this delectable dessert. The ingredients list is straightforward yet essential to achieve the authentic taste and texture:

  • 1 package of phyllo dough (16 ounces)
  • 1 cup of unsalted butter, melted
  • 2 cups of finely chopped almonds
  • 1 cup of granulated sugar
  • 1 teaspoon of ground cinnamon
  • 1 cup of honey
  • 1/2 cup of water
  • 1 teaspoon of vanilla extract
  • 1/2 teaspoon of lemon zest

Instructions

Preparing Honey Almond Baklava is an art form, and while it might seem daunting at first glance, the process is straightforward with a little patience and attention to detail. Here’s a step-by-step guide to crafting this delicious treat:

  1. Preheat your oven to 350°F (175°C). Grease a 9×13 inch baking dish.
  2. In a medium-sized bowl, mix the chopped almonds with sugar and cinnamon until well combined.
  3. Unroll the phyllo dough and cut it to fit your baking dish. Cover it with a damp cloth to prevent drying.
  4. Place two sheets of phyllo in the baking dish and brush with melted butter. Repeat this process until you have layered 8 sheets.
  5. Sprinkle a thin layer of the almond mixture over the phyllo layers.
  6. Continue layering 2 sheets of phyllo, brushing with butter, and sprinkling almond mixture for about 8 layers.
  7. Finish with a top layer of 8 sheets of phyllo brushed with butter.
  8. Using a sharp knife, cut the baklava into diamond or square shapes, ensuring to cut all the way through to the bottom layer.
  9. Bake in the preheated oven for about 50 minutes until the baklava is golden and crisp.
  10. While the baklava is baking, combine honey, water, vanilla extract, and lemon zest in a saucepan. Bring it to a boil, then reduce heat and simmer for 10 minutes.
  11. Remove the baklava from the oven and immediately pour the honey syrup over it, ensuring it seeps through all the layers.
  12. Allow the baklava to cool completely before serving. This helps the syrup to be fully absorbed.

Nutrition Facts

Baklava is a rich and indulgent dessert, and while it’s not an everyday treat, it’s perfect for special occasions or when you want to impress your guests. Here’s a quick look at the nutritional breakdown:

  • Servings: 24 pieces
  • Calories per serving: Approximately 200 calories

Preparation Time

The preparation time for Honey Almond Baklava might seem extensive, but each step is crucial to achieving the perfect balance of flavor and texture. Here’s an estimated time breakdown:

  • Preparation: 30 minutes
  • Cooking: 50 minutes
  • Total: 1 hour and 20 minutes

How to Serve

Serving Honey Almond Baklava can be as simple or as elaborate as you wish. Here are a few suggestions for presenting this delightful dessert:

  • Classic: Serve the baklava pieces on a decorative plate for a traditional presentation.
  • With Ice Cream: Pair with a scoop of vanilla or pistachio ice cream to complement the flavors.
  • With Whipped Cream: Add a dollop of whipped cream for an extra touch of decadence.
  • Garnished with Nuts: Sprinkle some finely chopped almonds or pistachios over the top for added texture and presentation.
  • With Coffee or Tea: Serve alongside a cup of strong coffee or tea to balance the sweetness.

Additional Tips

Making the perfect baklava can be an art, but here are some additional tips to ensure your dessert is a success:

  1. Keep Phyllo Moist: Phyllo dough dries out quickly, so always keep it covered with a damp cloth while working.
  2. Use Fresh Nuts: Fresh, high-quality almonds will provide the best flavor.
  3. Let it Sit: Allow the baklava to sit overnight for the flavors to meld and the syrup to fully absorb.
  4. Cut Before Baking: Always cut the baklava into pieces before baking to ensure clean edges.
  5. Experiment with Flavors: Try adding other spices like cardamom or clove for a unique twist.

FAQ Section

Q: Can I use other nuts in this recipe?

A: Absolutely! While almonds are delicious, you can substitute or mix with walnuts, pistachios, or pecans for different flavors and textures.

Q: How do I store leftover baklava?

A: Store leftover baklava in an airtight container at room temperature for up to a week. Avoid refrigeration as it may cause the phyllo to become soggy.

Q: Can I freeze baklava?

A: Yes, baklava can be frozen. Wrap it tightly in plastic wrap and foil before freezing. Thaw at room temperature before serving.

Q: What if my baklava turns out too soggy?

A: Ensure you bake it long enough until golden and crisp, and use a hot syrup over cooled baklava or vice versa to avoid sogginess.

Q: Can I make baklava ahead of time?

A: Yes, baklava can be made a day or two in advance. In fact, letting it sit allows the flavors to meld beautifully, making it taste even better.

Strawberry Shortcake Delight

There’s something undeniably charming about the classic dessert known as Strawberry Shortcake Delight. The combination of sweet, juicy strawberries, fluffy whipped cream, and tender cake layers creates a harmonious blend of flavors and textures that has delighted dessert lovers for generations. As a culinary journalist, I had the opportunity to indulge in this delightful treat with my family, and it quickly became a household favorite. The moment the first bite was taken, the room filled with smiles and nods of approval. The freshness of the strawberries paired with the lightness of the cake was nothing short of perfection. It’s a dessert that, while simple in its ingredients, manages to evoke a sense of nostalgia and joy, making it a staple for any occasion.

Ingredients

Creating the perfect Strawberry Shortcake Delight begins with selecting the finest ingredients. This dessert is all about freshness and quality, so it’s important to choose ripe, juicy strawberries. You’ll need about 2 cups of fresh strawberries, hulled and sliced. For the cake, you’ll require 1 and 1/2 cups of all-purpose flour, 1 cup of granulated sugar, 1/2 cup of unsalted butter (softened), 2 large eggs, 1 teaspoon of vanilla extract, 1 and 1/2 teaspoons of baking powder, and 1/2 teaspoon of salt. Whipped cream is the final touch, and you can either make your own using 1 cup of heavy whipping cream and 2 tablespoons of powdered sugar or opt for a high-quality store-bought version.

Instructions

Begin by preheating your oven to 350°F (175°C) and greasing a 9-inch round cake pan. In a large bowl, cream together the softened butter and granulated sugar until light and fluffy. Add the eggs one at a time, beating well after each addition. Mix in the vanilla extract. In a separate bowl, whisk together the flour, baking powder, and salt. Gradually add the dry ingredients to the wet ingredients, mixing just until combined. Pour the batter into the prepared cake pan and smooth the top with a spatula.

Bake for 25-30 minutes or until a toothpick inserted into the center comes out clean. Allow the cake to cool in the pan for 10 minutes, then transfer to a wire rack to cool completely. Once the cake is cooled, slice it in half horizontally to create two layers. Spread a generous layer of whipped cream over the bottom layer, followed by an even layer of sliced strawberries. Place the second cake layer on top and repeat with more whipped cream and strawberries. Serve immediately or refrigerate until ready to enjoy.

Nutrition Facts

This Strawberry Shortcake Delight serves approximately 8 people, with each serving containing around 320 calories. While this dessert is an indulgence, it’s a treat that can be enjoyed in moderation. The use of fresh ingredients and the option to control the sweetness of the whipped cream allow for a more balanced dessert experience.

Preparation Time

The preparation time for Strawberry Shortcake Delight is relatively quick, making it an excellent choice for a last-minute dessert option. From start to finish, you can expect to spend about 20 minutes on preparation and 30 minutes on baking and assembly, totaling approximately 50 minutes before you can dig into this delightful treat.

How to Serve

  • Serve the Strawberry Shortcake Delight on a large platter, allowing guests to help themselves to generous slices.
  • Add a sprig of mint or a light dusting of powdered sugar for an elegant presentation.
  • Pair with a chilled glass of sparkling wine or lemonade for a refreshing contrast.
  • For a more decadent experience, drizzle with a homemade strawberry sauce.
  • Consider serving with additional fresh strawberries on the side for those who can’t get enough.

Additional Tips

Tip 1: When selecting strawberries, look for ones that are bright red without any white or green spots, as these indicate ripeness and sweetness.

Tip 2: For a richer flavor, consider adding a tablespoon of lemon zest to the cake batter.

Tip 3: If you’re pressed for time, a store-bought angel food cake can be used as a substitute for the homemade cake.

Tip 4: Ensure the cake is completely cool before slicing it horizontally to prevent crumbling.

Tip 5: To stabilize the whipped cream, add a teaspoon of cornstarch while whipping to help it maintain its shape longer.

FAQ Section

Q1: Can I use frozen strawberries for this recipe?
A: While fresh strawberries are recommended for the best flavor and texture, you can use frozen strawberries in a pinch. Be sure to thaw and drain them thoroughly to avoid excess moisture.

Q2: How do I store leftover Strawberry Shortcake Delight?
A: Store any leftovers in an airtight container in the refrigerator for up to 2 days. The cake may become slightly soggy, but it will still taste delicious.

Q3: Can I make the cake portion ahead of time?
A: Yes, the cake can be baked a day in advance and stored in an airtight container. Assemble with whipped cream and strawberries just before serving for the freshest taste.

Q4: What can I use if I don’t have a cake pan?
A: A springform pan or a square baking dish can be used as alternatives. Adjust the baking time accordingly and check for doneness with a toothpick.

Q5: Is there a way to make this dessert gluten-free?
A: Absolutely! Substitute the all-purpose flour with a gluten-free flour blend designed for baking. Ensure all other ingredients are gluten-free as well to accommodate dietary restrictions.

Molten Lava Cake

Molten lava cakes, those small yet indulgent chocolate cakes with a gooey, flowing center, have captured the hearts of dessert lovers worldwide. The first bite into the soft, warm cake that releases a river of rich, molten chocolate is nothing short of a culinary delight. Originating from France, this dessert has seen a rise in popularity due to its perfect combination of simplicity and elegance. Whether served at a high-end restaurant or a cozy family dinner, molten lava cakes never fail to impress. This article delves into the history, preparation, and why this dessert remains a timeless classic.

The origins of the molten lava cake are often attributed to French chef Jean-Georges Vongerichten, who inadvertently undercooked a batch of chocolate cakes in 1987, leading to the creation of this now-iconic dessert. However, some food historians argue that similar recipes have existed in France for decades. Regardless of its exact origins, the molten lava cake quickly gained popularity in the United States and around the world, becoming a staple on dessert menus everywhere. Its appeal lies not only in its rich, chocolatey flavor but also in the element of surprise and decadence it offers.

Preparing a molten lava cake might seem daunting, but it is surprisingly straightforward. The key lies in the timing and temperature. The ingredients include high-quality dark chocolate, butter, sugar, eggs, and a touch of flour. After melting the chocolate and butter together, the mixture is combined with beaten eggs and sugar, and a small amount of flour is added to give the cake its structure. The batter is then poured into ramekins, and the cakes are baked for a short period—just enough to set the edges while keeping the center molten. The result is a perfectly cooked cake with a luscious liquid center that flows out when cut open.

Molten lava cakes are not only a treat for the taste buds but also a feast for the eyes. Their presentation can elevate any dining experience. Often, they are served with a dusting of powdered sugar, a dollop of whipped cream, or a scoop of vanilla ice cream, which complements the intense chocolate flavor. The contrast between the warm cake and cold ice cream adds another layer of sensory delight. Some chefs get creative, incorporating flavors like raspberry, orange zest, or even a touch of chili to add a twist to the classic recipe.

The enduring popularity of molten lava cakes can be attributed to their universal appeal and the sense of indulgence they provide. They are a testament to the fact that sometimes, the simplest ingredients can create the most extraordinary results. Whether you’re a seasoned pastry chef or a home cook trying to impress dinner guests, molten lava cakes offer a perfect balance of taste, texture, and presentation. As trends in the culinary world come and go, the molten lava cake remains a beloved classic, proving that some desserts are truly timeless.