Coconut Macaroons

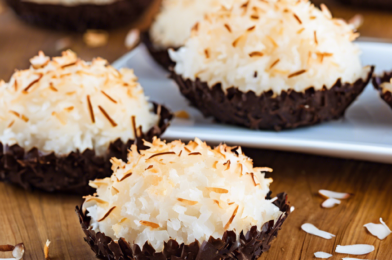
On a lazy Sunday afternoon, as I watched the golden rays of the sun filter through my kitchen window, the idea of baking something sweet and delightful struck me. I had recently come across a recipe for coconut macaroons, and it seemed like the perfect treat to indulge in. With a few simple ingredients and minimal preparation, these little morsels promised to deliver a burst of flavor and texture that would please any palate. As the macaroons baked, the aroma of toasted coconut filled the air, drawing my family from their various corners of the house to the kitchen. Their anticipation was palpable, and I was hopeful that this recipe would become a new family favorite.

Ingredients

Creating the perfect coconut macaroons requires just a handful of ingredients, most of which you might already have in your pantry. Here’s what you’ll need:

  • 14 ounces of sweetened shredded coconut
  • 14 ounces of sweetened condensed milk
  • 1 teaspoon of pure vanilla extract
  • 2 large egg whites, at room temperature
  • A pinch of salt

These ingredients combine to form the quintessential coconut macaroon, characterized by its chewy texture and rich, nutty flavor. The sweetened shredded coconut is the star of the show, providing not only flavor but also a delightful texture that is both chewy and crisp at the edges. The sweetened condensed milk acts as a binding agent, ensuring that each macaroon holds together perfectly. The vanilla extract adds a touch of warmth and depth, while the egg whites and salt bring balance and structure to the mix.

Instructions

Making coconut macaroons is a straightforward process that even novice bakers can master with ease. Here’s a step-by-step guide to help you create these delicious treats:

  1. Preheat your oven: Start by preheating your oven to 325°F (163°C). Line two baking sheets with parchment paper to prevent the macaroons from sticking.
  2. Mix the coconut and sweetened condensed milk: In a large mixing bowl, combine the sweetened shredded coconut and sweetened condensed milk. Stir until the coconut is evenly coated.
  3. Add vanilla extract: Stir in the vanilla extract, ensuring it is well-distributed throughout the mixture.
  4. Beat the egg whites: In a separate bowl, beat the egg whites with a pinch of salt until stiff peaks form. This step is crucial for achieving the right texture in your macaroons.
  5. Fold in the egg whites: Gently fold the beaten egg whites into the coconut mixture. Be careful not to deflate the egg whites, as they provide the macaroons with their light and airy texture.
  6. Shape the macaroons: Using a small ice cream scoop or a tablespoon, drop mounds of the mixture onto the prepared baking sheets, spacing them about an inch apart.
  7. Bake the macaroons: Place the baking sheets in the preheated oven and bake for 20-25 minutes, or until the macaroons are golden brown and set.
  8. Cool and enjoy: Allow the macaroons to cool on the baking sheets for a few minutes before transferring them to a wire rack to cool completely. Enjoy them as a delightful snack or dessert.

The process of making these macaroons is as enjoyable as eating them. The transformation of simple ingredients into a delicious treat is a rewarding experience, and the aroma that fills your kitchen is just an added bonus.

Nutrition Facts

It’s always good to know what you’re consuming, especially when it comes to sweet treats. Here are the nutrition facts for these coconut macaroons:

  • Servings: Approximately 24 macaroons
  • Calories per serving: 110 calories

Each macaroon is a small indulgence, offering a delightful sweetness without overwhelming your caloric intake for the day. Of course, moderation is key with any treat, and these macaroons are perfect for satisfying a sweet tooth without going overboard.

Preparation Time

The beauty of coconut macaroons lies not only in their taste but also in their simplicity and quick preparation time. Here’s a breakdown of the time required to make these delicious treats:

  • Preparation time: 15 minutes
  • Cooking time: 20-25 minutes
  • Total time: 35-40 minutes

In just under an hour, you can have a batch of freshly baked coconut macaroons ready to serve. This makes them an ideal option for last-minute gatherings or when you simply want to whip up something special without spending too much time in the kitchen.

How to Serve

Coconut macaroons are incredibly versatile and can be served in a variety of ways to suit any occasion. Here are a few ideas to consider:

  • Serve them with a cup of tea or coffee for a delightful afternoon treat.
  • Pair them with fresh fruit or berries for a light and refreshing dessert.
  • Drizzle them with melted chocolate for an extra touch of decadence.
  • Include them in a dessert platter alongside other sweet treats.
  • Gift them in a decorative box for a thoughtful and delicious present.

No matter how you choose to serve them, coconut macaroons are sure to be a hit with anyone who tries them. Their combination of chewy and crispy textures, along with their rich coconut flavor, makes them irresistible.

Additional Tips

To ensure your coconut macaroons turn out perfectly every time, consider the following tips:

  1. Use room temperature ingredients: Allow your egg whites to come to room temperature before beating them. This helps achieve the desired stiff peaks.
  2. Be gentle when folding in the egg whites: Take care not to deflate the egg whites when folding them into the coconut mixture, as they provide the light texture characteristic of macaroons.
  3. Keep an eye on the baking time: Oven temperatures can vary, so check your macaroons a few minutes before the recommended baking time to avoid over-browning.
  4. Store them properly: Keep the macaroons in an airtight container at room temperature to maintain their freshness for up to a week.
  5. Experiment with flavors: Add a touch of almond extract or a sprinkle of cinnamon for a unique twist on the classic recipe.

These tips will help you perfect your coconut macaroons, ensuring they are always a delightful treat to enjoy and share.

FAQ Section

Here are some frequently asked questions about coconut macaroons:

  1. Can I use unsweetened coconut? Yes, you can use unsweetened coconut if you prefer a less sweet macaroon. However, you may want to increase the amount of sweetened condensed milk to ensure the mixture binds well.
  2. How do I prevent macaroons from spreading too much during baking? Ensure that your egg whites are beaten to stiff peaks and that you don’t overmix the batter when folding them in.
  3. Can I freeze coconut macaroons? Yes, coconut macaroons freeze well. Place them in a single layer on a baking sheet to freeze initially, then transfer them to an airtight container or freezer bag for long-term storage.
  4. What should I do if my macaroons are too dry? If your macaroons turn out dry, try reducing the baking time slightly or ensuring your ingredients are fresh and properly measured.
  5. Can I add other ingredients to the macaroons? Absolutely! You can add ingredients like chocolate chips, nuts, or dried fruit to customize your macaroons to your taste.

Coconut macaroons are a delightful treat that can be enjoyed in many ways, and with these tips and answers to common questions, you’ll be well on your way to mastering this classic dessert.

Chickpea Flour Flatbread

Chickpea Flour Flatbread, often known as Socca, Besan Chilla, or Farinata, is a versatile and delicious dish celebrated in various cultures around the world. This gluten-free flatbread is not only easy to make but also a nutritious option for those looking to diversify their culinary repertoire. In this article, we will explore the rich history and diverse applications of chickpea flour flatbread, delve into its nutritional benefits, and provide a step-by-step guide to making this delightful dish at home. Whether you’re a seasoned cook or a beginner in the kitchen, chickpea flour flatbread is a rewarding recipe to try.

Chickpea flour, the star ingredient in this flatbread, is derived from ground chickpeas, also known as garbanzo beans. It has been a staple in Middle Eastern, Indian, and Mediterranean cuisines for centuries. The versatility of chickpea flour makes it a popular choice for various dishes, including pancakes, fritters, and, of course, flatbreads. Its nutty flavor and slightly earthy undertones add depth to any dish, making it a favorite among chefs and home cooks alike. The origins of chickpea flour flatbread can be traced to different regions, with each culture adding its unique twist. In Southern France, it’s known as Socca, while in Italy, it’s called Farinata. In India, Besan Chilla is a popular street food, often enjoyed as a savory breakfast or snack.

Nutritionally, chickpea flour is a powerhouse. It is a rich source of protein, fiber, and essential vitamins and minerals. For those following a gluten-free diet, chickpea flour serves as an excellent alternative to wheat flour. The high protein content makes it a valuable addition to vegetarian and vegan diets, providing essential amino acids that are often lacking in plant-based foods. Additionally, chickpea flour is low in carbohydrates, making it a suitable option for those managing their blood sugar levels. The presence of fiber aids in digestion and promotes a feeling of fullness, which can be beneficial for weight management. With such impressive nutritional credentials, it’s no wonder chickpea flour flatbread is gaining popularity among health-conscious individuals.

The process of making chickpea flour flatbread is simple and requires just a few ingredients. To start, you’ll need chickpea flour, water, olive oil, and a pinch of salt. First, mix the flour and water to form a smooth batter, then let it rest for about 30 minutes to allow the flour to hydrate fully. Preheat your oven to a high temperature, as the key to a crispy flatbread is a hot cooking environment. Once the oven is ready, pour the batter onto a preheated skillet or baking sheet, ensuring an even spread. Drizzle olive oil over the top for added flavor and bake until the edges are golden and crisp. The result is a beautifully rustic flatbread with a slightly chewy texture and a deliciously nutty taste.

Chickpea flour flatbread can be enjoyed in numerous ways. Its adaptability allows it to pair well with a variety of toppings and accompaniments. For a simple yet satisfying meal, serve it warm with a drizzle of olive oil and a sprinkle of sea salt. Alternatively, top it with fresh vegetables, cheese, or your favorite protein for a more substantial dish. It can also be used as a base for pizza or as an accompaniment to soups and stews. The possibilities are endless, making it a valuable addition to any recipe collection. As more people discover the benefits and flavors of chickpea flour flatbread, its popularity is sure to grow, bringing this ancient culinary tradition into modern kitchens worldwide.

Gluten-Free Blueberry Muffins

Gluten-free blueberry muffins have emerged as a delightful option for those seeking to indulge in a sweet treat without compromising their dietary restrictions. With the rise in awareness about gluten sensitivity and celiac disease, many people are turning to gluten-free alternatives to enjoy their favorite foods without discomfort. These muffins are not only gluten-free but are also packed with juicy blueberries, offering a burst of flavor in every bite. The combination of almond flour and coconut flour in the recipe ensures a moist and fluffy texture, which is often a challenge in gluten-free baking. Furthermore, the natural sweetness of the blueberries reduces the need for excessive sugar, making these muffins a healthier option for those watching their sugar intake. The balance of flavors and the tender crumb make these muffins a hit among both gluten-sensitive individuals and those simply looking to explore new culinary adventures.

Incorporating gluten-free baking into daily life can be daunting for beginners, but these blueberry muffins are a perfect starting point. The recipe is straightforward, requiring only a few key ingredients that are easily available in most supermarkets or health food stores. Almond flour and coconut flour serve as the base, offering a nutty flavor that complements the sweetness of the blueberries. Eggs, baking powder, and a pinch of salt help the muffins rise and maintain their structure. For those who prefer added sweetness, a touch of honey or maple syrup can be included. The preparation process is simple: mix the dry ingredients, fold in the wet ones, and gently incorporate the blueberries before spooning the batter into muffin tins. In about half an hour, the kitchen is filled with the inviting aroma of freshly baked muffins, ready to enjoy.

For many, gluten-free blueberry muffins are more than just a dietary necessity; they are a testament to the creativity and adaptability required in modern cooking. These muffins cater to a growing segment of the population that values both health and taste. They are perfect for breakfast, a midday snack, or even as a dessert when paired with a dollop of whipped cream or a scoop of vanilla ice cream. Their versatility makes them a staple in many households, proving that gluten-free baking doesn’t mean compromising on flavor or enjoyment. Whether you’re serving them at a family brunch or bringing them to a potluck, these muffins are sure to impress and satisfy. As more people discover the joys of gluten-free eating, recipes like these blueberry muffins pave the way for a more inclusive and delicious culinary landscape.

Baked Salmon with Garlic Butter

There’s something universally delightful about the aroma of baked salmon wafting through the kitchen. Recently, I decided to try a recipe for Baked Salmon with Garlic Butter, and let me tell you, it was an instant hit with my family. The tender, flaky texture of the salmon contrasted beautifully with the rich, buttery garlic sauce, creating a dish that felt both luxurious and comforting. My family couldn’t get enough, and even my pickiest eater asked for seconds. The simplicity of the preparation belies the depth of flavor in every bite, making it the perfect dish for both special occasions and simple weeknight dinners.

Ingredients

For this delightful Baked Salmon with Garlic Butter, you’ll need the following ingredients:

  • 4 salmon fillets (about 6 ounces each)
  • 1/4 cup unsalted butter, melted
  • 4 garlic cloves, minced
  • 1 tablespoon lemon juice
  • Salt and freshly ground black pepper, to taste
  • 2 tablespoons fresh parsley, chopped
  • 1 lemon, sliced for garnish

Instructions

Baking salmon with garlic butter is a straightforward process, but it yields an exceptionally flavorful result. Here’s how to do it:

  1. Preheat your oven to 375°F (190°C). Line a baking sheet with aluminum foil or parchment paper for easy cleanup.
  2. Place the salmon fillets skin-side down on the prepared baking sheet. Season each fillet with salt and pepper to taste.
  3. In a small bowl, combine the melted butter, minced garlic, and lemon juice. Stir to blend the ingredients well.
  4. Pour the garlic butter mixture evenly over the salmon fillets, ensuring that each piece is well coated.
  5. Bake the salmon in the preheated oven for 12-15 minutes, or until the fish flakes easily with a fork. Cooking time may vary slightly depending on the thickness of the fillets.
  6. Remove the salmon from the oven and let it rest for a few minutes. Garnish with chopped parsley and lemon slices before serving.

Nutrition Facts

This recipe serves 4, with each serving containing approximately 350 calories. The nutritional benefits of salmon, combined with the healthy fats from butter, make this a wholesome choice for anyone looking to enjoy a nutritious meal without compromising on taste.

Preparation Time

One of the best parts about this recipe is its efficiency. From start to finish, the preparation and cooking time total around 30 minutes. This makes it an excellent option for busy weeknights when you want to serve something delicious without spending hours in the kitchen.

How to Serve

While the Baked Salmon with Garlic Butter is exquisite on its own, here are some serving suggestions to complete your meal:

  • Serve with a side of steamed vegetables such as asparagus or broccoli to add a pop of color and freshness.
  • Pair with a simple green salad dressed with olive oil and balsamic vinegar for a light, complementary side.
  • Add a serving of buttery mashed potatoes or quinoa for a more filling meal.
  • Top the salmon with additional lemon slices or fresh herbs for extra flavor.
  • For a touch of elegance, consider serving the salmon on a bed of creamy risotto.

Additional Tips

To ensure your Baked Salmon with Garlic Butter is perfect every time, consider these tips:

  • Choose Fresh Salmon: Whenever possible, select fresh salmon fillets for the best flavor and texture. Look for fillets with vibrant color and a clean, mild scent.
  • Don’t Overcook: Salmon is best when it is slightly undercooked. It will continue to cook after being removed from the oven, ensuring it remains moist and tender.
  • Customize the Butter Sauce: Feel free to add other herbs such as dill or thyme to the garlic butter mixture for a different flavor profile.
  • Use a Meat Thermometer: For precision, use a meat thermometer to check that the internal temperature of the salmon reaches 145°F (63°C).
  • Experiment with Citrus: Besides lemon, you can try using orange or lime juice for a different citrus twist.

FAQ Section

Here are some frequently asked questions about Baked Salmon with Garlic Butter:

  1. Can I use frozen salmon fillets? Yes, you can use frozen salmon, but make sure to thaw them completely before cooking to ensure even cooking.
  2. Is it necessary to use unsalted butter? While unsalted butter is preferred to control the saltiness of the dish, you can use salted butter and reduce the amount of added salt.
  3. Can I substitute the butter with olive oil? Absolutely! Olive oil is a great alternative for those looking to reduce dairy or saturated fat in the recipe.
  4. What other herbs can I use? In addition to parsley, dill, thyme, or basil can be used to complement the flavors of the garlic butter sauce.
  5. How do I store leftovers? Store leftover salmon in an airtight container in the refrigerator for up to 2 days. Reheat gently in the oven or microwave to prevent drying out.

Grilled Lemon Herb Chicken

There’s something undeniably satisfying about the sizzle and aroma of grilled chicken wafting through the air, a beacon of culinary delight that heralds the arrival of a delicious meal. Recently, I prepared the Grilled Lemon Herb Chicken for a family dinner, and it was met with resounding approval. The delicate balance of citrus and herbs paired with the smoky notes from the grill made it an instant hit at our dining table. My family, who are often honest to a fault about their preferences, couldn’t stop praising the juiciness and flavor of the chicken. Even the pickiest eaters asked for seconds, a testament to the universal appeal of this dish. The recipe is so simple yet remarkably flavorful, making it a perfect choice for both casual family dinners and more formal gatherings.

Ingredients

The key to the irresistible taste of Grilled Lemon Herb Chicken lies in its thoughtfully selected ingredients. Here’s what you’ll need for this recipe:

  • 4 boneless, skinless chicken breasts
  • 1/3 cup olive oil
  • 1/4 cup freshly squeezed lemon juice (about 2 lemons)
  • 3 cloves garlic, minced
  • 1 tablespoon fresh thyme leaves
  • 1 tablespoon chopped fresh rosemary
  • 1 teaspoon salt
  • 1/2 teaspoon black pepper
  • Lemon slices and fresh herbs for garnish (optional)

These ingredients work harmoniously to create a marinade that infuses the chicken with vibrant flavors, transforming a simple piece of poultry into a gourmet delight.

Instructions

Creating Grilled Lemon Herb Chicken is a straightforward process, yet the results are nothing short of spectacular. Follow these detailed steps to achieve the best results:

  1. In a small mixing bowl, whisk together the olive oil, lemon juice, garlic, thyme, rosemary, salt, and pepper until well combined. This mixture serves as your marinade, a critical component that imparts flavor and moisture to the chicken.
  2. Place the chicken breasts in a shallow dish or a resealable plastic bag. Pour the marinade over the chicken, ensuring each piece is well-coated. Seal the bag or cover the dish, and refrigerate for at least 30 minutes, or up to 4 hours for maximum flavor infusion.
  3. Preheat your grill to medium-high heat. Lightly oil the grill grates to prevent sticking. Remove the chicken from the marinade, letting any excess drip off, and discard the marinade.
  4. Grill the chicken for about 6-7 minutes per side, or until the internal temperature reaches 165°F (75°C). During grilling, avoid pressing down on the chicken, as this can force out juices and result in a drier texture.
  5. Once cooked, remove the chicken from the grill and let it rest for a few minutes. This resting period allows the juices to redistribute, ensuring each bite is juicy and flavorful.
  6. Garnish with lemon slices and fresh herbs if desired, and serve immediately.

Nutrition Facts

Understanding the nutritional value of the dishes we prepare is crucial, especially for those mindful of their dietary intake. Here’s a breakdown of the nutrition facts for Grilled Lemon Herb Chicken:

  • Servings: 4
  • Calories per serving: 280

This recipe is not only delicious but also offers a healthy dose of protein without excessive calories, making it an excellent choice for those seeking a balanced meal.

Preparation Time

Time is of the essence in our busy lives, and this recipe respects that by offering a quick yet flavorful meal option. Here’s the time breakdown for Grilled Lemon Herb Chicken:

  • Preparation Time: 10 minutes
  • Marinating Time: 30 minutes to 4 hours (depending on your schedule)
  • Cooking Time: 15 minutes
  • Total Time: 55 minutes to 4 hours 25 minutes

With a minimal active cooking period, this dish allows you to multitask while the chicken absorbs the marinade’s robust flavors.

How to Serve

The versatility of Grilled Lemon Herb Chicken means it can be paired with a variety of sides to create a complete meal. Here are some serving suggestions:

  • Over a bed of greens: Serve the chicken atop a fresh salad with arugula, cherry tomatoes, and a light vinaigrette for a refreshing meal.
  • With roasted vegetables: Pair with a medley of roasted seasonal vegetables like zucchini, bell peppers, and asparagus for a colorful plate.
  • Alongside rice or quinoa: Serve with a side of fluffy rice or quinoa to soak up the flavorful juices from the chicken.
  • In a wrap: Slice the chicken and wrap it in a tortilla with lettuce, avocado, and a drizzle of tzatziki sauce for a portable meal.
  • With pasta: Combine with a light lemon and herb pasta for a satisfying and cohesive dish.

Additional Tips

To ensure your Grilled Lemon Herb Chicken turns out perfectly every time, consider the following tips:

  1. Use fresh herbs: Fresh herbs impart a more vibrant flavor than dried ones, enhancing the overall taste of the dish.
  2. Marinate in advance: For maximum flavor, allow the chicken to marinate for at least a couple of hours, or even overnight, if time permits.
  3. Check grill temperature: Ensure your grill is preheated to the right temperature to avoid overcooking or undercooking the chicken.
  4. Use a meat thermometer: To avoid guessing, use a meat thermometer to check that the chicken reaches an internal temperature of 165°F (75°C).
  5. Let it rest: Allow the chicken to rest for a few minutes after grilling to let the juices redistribute for a juicy bite.

FAQ Section

Here are some frequently asked questions about Grilled Lemon Herb Chicken:

  1. Can I use chicken thighs instead of breasts?

    Absolutely! Chicken thighs are more forgiving in terms of cooking time and remain juicy, making them a great alternative to breasts.

  2. Can I bake this chicken instead of grilling?

    Yes, you can bake it in the oven at 375°F (190°C) for about 25-30 minutes or until the internal temperature reaches 165°F (75°C).

  3. Is it possible to freeze the marinated chicken?

    Yes, you can freeze the chicken in the marinade for up to 3 months. Thaw in the refrigerator before grilling.

  4. What if I don’t have fresh herbs?

    You can substitute with dried herbs, but use about one-third of the amount as dried herbs are more potent.

  5. How do I prevent the chicken from drying out?

    A well-marinated chicken and not overcooking are key. Use a meat thermometer to ensure precise cooking.

Grilled Lemon Herb Chicken is not only a feast for the taste buds but also a versatile and healthy choice for any meal. Its ease of preparation and delightful flavor profile make it a go-to recipe for any home cook looking to impress family and friends alike. Whether served at a casual backyard barbecue or a formal dinner, this dish is sure to become a staple in your culinary repertoire.

Turmeric Quinoa Salad

“`html

This Turmeric Quinoa Salad quickly became a favorite in our household, and I can’t wait to share it with you. The vibrant colors and flavors make it a feast for the senses, and it’s packed with nutrients that leave you feeling satisfied and energized. My family loved it so much that we ended up making it twice in one week! The turmeric gives the quinoa a beautiful golden hue, and when paired with fresh vegetables and a tangy dressing, it’s truly a dish that delights both the eyes and the palate. If you’re looking for a healthy, delicious, and easy-to-make salad, this recipe is a must-try.

Ingredients

The success of this Turmeric Quinoa Salad lies in its fresh and wholesome ingredients. Here’s what you’ll need to gather before starting:

  • 1 cup quinoa, rinsed
  • 2 cups water
  • 1 teaspoon ground turmeric
  • 1/2 teaspoon sea salt
  • 1 cup cherry tomatoes, halved
  • 1 cucumber, diced
  • 1 red bell pepper, diced
  • 1/4 cup red onion, finely chopped
  • 1/4 cup fresh parsley, chopped
  • 1/4 cup fresh mint, chopped
  • 1/4 cup lemon juice
  • 2 tablespoons olive oil
  • Salt and pepper to taste

Instructions

Creating this Turmeric Quinoa Salad is a straightforward process that even beginners can tackle with ease. Follow these steps to ensure your salad turns out perfectly every time:

  1. Start by cooking the quinoa. In a medium saucepan, combine the rinsed quinoa, water, turmeric, and sea salt. Bring to a boil over medium-high heat.
  2. Once boiling, reduce the heat to low, cover, and let it simmer for about 15 minutes, or until all the water is absorbed and the quinoa is fluffy.
  3. Remove from heat and let the quinoa cool to room temperature.
  4. In a large salad bowl, combine the cooked quinoa with cherry tomatoes, cucumber, red bell pepper, red onion, parsley, and mint.
  5. In a small bowl, whisk together the lemon juice, olive oil, salt, and pepper. Pour the dressing over the salad and toss gently to combine.
  6. Taste and adjust the seasoning as needed, then serve immediately or refrigerate for later.

Nutrition Facts

The Turmeric Quinoa Salad is not only delicious but also nutritious. Here’s a breakdown of the nutrition facts:

  • Servings: 4
  • Calories per serving: Approximately 220

Preparation Time

One of the best aspects of this recipe is how quickly it comes together. From start to finish, you can have this salad ready in under 30 minutes:

  • Preparation time: 10 minutes
  • Cooking time: 15 minutes
  • Total time: 25 minutes

How to Serve

This salad is versatile and pairs well with a variety of dishes. Here are a few serving suggestions:

  • As a main dish for a light lunch or dinner
  • As a side dish with grilled chicken or fish
  • In a wrap with hummus for a quick meal
  • As a part of a buffet or potluck spread
  • With a dollop of Greek yogurt on top for extra creaminess

Additional Tips

To make the most out of this recipe, consider the following tips:

  1. Rinse the quinoa: Rinsing removes the saponin coating, which can make quinoa taste bitter.
  2. Use fresh herbs: Fresh parsley and mint add a bright flavor that dried herbs can’t replicate.
  3. Customize the vegetables: Feel free to add or substitute your favorite veggies based on what’s in season.
  4. Make ahead: This salad can be prepared a day in advance, allowing the flavors to meld together.
  5. Store correctly: Keep leftovers in an airtight container in the fridge for up to three days.

FAQ Section

Here are some frequently asked questions about the Turmeric Quinoa Salad:

Q: Can I use a different grain instead of quinoa?

A: Yes, you can substitute quinoa with couscous or farro, but keep in mind that cooking times may vary.

Q: Is this salad gluten-free?

A: Yes, quinoa is naturally gluten-free, making this salad suitable for those with gluten sensitivities.

Q: Can I add protein to this salad?

A: Absolutely! Grilled chicken, chickpeas, or feta cheese are excellent additions for added protein.

Q: How can I make this salad spicier?

A: Add a pinch of red pepper flakes or diced jalapeño for some heat.

Q: What can I do if my salad is too dry?

A: Simply drizzle a bit more olive oil or lemon juice to bring back moisture and enhance the flavor.

“`

The above HTML content is formatted for easy integration into a WordPress post, offering an engaging and detailed presentation of the Turmeric Quinoa Salad recipe.

Lentil & Spinach Soup

The aroma of a warm, freshly cooked pot of lentil and spinach soup wafting through the kitchen is nothing short of heavenly, particularly on a chilly evening. This hearty and nutritious dish has become a staple in our household, cherished by family members of all ages. The blend of earthy lentils and vibrant spinach creates a symphony of flavors that is both comforting and invigorating. Each spoonful is a testament to the beauty of simple, wholesome ingredients coming together to create something truly special. It’s not just about sustenance; it’s about the joy of sharing a meal that nurtures the body and soul. Over countless dinners, this soup has sparked conversations, warmed hearts, and brought smiles to our faces, making it a permanent fixture in our culinary repertoire.

Ingredients

To craft this delightful lentil and spinach soup, you’ll need the following ingredients:

  • 1 cup of dried lentils, rinsed and sorted
  • 2 tablespoons of olive oil
  • 1 onion, finely chopped
  • 2 cloves of garlic, minced
  • 1 carrot, diced
  • 1 celery stalk, diced
  • 4 cups of vegetable broth
  • 2 cups of fresh spinach leaves, washed and chopped
  • 1 teaspoon of cumin
  • 1 teaspoon of paprika
  • Salt and pepper to taste
  • Juice of half a lemon
  • Fresh parsley for garnish (optional)

Instructions

Creating this soup is a straightforward process that even novice cooks can master with ease. Begin by heating the olive oil in a large pot over medium heat. Add the chopped onion and sauté until it becomes translucent, which should take about five minutes. Introduce the minced garlic, diced carrot, and celery to the pot, cooking for an additional five minutes until the vegetables soften.

Next, stir in the cumin and paprika, allowing the spices to release their flavors for about a minute. Add the rinsed lentils to the pot, followed by the vegetable broth. Bring the mixture to a boil, then reduce the heat and let it simmer for about 25-30 minutes, or until the lentils are tender.

Once the lentils are cooked, add the chopped spinach, stirring until the leaves wilt into the soup. Season with salt, pepper, and a squeeze of lemon juice to enhance the flavors. Allow the soup to simmer for an additional five minutes before removing it from the heat. Serve hot, garnished with fresh parsley if desired.

Nutrition Facts

This recipe yields approximately four servings, with each serving containing around 250 calories. It’s a low-calorie, nutrient-dense meal that provides a hefty dose of protein, fiber, and iron, making it an excellent choice for those seeking a healthy and satisfying dish.

Preparation Time

The total preparation time for this lentil and spinach soup is about 45 minutes. This includes the time needed to chop the vegetables and rinse the lentils, as well as the cooking time. It’s a relatively quick recipe that can be whipped up on a busy weeknight or prepared ahead of time for an easy meal option.

How to Serve

This versatile soup can be served in a variety of ways to suit different tastes and occasions:

  • As a starter: Serve a small bowl as an appetizer to whet the appetite before a larger meal.
  • As a main course: Pair with a crusty loaf of bread for a complete and satisfying meal.
  • With toppings: Add a dollop of Greek yogurt or a sprinkle of grated Parmesan cheese for added richness.
  • With sides: Serve alongside a fresh garden salad for a balanced and nutritious meal.
  • For lunch: Pack in a thermos for a warm, portable lunch option.

Additional Tips

To elevate your lentil and spinach soup, consider these additional tips:

  1. Use different lentils: Experiment with different types of lentils, such as red or French green, to vary the texture and flavor.
  2. Make it spicy: Add a pinch of red pepper flakes or a splash of hot sauce for a spicy kick.
  3. Include more vegetables: Enhance the nutritional value by adding additional vegetables like zucchini or bell peppers.
  4. Use homemade broth: For an even richer flavor, use homemade vegetable or chicken broth instead of store-bought.
  5. Prepare in advance: This soup freezes well, so make a large batch and store portions in the freezer for quick and easy future meals.

FAQ Section

Q: Can I use canned lentils instead of dried?

A: Yes, you can use canned lentils. Be sure to drain and rinse them before adding to the soup, and reduce the cooking time to 10 minutes since canned lentils are already cooked.

Q: Can I make this soup vegan?

A: Absolutely! This recipe is naturally vegan as long as you use vegetable broth and avoid any non-vegan toppings like cheese or yogurt.

Q: What can I substitute for spinach?

A: If you don’t have spinach on hand, you can substitute it with other leafy greens such as kale, Swiss chard, or even collard greens.

Q: How can I thicken the soup?

A: For a thicker consistency, you can blend a portion of the soup with an immersion blender or add a small amount of cooked potatoes or rice.

Q: How long will leftovers keep?

A: Leftover soup can be stored in an airtight container in the refrigerator for up to five days, or frozen for up to three months.

Stuffed Bell Peppers

Stuffed bell peppers have long captivated the culinary world with their vibrant colors, enticing aromas, and delightful flavors. As a food journalist who has explored countless recipes, I can confidently say that stuffed bell peppers offer a comforting and versatile meal option that caters to diverse palates. The beauty of this dish lies in its adaptability; whether you prefer a meaty filling, a vegetarian option, or a blend of grains and legumes, stuffed bell peppers can be tailored to suit any dietary preference. My family and I have relished this dish numerous times, often experimenting with different ingredients to keep the experience fresh and exciting. It’s a meal that brings people together, inviting everyone to gather around the table to enjoy a wholesome and satisfying culinary experience.

Ingredients

The ingredients for stuffed bell peppers vary according to personal preference and dietary requirements. A classic stuffed bell pepper recipe typically includes fresh bell peppers, ground meat, rice, tomato sauce, onions, and a variety of spices. However, vegetarian versions might forgo meat in favor of black beans, quinoa, or lentils. Here’s a comprehensive list for a traditional recipe:

  • 6 large bell peppers (any color)
  • 1 pound ground beef or turkey
  • 1 cup cooked rice (white or brown)
  • 1 small onion, chopped
  • 2 cloves garlic, minced
  • 1 can (14.5 ounces) diced tomatoes
  • 1 cup tomato sauce
  • 1 teaspoon Italian seasoning
  • 1 cup shredded cheese (cheddar or mozzarella)
  • Salt and pepper to taste
  • Olive oil

Instructions

Preparing stuffed bell peppers is a straightforward process that yields impressive results. Begin by preheating your oven to 375°F (190°C). While the oven is warming up, cut the tops off the bell peppers and remove the seeds and membranes. Lightly brush the peppers with olive oil, place them in a baking dish, and set aside.

In a skillet, heat a tablespoon of olive oil over medium heat. Add the chopped onion and minced garlic, sautéing until the onion becomes translucent. Next, add the ground beef or turkey to the skillet, cooking until browned and fully cooked. Drain any excess fat.

Stir in the cooked rice, diced tomatoes, tomato sauce, and Italian seasoning. Allow the mixture to simmer for about 10 minutes, allowing the flavors to meld. Season with salt and pepper to taste.

Spoon the filling into each prepared bell pepper, packing it tightly. Top each pepper with a generous sprinkle of shredded cheese. Cover the baking dish with foil and bake for 30 minutes. Remove the foil and bake for an additional 15 minutes, or until the peppers are tender and the cheese is bubbly and golden.

Nutrition Facts

Stuffed bell peppers are not only a feast for the senses but also a nutritious meal choice. Depending on the ingredients used, they can offer a balanced mix of protein, carbohydrates, and healthy fats. For a standard serving of one stuffed pepper, the nutritional information is approximately as follows:

  • Servings: 6 stuffed peppers
  • Calories per serving: 350
  • Protein: 20 grams
  • Carbohydrates: 25 grams
  • Fat: 15 grams
  • Fiber: 5 grams

Preparation Time

The preparation time for stuffed bell peppers can vary depending on the complexity of the filling and personal experience in the kitchen. However, on average, expect to spend about 20 minutes on preparation and an additional 45 minutes on cooking. The entire process, from start to finish, will take approximately 1 hour and 15 minutes. This makes stuffed bell peppers an excellent choice for a hearty weeknight dinner without demanding an excessive amount of time in the kitchen.

How to Serve

Stuffed bell peppers are a versatile dish that can be served in a variety of ways to enhance the dining experience. Here are some ideas for serving:

  • **With a Side Salad:** Pair the peppers with a fresh green salad for a light and refreshing contrast.
  • **With Crusty Bread:** Serve alongside a slice of warm, crusty bread to soak up any delicious juices.
  • **With a Dollop of Sour Cream:** Add a creamy element by topping the peppers with a spoonful of sour cream or Greek yogurt.
  • **With Avocado:** Slice some ripe avocado for a healthy and flavorful garnish.
  • **With a Sprinkle of Fresh Herbs:** Garnish with fresh parsley, cilantro, or basil for an aromatic finish.

Additional Tips

Creating the perfect stuffed bell peppers can be enhanced with a few expert tips. Here are five tips to ensure your dish turns out perfectly every time:

  1. Choose the Right Peppers: Look for firm, evenly shaped peppers that can stand upright in your baking dish.
  2. Pre-cook the Peppers: For a softer texture, consider parboiling the peppers for a few minutes before stuffing them.
  3. Experiment with Fillings: Feel free to get creative with your fillings. Try mixing in different grains, beans, or vegetables.
  4. Adjust Seasonings: Taste your filling before stuffing the peppers and adjust the seasonings to your liking.
  5. Make Ahead: Prepare the filling a day in advance to save time on the day of cooking.

FAQ Section

Curious about making stuffed bell peppers? Here are some frequently asked questions to guide you:

1. Can I freeze stuffed bell peppers?
Yes, stuffed bell peppers freeze well. Allow them to cool completely, then wrap individually in foil or plastic wrap before storing in a freezer-safe container for up to 3 months.

2. What type of rice works best?
You can use any type of rice you prefer, including white, brown, or wild rice. For a healthier option, consider using quinoa or cauliflower rice.

3. How can I make them vegetarian?
To make vegetarian stuffed peppers, substitute the ground meat with black beans, chickpeas, or lentils and add more vegetables like mushrooms or zucchini.

4. Can I use other types of cheese?
Absolutely! Feel free to experiment with different cheeses such as feta, goat cheese, or Monterey Jack for varied flavors.

5. How do I prevent the peppers from tipping over?
Choose peppers with flat bottoms that can stand on their own, or slice a small piece off the bottom to create a stable base.

Gluten-Free Banana Bread

There’s something incredibly comforting about the aroma of freshly baked banana bread wafting through the house. It’s a scent that welcomes you with warmth and nostalgia, evoking memories of cozy kitchens and family gatherings. Recently, I decided to try my hand at a gluten-free version of this classic treat, and the results were nothing short of delightful. My family, skeptical at first about any ‘gluten-free’ baked goods, were pleasantly surprised by how moist and flavorful it turned out. This gluten-free banana bread has now become a staple in our household, enjoyed equally by those with dietary restrictions and those without.

Ingredients

Creating a delicious gluten-free banana bread requires a careful selection of ingredients that complement each other while maintaining the bread’s classic texture and flavor. Here’s what you’ll need:

  • 3 ripe bananas, mashed
  • 1/3 cup melted coconut oil
  • 1 teaspoon vanilla extract
  • 1 teaspoon baking soda
  • Pinch of salt
  • 3/4 cup sugar
  • 1 large egg, lightly beaten
  • 1 1/2 cups gluten-free all-purpose flour
  • 1 teaspoon cinnamon (optional)
  • 1/2 cup chopped walnuts or chocolate chips (optional)

Instructions

Baking banana bread is a straightforward process, even when making it gluten-free. Here’s a step-by-step guide to help you through:

  1. Preheat your oven to 350°F (175°C) and grease a 9×5-inch loaf pan.
  2. In a large mixing bowl, combine the mashed bananas with the melted coconut oil, stirring until blended.
  3. Add the vanilla extract, baking soda, salt, and sugar. Mix well to combine all the ingredients.
  4. Stir in the beaten egg, ensuring it is fully incorporated into the banana mixture.
  5. Gradually add the gluten-free flour, stirring until the batter is smooth and no lumps remain.
  6. If desired, fold in the cinnamon and any additional mix-ins, such as walnuts or chocolate chips.
  7. Pour the batter into the prepared loaf pan, smoothing the top with a spatula.
  8. Bake for 50 to 60 minutes, or until a toothpick inserted into the center comes out clean.
  9. Allow the bread to cool in the pan for about 10 minutes before transferring it to a wire rack to cool completely.

Nutrition Facts

Understanding the nutritional content of what we eat is crucial, especially for those with dietary restrictions. This gluten-free banana bread makes approximately 8 servings, with each serving providing around 200 calories. It’s a wholesome treat that fits well into a balanced diet.

Preparation Time

One of the joys of making banana bread is its simplicity and the relatively short time it takes from start to finish. The preparation time for this recipe is about 15 minutes, while baking will take approximately 50 to 60 minutes. In just over an hour, you’ll have a delicious loaf ready to enjoy.

How to Serve

Banana bread is versatile and can be enjoyed in various ways:

  • Warm and Fresh: Serve slices warm from the oven for a comforting snack.
  • With a Spread: Top with butter or cream cheese for an extra layer of flavor.
  • As a Dessert: Pair with a scoop of vanilla ice cream for a sweet treat.
  • Breakfast Delight: Enjoy with a cup of coffee or tea to start your day.
  • On the Go: Pack slices for a quick and easy snack or lunchbox addition.

Additional Tips

Baking gluten-free can sometimes be tricky, but these tips should help ensure your banana bread turns out perfectly:

  1. Use Ripe Bananas: The riper the bananas, the sweeter and more flavorful your bread will be.
  2. Check Your Flour: Not all gluten-free flours are created equal; a blend that includes xanthan gum helps mimic the texture of regular flour.
  3. Don’t Overmix: Overmixing the batter can lead to a dense loaf, so stir just until the ingredients are combined.
  4. Adjust Baking Time: Oven temperatures can vary, so start checking your bread at the 50-minute mark.
  5. Storage: Store the bread in an airtight container to keep it fresh for up to a week.

FAQ Section

Here are some common questions about gluten-free banana bread:

  1. Can I make this recipe vegan? Yes, substitute the egg with a flax egg (1 tablespoon ground flaxseed mixed with 3 tablespoons water) and use a plant-based sweetener.
  2. What if I don’t have coconut oil? You can use melted butter or any neutral oil like vegetable oil instead.
  3. Can I add other ingredients? Absolutely! Feel free to experiment with add-ins like dried fruit, seeds, or spices.
  4. How do I know if my bananas are ripe enough? Look for bananas with lots of brown spots on the skin; they should be soft to the touch.
  5. Can I freeze banana bread? Yes, slice the bread and wrap each piece in plastic wrap, then store in a freezer bag for up to 3 months.

Cauliflower Crust Pizza

In recent years, cauliflower crust pizza has emerged as a popular alternative to traditional pizza, captivating health enthusiasts and culinary adventurers alike. With its promise of being a lower-carb, gluten-free substitute, it’s no wonder that this innovative dish has found its way into kitchens and restaurants across the globe. As someone who enjoys experimenting with healthier versions of classic dishes, I decided to give cauliflower crust pizza a try. The results were surprisingly delightful, and even my family, who are staunch traditionalists when it comes to pizza, appreciated the unique flavor and texture. The crust, with its subtle nutty taste and satisfying crunch, paired beautifully with our favorite toppings. This experience opened my eyes to the versatility of cauliflower and the potential it holds in transforming familiar recipes into healthier options.

Ingredients

Creating a delicious cauliflower crust pizza starts with gathering the right ingredients. To make a crust that is both flavorful and holds together well, you will need:

  • 1 medium-sized head of cauliflower (about 2 pounds)
  • 1 large egg
  • 1 cup shredded mozzarella cheese
  • 1/4 cup grated Parmesan cheese
  • 1/2 teaspoon dried oregano
  • 1/4 teaspoon garlic powder
  • 1/4 teaspoon salt
  • Your choice of pizza sauce and toppings (such as pepperoni, mushrooms, bell peppers, etc.)

Instructions

Begin by preheating your oven to 425°F (220°C) and lining a baking sheet with parchment paper. This will prevent the crust from sticking and ensure an even bake. Next, wash and thoroughly dry the cauliflower. Cut it into florets and pulse in a food processor until it reaches a rice-like consistency. This step is crucial as it forms the base of the crust.

Transfer the cauliflower rice to a microwave-safe bowl and microwave on high for about 4 minutes. Once it has cooled slightly, place the cooked cauliflower in a clean kitchen towel and squeeze out as much moisture as possible. This step is essential to achieving a crispy crust, as excess moisture will result in a soggy base.

In a large bowl, combine the cauliflower, egg, mozzarella, Parmesan, oregano, garlic powder, and salt. Mix until well incorporated. Spread the mixture onto the prepared baking sheet, shaping it into a thin, even circle or rectangle. Bake in the preheated oven for 20-25 minutes or until the crust is golden brown and firm to the touch.

Remove the crust from the oven and add your choice of pizza sauce and toppings. Return the pizza to the oven and bake for an additional 10 minutes, or until the cheese is melted and bubbly. Allow the pizza to cool for a few minutes before slicing and serving.

Nutrition Facts

One of the appealing aspects of cauliflower crust pizza is its nutritional profile. This recipe yields approximately 8 servings, with each serving containing about 120 calories. It’s a lighter option compared to traditional pizza crusts, making it suitable for those monitoring their calorie intake.

Preparation Time

The preparation time for cauliflower crust pizza is relatively short, making it a convenient option for busy weeknights. Expect to spend about 20 minutes preparing the ingredients and forming the crust, with an additional 30-35 minutes of baking time. In total, this meal can be ready to enjoy in under an hour.

How to Serve

  • Serve the pizza with a fresh green salad on the side for a balanced meal.
  • Pair with a glass of crisp white wine for a delightful dining experience.
  • Consider adding a sprinkle of fresh herbs, such as basil or parsley, for added flavor.
  • For a heartier meal, serve with a side of roasted vegetables.
  • Enjoy as a light lunch, or prepare a double batch for a more substantial dinner.

Additional Tips

  • Squeeze the cauliflower: Ensuring that all excess moisture is removed from the cauliflower is crucial for a crispy crust.
  • Experiment with herbs: Adding fresh or dried herbs can enhance the flavor of your crust.
  • Use parchment paper: This prevents sticking and makes transferring the crust easier.
  • Don’t overload with toppings: Too many toppings can weigh down the crust, making it soggy.
  • Customize your sauce: Try pesto or white sauce as an alternative to traditional tomato sauce for a unique twist.

FAQ Section

Q: Can I freeze cauliflower crust pizza?

A: Yes, you can freeze the baked crust. Allow it to cool completely, then wrap it tightly in plastic wrap and foil. It can be stored in the freezer for up to 3 months. Add toppings and bake directly from frozen when ready to eat.

Q: Is cauliflower crust pizza suitable for a keto diet?

A: Cauliflower crust pizza is lower in carbs than traditional crusts, making it a popular choice for those following a keto diet. However, be mindful of the toppings you choose to keep it keto-friendly.

Q: How can I make the crust firmer?

A: To achieve a firmer crust, ensure that you thoroughly squeeze out all moisture from the cauliflower and consider adding an extra tablespoon of Parmesan cheese.

Q: Can I use frozen cauliflower rice?

A: Yes, you can use frozen cauliflower rice. Thaw it completely and drain any excess water before proceeding with the recipe.

Q: What can I do if my crust is too soft?

A: If your crust is too soft, try baking it a bit longer or reducing the amount of sauce used on top. Ensuring all moisture is removed from the cauliflower is also key.