Zucchini Noodle Stir-Fry

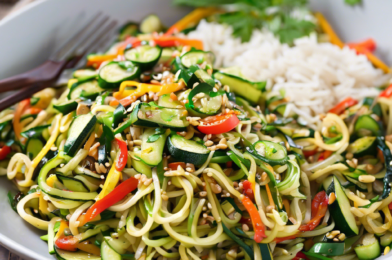
When I first stumbled upon the Zucchini Noodle Stir-Fry recipe, I was a bit skeptical. Could zucchini noodles really hold their own against traditional pasta? However, one bite was all it took to win me over. The dish is a delightful blend of flavors and textures, and it quickly became a family favorite. The zucchini noodles offer a light, fresh base that perfectly complements the array of vegetables and sauces. My family, who are not always the biggest fans of vegetables, couldn’t get enough of it. It’s a meal that feels indulgent while still being incredibly healthy, making it perfect for weeknight dinners or even special occasions.

Ingredients

To create the perfect Zucchini Noodle Stir-Fry, you will need the following ingredients:

  • 3 medium zucchinis, spiralized
  • 1 tablespoon olive oil
  • 2 cloves garlic, minced
  • 1 red bell pepper, sliced
  • 1 cup broccoli florets
  • 1 cup sliced mushrooms
  • 1 cup snap peas
  • 1 carrot, julienned
  • 2 tablespoons soy sauce
  • 1 tablespoon sesame oil
  • 1 tablespoon oyster sauce
  • 1 teaspoon grated ginger
  • Salt and pepper to taste
  • Sesame seeds and chopped scallions for garnish

Instructions

Follow these steps to make the Zucchini Noodle Stir-Fry:

  1. Prepare the zucchini noodles: Use a spiralizer to cut the zucchinis into noodles. If you don’t have a spiralizer, you can use a julienne peeler or buy pre-spiralized zucchini.
  2. Cook the vegetables: Heat olive oil in a large pan over medium heat. Add the garlic and sauté for about 30 seconds until fragrant. Add the red bell pepper, broccoli, mushrooms, snap peas, and carrot. Stir-fry the vegetables for 5-7 minutes until they are tender-crisp.
  3. Mix the sauce: In a small bowl, combine soy sauce, sesame oil, oyster sauce, and grated ginger. Stir well to blend the flavors.
  4. Add the zucchini noodles: Add the zucchini noodles to the pan with the vegetables. Pour the sauce over the noodles and vegetables, tossing everything together to coat evenly. Cook for another 2-3 minutes until the zucchini noodles are just tender but not mushy.
  5. Season and serve: Taste and adjust seasoning with salt and pepper as needed. Transfer the stir-fry to serving plates and garnish with sesame seeds and chopped scallions. Serve immediately and enjoy!

Nutrition Facts

This recipe serves 4 people, with each serving containing approximately 180 calories. It’s a nutrient-dense meal that offers a good amount of vitamins and minerals without being too heavy on calories.

Preparation Time

The Zucchini Noodle Stir-Fry is a quick and easy meal to prepare, taking about 15 minutes for preparation and another 15 minutes for cooking, totaling around 30 minutes from start to finish.

How to Serve

Here are some ideas on how to serve this delicious stir-fry:

  • Serve it as a main dish, adding some grilled chicken or tofu for extra protein.
  • Pair it with a side of steamed rice or quinoa to make the meal more filling.
  • Enjoy it with a light salad for a refreshing and balanced meal.
  • Top it with a sprinkle of crushed peanuts for a crunchy texture.
  • Serve it with a side of miso soup for a complete Asian-inspired meal.

Additional Tips

Follow these tips to enhance your Zucchini Noodle Stir-Fry experience:

  • Tip 1: Make sure not to overcook the zucchini noodles. They should be tender but still have a bit of a bite to them.
  • Tip 2: Feel free to experiment with different vegetables based on what you have on hand or what’s in season.
  • Tip 3: For added heat, consider adding a dash of chili flakes or a splash of sriracha to the sauce.
  • Tip 4: If you prefer a thicker sauce, add a teaspoon of cornstarch mixed with water to the sauce before adding it to the stir-fry.
  • Tip 5: For a richer flavor, try using toasted sesame oil instead of regular sesame oil.

FAQ Section

Here are some frequently asked questions about the Zucchini Noodle Stir-Fry:

  • Q: Can I make the zucchini noodles in advance?
  • A: Yes, you can spiralize the zucchini up to a day in advance. Store them in an airtight container in the refrigerator until ready to use.

  • Q: What if I don’t have oyster sauce?
  • A: You can substitute oyster sauce with hoisin sauce or leave it out entirely if you prefer a lighter dish.

  • Q: How can I prevent the zucchini noodles from getting watery?
  • A: After spiralizing, lightly salt the zucchini noodles and let them sit for 10 minutes, then pat dry with a paper towel to remove excess moisture.

  • Q: Is this recipe gluten-free?
  • A: To make it gluten-free, use tamari or a gluten-free soy sauce instead of regular soy sauce, and ensure that your other sauces are also gluten-free.

  • Q: Can I add protein to this dish?
  • A: Absolutely! Add cooked chicken, beef, shrimp, or tofu to increase the protein content and make it a more satisfying meal.

Sweet Potato Hash with Eggs

Sweet Potato Hash with Eggs has become a beloved staple in my household, offering the perfect balance of flavors, textures, and nutrition. I first stumbled upon this delightful recipe during a weekend brunch experiment, and it quickly became a family favorite. The combination of sweet potatoes, bell peppers, and onions, all topped with perfectly cooked eggs, creates a dish that is both comforting and satisfying. My family loves the way the natural sweetness of the potatoes complements the savory spices, while the eggs add a creamy richness that ties everything together. It’s become our go-to meal not only for brunch but also for those evenings when we crave something hearty yet healthy.

Ingredients

To bring this delicious Sweet Potato Hash with Eggs to life, you will need the following ingredients. Each component plays a crucial role in creating the harmonious blend of flavors you’re sure to love. Here’s what you’ll need:

  • 2 large sweet potatoes, peeled and diced
  • 1 red bell pepper, diced
  • 1 green bell pepper, diced
  • 1 medium onion, chopped
  • 2 tablespoons olive oil
  • 1 teaspoon smoked paprika
  • 1/2 teaspoon ground cumin
  • Salt and pepper to taste
  • 4 large eggs
  • Fresh parsley, chopped (for garnish)

Instructions

Creating this delicious Sweet Potato Hash with Eggs is straightforward and rewarding. Follow these instructions to ensure a perfect dish every time:

Step 1: Start by heating the olive oil in a large skillet over medium heat. Once the oil is shimmering, add the diced sweet potatoes. Cook them for about 10 minutes, stirring occasionally, until they begin to soften and develop a slight golden brown color.

Step 2: Add the chopped onions, red bell pepper, and green bell pepper to the skillet. Stir the vegetables together, ensuring they are evenly coated with the olive oil. Continue to cook for another 5-7 minutes, or until the onions become translucent and the peppers have softened.

Step 3: Sprinkle the smoked paprika, ground cumin, salt, and pepper over the vegetable mixture. Stir well to distribute the spices evenly. Allow the hash to cook for an additional 2-3 minutes, letting the spices infuse the vegetables with their flavors.

Step 4: Using a spoon, create four small wells in the hash mixture for the eggs. Crack one egg into each well, taking care not to break the yolks. Cover the skillet with a lid and let the eggs cook for about 5 minutes, or until the whites are set but the yolks remain runny.

Step 5: Once the eggs are cooked to your liking, remove the skillet from the heat. Garnish the dish with freshly chopped parsley before serving. Enjoy your Sweet Potato Hash with Eggs hot, straight from the skillet!

Nutrition Facts

This recipe serves four people, with each serving providing a balanced dose of nutrients. Here’s a breakdown of the nutritional information per serving:

  • Calories: 250
  • Protein: 9g
  • Carbohydrates: 30g
  • Fat: 12g
  • Fiber: 5g

Preparation Time

One of the great advantages of this Sweet Potato Hash with Eggs recipe is its simplicity and speed. From start to finish, you can expect to spend approximately 30-40 minutes preparing this dish. It’s perfect for a quick brunch or a weeknight dinner when time is of the essence, yet you still want something homemade and nutritious.

How to Serve

Serving Sweet Potato Hash with Eggs can be a delightful experience. Here are a few ideas to enhance your dining experience:

  • Serve with a side of crusty bread to soak up the delicious egg yolk and juices.
  • Add a dollop of sour cream or Greek yogurt for a tangy contrast.
  • Top with avocado slices for an added creamy texture and flavor.
  • Sprinkle with feta cheese for a salty, savory punch.
  • Pair with a simple green salad to create a well-rounded meal.

Additional Tips

To ensure your Sweet Potato Hash with Eggs turns out perfectly every time, consider these additional tips:

  1. Cut the sweet potatoes evenly: Uniform pieces ensure even cooking, preventing some pieces from becoming too mushy while others remain undercooked.
  2. Pre-cook the sweet potatoes: If you’re short on time, consider microwaving the diced sweet potatoes for a few minutes before adding them to the skillet.
  3. Use a non-stick skillet: A non-stick surface helps prevent sticking and makes cleaning up a breeze.
  4. Adjust the spices: Feel free to increase or decrease the amount of smoked paprika and cumin to suit your taste preferences.
  5. Make it spicy: For a bit of heat, add a pinch of cayenne pepper or crushed red pepper flakes.

FAQ Section

Here are some frequently asked questions about Sweet Potato Hash with Eggs:

Q: Can I make this dish vegan?
A: Absolutely! Simply omit the eggs and add extra vegetables or tofu for protein.

Q: Can I prepare this dish in advance?
A: Yes, you can prepare the hash portion in advance and reheat it in a skillet before adding fresh eggs when ready to serve.

Q: What other vegetables can I add?
A: Feel free to add your favorite vegetables such as zucchini, mushrooms, or spinach for added nutrition and flavor.

Q: Can I use regular potatoes instead of sweet potatoes?
A: Yes, you can substitute regular potatoes, but keep in mind the cooking time may vary slightly.

Q: How can I store leftovers?
A: Store any leftovers in an airtight container in the refrigerator for up to three days. Reheat gently on the stovetop before serving.

Chia Seed Pudding

Chia seed pudding has emerged as a modern-day superfood sensation, seamlessly blending health benefits with culinary versatility. This delightful pudding, made primarily from the tiny chia seed, has become a staple for those seeking a convenient yet nutritious snack or breakfast option. The beauty of chia seed pudding lies in its simplicity and adaptability, allowing it to fit into various dietary preferences and lifestyles. Its texture, reminiscent of tapioca, coupled with its mild flavor, makes it an ideal canvas for a myriad of flavor combinations. Whether you’re a health enthusiast or someone just looking to diversify your meal options, chia seed pudding offers a nutritious and delicious solution.

At its core, chia seed pudding requires just a few basic ingredients: chia seeds, a liquid of choice (commonly almond or coconut milk), and a sweetener if desired. The magic happens when chia seeds are combined with liquid, as they expand and form a gel-like consistency due to their high soluble fiber content. This transformation not only creates the pudding’s unique texture but also contributes to its impressive health benefits. Chia seeds are packed with omega-3 fatty acids, essential for heart health, and are a rich source of antioxidants and minerals such as calcium and magnesium. This makes chia seed pudding not just a treat for the taste buds but also a boon for the body.

One of the most appealing aspects of chia seed pudding is its versatility. With a basic recipe as a foundation, the possibilities for customization are endless. Fresh fruits, nuts, and spices can be added to tailor the flavor profile to individual preferences. For a tropical twist, one might incorporate mango or pineapple, while a chocolate lover might mix in cocoa powder and a dash of vanilla. The pudding can also serve as a base for more elaborate desserts or breakfast bowls, adorned with granola, berries, or a drizzle of honey. This adaptability has made chia seed pudding a favorite among those following vegan, gluten-free, or low-sugar diets, as it can be easily modified to meet specific dietary needs.

The ease of preparation is another factor that contributes to the pudding’s popularity. Made with minimal effort, chia seed pudding can be prepared in advance, making it an ideal choice for meal prepping. Simply mix the ingredients, refrigerate overnight, and wake up to a ready-to-eat, nutritious breakfast. This convenience, combined with its long shelf life when stored properly, makes chia seed pudding a practical option for busy lifestyles. Moreover, its compact nature means it can be easily transported, providing a quick and healthy option for those on the go. This combination of convenience and health benefits has led to chia seed pudding being embraced by a wide audience, from busy professionals to health-conscious families.

As chia seed pudding continues to gain popularity, it also invites a broader conversation about the importance of incorporating nutrient-dense foods into our diets. It serves as a reminder that healthy eating doesn’t have to be complicated or time-consuming. With a simple ingredient like chia seeds, one can create a dish that is not only enjoyable but also supports overall well-being. As more people discover the benefits and versatility of chia seed pudding, it stands as a testament to the idea that nourishing our bodies can be both delicious and convenient. Whether enjoyed as a breakfast staple, a midday snack, or a guilt-free dessert, chia seed pudding is a delightful way to embrace a healthier lifestyle.

Quinoa Breakfast Bowl

There’s something truly magical about starting your day with a meal that’s not only nutritious but also incredibly satisfying. The quinoa breakfast bowl has become a staple in my household, transforming our mornings into a delightful culinary experience. My family’s love for this dish is palpable, and it’s not uncommon to hear the clinking of spoons against bowls first thing in the morning as everyone eagerly digs in. The combination of warm quinoa, fresh fruits, nuts, and a drizzle of honey or maple syrup creates a harmony of flavors and textures that is simply irresistible. It’s a breakfast option that leaves us feeling energized and ready to tackle the day ahead, and I’m excited to share this recipe with you.

Ingredients

The beauty of the quinoa breakfast bowl lies in its versatility and the ability to customize it according to your preferences. Here’s what you’ll need:

  • 1 cup of quinoa – Rinsed and drained to remove any bitterness.
  • 2 cups of water or milk – For a creamier texture, opt for almond or coconut milk.
  • 1/4 teaspoon of salt – To enhance the flavor.
  • 1 tablespoon of honey or maple syrup – For natural sweetness.
  • 1/2 teaspoon of cinnamon – To add warmth and depth.
  • Fresh fruits – Such as sliced bananas, berries, or apple slices.
  • Nuts and seeds – Such as almonds, walnuts, or chia seeds for a crunchy texture.
  • Optional toppings: Yogurt, shredded coconut, or dark chocolate shavings.

Instructions

Creating a quinoa breakfast bowl is a straightforward process that requires minimal preparation. Follow these steps to craft your perfect morning meal:

  1. Start by bringing the water or milk to a gentle boil in a medium saucepan over medium heat.
  2. Add the rinsed quinoa and salt, then reduce the heat to low. Cover the saucepan and let it simmer for 15 minutes, or until the quinoa is tender and has absorbed the liquid.
  3. Once cooked, remove the saucepan from the heat and let it sit, covered, for an additional 5 minutes to allow the quinoa to fluff up perfectly.
  4. Fluff the quinoa with a fork and stir in the honey or maple syrup and cinnamon, ensuring the flavors are evenly distributed.
  5. Spoon the quinoa into bowls and top with your choice of fresh fruits, nuts, and seeds. Add any optional toppings you desire.
  6. Serve immediately and enjoy your nutritious and delicious breakfast.

Nutrition Facts

This recipe makes approximately four servings, with each serving containing around 300 calories. The exact nutritional value will vary depending on the toppings you choose to add.

Preparation Time

One of the many advantages of the quinoa breakfast bowl is its quick and easy preparation. You can have this delightful breakfast ready in just 25 minutes, making it an ideal choice for busy mornings.

How to Serve

Here’s how you can serve your quinoa breakfast bowl to maximize both taste and presentation:

  • Serve the quinoa warm for a comforting start to your day.
  • Arrange the fruit in a visually appealing pattern for an Instagram-worthy presentation.
  • Offer a variety of toppings in small bowls so everyone can customize their own bowl.
  • Pair with a hot beverage, such as coffee or tea, for a complete breakfast experience.
  • For a protein boost, add a spoonful of Greek yogurt or a poached egg on top.

Additional Tips

To ensure your quinoa breakfast bowl is always a hit, consider these tips:

  1. Pre-cook Quinoa: Prepare quinoa in advance and store it in the fridge for up to five days to save time on busy mornings.
  2. Experiment with Flavors: Try adding spices like nutmeg or cardamom for a unique twist on traditional flavors.
  3. Boost Protein: Incorporate protein powder or nut butter into your bowl for a more filling meal.
  4. Seasonal Fruits: Utilize seasonal fruits to keep the bowl fresh and exciting throughout the year.
  5. Texture Variety: Include a mix of crunchy and soft ingredients for a dynamic eating experience.

FAQ Section

  1. Can I make the quinoa breakfast bowl the night before?

    Yes, you can prepare the quinoa portion ahead of time and store it in the refrigerator. Simply reheat it in the morning and add your fresh toppings.

  2. Is quinoa gluten-free?

    Absolutely, quinoa is naturally gluten-free, making it a great option for those with gluten sensitivities or celiac disease.

  3. Can I use frozen fruits?

    Frozen fruits can be used and are a convenient option. Just be sure to thaw them before adding to your bowl for the best texture.

  4. What can I use as a sweetener alternative?

    If you prefer not to use honey or maple syrup, consider agave nectar, stevia, or a mashed banana for natural sweetness.

  5. How can I make this vegan?

    To make the quinoa breakfast bowl vegan, use plant-based milk and opt for maple syrup instead of honey.

Almond Flour Pancakes

The aroma of almond flour pancakes wafting through the house is enough to make anyone’s morning extra special. Recently, I decided to try my hand at this gluten-free alternative, and the results were nothing short of delightful. My family, usually staunch supporters of the traditional pancake, were pleasantly surprised by the light, nutty flavor and fluffy texture that these almond flour pancakes offered. It was a unanimous hit at the breakfast table, with requests for seconds and a newfound appreciation for this wholesome twist on a classic dish. The experience was not just about the taste but also about discovering a healthier option that didn’t compromise on flavor or satisfaction.

Ingredients

The beauty of almond flour pancakes lies in their simplicity and the quality of ingredients used. Here’s what you’ll need to whip up a batch of these delightful pancakes:

  • 1 cup of almond flour
  • 2 large eggs
  • 1/4 cup of almond milk (or any milk of your choice)
  • 1 tablespoon of honey (or maple syrup for a vegan option)
  • 1 teaspoon of vanilla extract
  • 1/2 teaspoon of baking powder
  • A pinch of salt
  • Butter or oil for cooking

These ingredients come together to create a batter that’s not only easy to make but also packed with flavor and nutrition. Almond flour, being the star ingredient, is rich in protein and healthy fats, making these pancakes a nutritious start to your day.

Instructions

Making almond flour pancakes is a straightforward process that even novice cooks can master. Follow these steps to create a stack of golden-brown pancakes that are sure to impress:

  1. Mix the wet ingredients: In a large bowl, whisk together the eggs, almond milk, honey, and vanilla extract until well combined.
  2. Add the dry ingredients: Gradually add the almond flour, baking powder, and salt to the wet mixture. Stir until you have a smooth batter without lumps.
  3. Heat the skillet: Place a non-stick skillet or griddle over medium heat. Add a small amount of butter or oil to the pan.
  4. Cook the pancakes: Pour 1/4 cup of batter onto the skillet for each pancake. Cook for about 2-3 minutes on one side or until bubbles form on the surface. Flip the pancake and cook for another 2 minutes until golden brown.
  5. Serve: Once all pancakes are cooked, serve them warm with your favorite toppings.

With these simple steps, you’ll have a delicious breakfast ready in no time, perfect for leisurely weekends or a quick weekday meal.

Nutrition Facts

Understanding the nutritional value of your meals is essential for maintaining a balanced diet. Here’s the breakdown for almond flour pancakes:

  • Servings: 4
  • Calories per serving: Approximately 200

These pancakes are not only delicious but also a healthier alternative to traditional wheat-based pancakes. Almond flour contributes to a lower glycemic index, which is beneficial for blood sugar management. The addition of eggs and almond milk provides a good source of protein and essential vitamins, making this breakfast option both tasty and nutrient-rich.

Preparation Time

One of the many advantages of almond flour pancakes is their quick preparation time, making them ideal for busy mornings:

  • Total preparation time: Approximately 20 minutes
  • Active cooking time: 10 minutes

This efficient cooking process allows you to enjoy a fresh, homemade meal without spending hours in the kitchen. The minimal preparation and cooking time ensure that you can savor these pancakes without the stress of a lengthy cleanup.

How to Serve

Pancakes are incredibly versatile and can be enjoyed in numerous ways. Here are some creative serving ideas to elevate your almond flour pancakes:

  • Classic: Drizzle with maple syrup and top with fresh berries for a traditional touch.
  • Nutty Delight: Sprinkle chopped nuts such as almonds or walnuts for added crunch and flavor.
  • Fruity Twist: Add sliced bananas or apples with a dollop of yogurt for a refreshing combination.
  • Indulgent: Spread a thin layer of chocolate hazelnut spread and top with whipped cream for a decadent treat.
  • Savory Option: Top with smoked salmon and cream cheese for a unique and savory breakfast experience.

These serving suggestions highlight the versatility of almond flour pancakes, allowing you to tailor your breakfast to suit your taste preferences.

Additional Tips

To ensure your almond flour pancakes turn out perfectly every time, here are some helpful tips to keep in mind:

  1. Use fresh almond flour: The quality of your almond flour affects the texture and flavor of the pancakes. Always use fresh, finely ground almond flour for the best results.
  2. Don’t overmix the batter: Mixing the batter too vigorously can lead to dense pancakes. Stir until just combined to maintain a light and fluffy texture.
  3. Adjust the heat: If the pancakes are browning too quickly, reduce the heat to ensure they cook evenly without burning.
  4. Experiment with flavors: Consider adding spices such as cinnamon or nutmeg for an extra layer of flavor.
  5. Prepare ahead of time: Make the batter the night before and store it in the fridge for a quick breakfast option in the morning.

These tips are designed to enhance your cooking experience and help you achieve pancake perfection with every batch.

FAQ Section

Here are some frequently asked questions about almond flour pancakes, along with detailed answers to guide you:

  1. Can I substitute almond flour with another type of flour? While almond flour is the star of this recipe, you can substitute it with other nut flours like cashew or hazelnut flour. However, keep in mind that each flour has unique properties that may alter the texture and flavor.
  2. Are these pancakes suitable for a keto diet? Yes, almond flour pancakes are generally suitable for a keto diet due to their low carbohydrate content. To make them fully keto-friendly, ensure all ingredients align with keto guidelines, particularly the sweeteners.
  3. Can I make these pancakes vegan? To make vegan almond flour pancakes, replace eggs with flaxseed meal mixed with water as an egg substitute, and use a plant-based milk option.
  4. How should I store leftover pancakes? Store any leftover pancakes in an airtight container in the refrigerator for up to 3 days. To reheat, simply warm them in a skillet or microwave until heated through.
  5. Can I freeze almond flour pancakes? Yes, you can freeze these pancakes. Place them in a single layer on a baking sheet, freeze until solid, then transfer to a freezer-safe bag. They can be stored for up to 2 months. Reheat directly from frozen in a toaster or oven.

These FAQs aim to address common queries and provide further assistance in making the most out of your almond flour pancake experience.