Dairy-Free Oatmeal with Berries

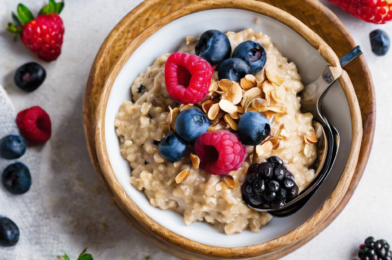
I recently tried out a delightful recipe that has quickly become a family favorite: Dairy-Free Oatmeal with Berries. As someone who appreciates both hearty breakfasts and accommodating various dietary needs, I was thrilled with how this dish turned out. My family, notorious for their varied tastes, all gave it a resounding thumbs up. The oatmeal’s creamy texture, despite being dairy-free, coupled with the natural sweetness from the berries, made it an instant hit at our breakfast table. Not only is it delicious, but it’s also a nutritious way to start the day. I found myself looking forward to breakfast every morning just to enjoy this delightful concoction.

Ingredients

Creating this dairy-free oatmeal is a straightforward process, with ingredients easily found in most kitchens or local grocery stores. Here’s what you need to gather:

  • 1 cup of rolled oats
  • 2 cups of almond milk or any other plant-based milk
  • 1 tablespoon of chia seeds
  • 1 tablespoon of maple syrup or honey
  • 1 teaspoon of vanilla extract
  • 1/2 teaspoon of cinnamon
  • 1 cup of mixed berries (such as blueberries, raspberries, and strawberries)
  • A pinch of salt
  • Optional toppings: sliced almonds, coconut flakes, or more fresh berries

Instructions

With your ingredients ready, it’s time to prepare the oatmeal. This process is simple and takes only a few steps. Here’s how you can make this delicious breakfast:

  1. Start by combining the rolled oats, almond milk, chia seeds, maple syrup, vanilla extract, cinnamon, and salt in a medium saucepan.
  2. Place the saucepan over medium heat and bring the mixture to a gentle boil, stirring occasionally.
  3. Once boiling, reduce the heat to low and let the oatmeal simmer for about 10-15 minutes. Stir frequently to prevent sticking and to achieve a creamy consistency.
  4. Once the oatmeal reaches your desired thickness, remove it from the heat.
  5. Fold in the mixed berries, allowing their juices to blend with the oatmeal, enhancing both flavor and color.
  6. Serve the oatmeal warm, garnished with your choice of optional toppings for added texture and flavor.

Nutrition Facts

This recipe makes about four servings, perfect for a family breakfast or for meal prepping. Each serving contains approximately 250 calories, making it a wholesome and satisfying start to your day. The combination of oats and chia seeds provides a healthy dose of fiber, while the berries add antioxidants and essential vitamins.

Preparation Time

The beauty of this dish, aside from its taste and nutritional value, is its quick preparation time. From start to finish, you can have this delicious oatmeal ready in about 20 minutes. This makes it an ideal choice for busy mornings when time is of the essence but a nutritious breakfast is still a priority.

How to Serve

There are several ways you can serve this delightful oatmeal to make it even more enjoyable:

  • Family-Style: Serve it in a large bowl, allowing everyone to scoop their desired amount and customize with their favorite toppings.
  • Individual Bowls: Portion out the oatmeal into individual bowls, each garnished with a unique combination of toppings for a personalized touch.
  • On-the-Go: Prepare the oatmeal in advance and store it in portable containers for a quick and easy breakfast option during busy mornings.
  • Brunch Spread: Include this oatmeal as part of a larger brunch spread, paired with other breakfast favorites like scrambled eggs or avocado toast.
  • Meal Prep: Make a large batch and store portions in the fridge or freezer for easy reheating throughout the week.

Additional Tips

To enhance your oatmeal experience, consider these additional tips:

  1. Experiment with Milk Alternatives: While almond milk is a popular choice, feel free to experiment with other plant-based milks such as coconut, oat, or soy milk to find your preferred flavor.
  2. Use Seasonal Berries: Opt for seasonal berries for the freshest taste. In the summer, fresh strawberries or blueberries are perfect, while in the winter, frozen berries are a convenient and nutritious option.
  3. Add a Protein Boost: For additional protein, consider topping your oatmeal with a dollop of almond butter or a sprinkle of hemp seeds.
  4. Make it Overnight: Prepare the oatmeal mixture the night before and let it sit in the fridge overnight. In the morning, simply heat it up for a quick and effortless breakfast.
  5. Sugar Alternatives: If you’re watching your sugar intake, reduce or omit the maple syrup and rely on the natural sweetness of the berries.

FAQ Section

Here are some frequently asked questions about this dairy-free oatmeal recipe:

Q: Can I use steel-cut oats instead of rolled oats?
A: Yes, but keep in mind that steel-cut oats require a longer cooking time and a bit more liquid. Adjust the cooking time to about 20-30 minutes and add extra almond milk as needed to achieve the desired consistency.

Q: Can I make this oatmeal gluten-free?
A: Absolutely! Just ensure that your oats are labeled gluten-free, as some oats can be cross-contaminated with gluten during processing.

Q: What if I don’t have chia seeds?
A: You can omit the chia seeds if you don’t have them on hand. They add a nice texture and nutritional boost, but the oatmeal will still be delicious without them.

Q: Can I use frozen berries instead of fresh?
A: Yes, frozen berries work just as well and are often more economical. They will thaw as you fold them into the hot oatmeal, releasing their juices and flavor.

Q: How long can I store leftover oatmeal?
A: Leftover oatmeal can be stored in an airtight container in the refrigerator for up to four days. Reheat it on the stovetop or in the microwave, adding a splash of almond milk to restore its creamy texture.

Coconut Flour Waffles

There’s something truly special about waking up to the aroma of freshly cooked waffles. And when those waffles are made with coconut flour, they bring an extra layer of texture and flavor that elevates the breakfast experience to new heights. Recently, I decided to try a recipe for coconut flour waffles that I stumbled upon, and the results were nothing short of delightful. My family, who are usually quite selective when it comes to breakfast items, were pleasantly surprised by the unique taste and light texture of these waffles. The subtle hint of coconut combined with the crispy exterior made for a breakfast dish that quickly became a household favorite. This recipe is perfect for anyone looking to try something different while still savoring the classic comfort of a warm waffle.

Ingredients

To create these delicious coconut flour waffles, you’ll need the following ingredients:

  • 1/2 cup of coconut flour
  • 1/4 teaspoon of baking soda
  • 1/4 teaspoon of salt
  • 4 large eggs
  • 1/4 cup of melted coconut oil or butter
  • 1/4 cup of milk (dairy or non-dairy)
  • 1 tablespoon of honey or maple syrup
  • 1/2 teaspoon of vanilla extract

Instructions

Begin by preheating your waffle iron to the desired setting. In a medium-sized bowl, whisk together the coconut flour, baking soda, and salt. Set this dry mixture aside. In a separate large bowl, beat the eggs until they are frothy. This step is crucial as it helps incorporate air into the batter, ensuring that the waffles remain light and fluffy.

Next, add the melted coconut oil or butter, milk, honey or maple syrup, and vanilla extract to the beaten eggs. Mix until all the ingredients are well combined. Gradually incorporate the dry ingredients into the wet mixture, stirring slowly to avoid lumps. The batter will be thicker than traditional waffle batter due to the absorbent nature of coconut flour, but this is entirely normal.

Spoon the batter onto the preheated waffle iron, using about 1/4 cup per waffle, depending on the size of your waffle maker. Close the lid and cook until the waffles are golden brown and crisp on the outside. This usually takes about 3-5 minutes, but times may vary depending on your waffle iron. Once cooked, carefully remove the waffles and place them on a wire rack to prevent them from becoming soggy.

Nutrition Facts

This recipe yields approximately 4 servings, with each serving consisting of one waffle. Each waffle contains around 240 calories, making this a relatively light breakfast option that doesn’t compromise on flavor or satisfaction.

Preparation Time

The total preparation time for these coconut flour waffles is approximately 15 minutes. This includes 10 minutes for mixing the ingredients and 5 minutes for cooking each batch of waffles. This quick prep time makes it a convenient breakfast option for busy mornings or leisurely weekend brunches.

How to Serve

These coconut flour waffles can be served in a variety of ways to suit your taste preferences:

  • Classic: Top with butter and a drizzle of pure maple syrup for a timeless treat.
  • Fruit-Loaded: Add fresh berries like strawberries, blueberries, or raspberries for a burst of freshness.
  • Nutty Delight: Sprinkle with chopped nuts such as almonds or walnuts for added crunch.
  • Tropical Twist: Garnish with slices of banana and a sprinkle of shredded coconut.
  • Indulgent: Serve with a dollop of whipped cream and a drizzle of chocolate sauce for a decadent dessert-style breakfast.

Additional Tips

To ensure your coconut flour waffles turn out perfectly every time, consider these additional tips:

  • Tip 1: Allow the batter to rest for a few minutes before cooking. This gives the coconut flour time to absorb the liquid, resulting in a better texture.
  • Tip 2: Always preheat your waffle iron. A hot iron ensures crispy edges and prevents the waffles from sticking.
  • Tip 3: If you prefer sweeter waffles, adjust the amount of honey or syrup to taste. However, keep in mind that toppings will add sweetness.
  • Tip 4: For additional flavor, consider adding a pinch of cinnamon or nutmeg to the dry ingredients.
  • Tip 5: Leftover waffles can be stored in an airtight container and reheated in the toaster for a quick breakfast option.

FAQ Section

Q: Can I substitute coconut flour with almond flour?

A: Coconut flour and almond flour have different properties and absorb liquids differently. If substituting, adjustments to the liquid ingredients will be necessary to achieve the correct batter consistency.

Q: Are these waffles gluten-free?

A: Yes, coconut flour is naturally gluten-free, making these waffles a great option for those with gluten sensitivities or celiac disease.

Q: Can I use egg substitutes in this recipe?

A: Coconut flour relies heavily on eggs for structure and moisture. While you can try using a commercial egg replacer, the results may vary in texture and flavor.

Q: How can I make these waffles dairy-free?

A: To make the recipe dairy-free, use a non-dairy milk such as almond or coconut milk and replace butter with coconut oil.

Q: What other toppings go well with coconut flour waffles?

A: In addition to the suggestions above, you can try topping your waffles with yogurt, applesauce, or nut butters for a nutritious twist.

Almond Butter Smoothie

In the realm of smoothies, few concoctions offer the creamy richness and satisfying depth of an almond butter smoothie. This delightful blend not only tantalizes the taste buds but also provides a wholesome nutritional boost that is perfect for any time of the day. As an avid smoothie enthusiast, I was eager to introduce this recipe to my family, and it did not disappoint. The moment I served it at breakfast, the unanimous nods of approval were enough to confirm its place as a family favorite. The creamy texture and nutty flavor were complemented by a hint of sweetness, making it a perfect morning pick-me-up or an afternoon snack. It’s a versatile recipe that has quickly become a staple in our household, offering a delicious way to incorporate healthy fats and proteins into our diet.

Ingredients

To create this delectable almond butter smoothie, you will need the following ingredients:

  • 2 tablespoons of almond butter
  • 1 banana, preferably frozen for a creamier texture
  • 1 cup of almond milk (or your choice of milk)
  • 1 tablespoon of honey or maple syrup for sweetness
  • 1 teaspoon of vanilla extract
  • A pinch of cinnamon for added warmth
  • Ice cubes, as needed for desired consistency

Instructions

Creating an almond butter smoothie is as simple as it is rewarding. Follow these steps to blend up a perfect glass:

  1. Start by adding the almond butter and frozen banana to your blender. The frozen banana helps achieve a thick, creamy texture without the need for ice cream or other dairy products.
  2. Pour in the almond milk. You can adjust the quantity depending on how thick or thin you prefer your smoothie.
  3. Add the honey or maple syrup, vanilla extract, and a pinch of cinnamon. These ingredients add depth to the flavor and enhance the natural sweetness of the banana.
  4. Blend on high speed until all ingredients are thoroughly combined and the mixture is smooth. If you find the smoothie too thick, add a bit more almond milk until you reach your desired consistency.
  5. If you prefer your smoothie cold and refreshing, add a few ice cubes and blend again until smooth.
  6. Pour into a glass and enjoy immediately, or store in the refrigerator for a quick, nutritious meal on the go.

Nutrition Facts

This almond butter smoothie recipe serves 2 and packs a punch with approximately 250 calories per serving. It’s a nutritious option that provides a good balance of healthy fats, proteins, and carbohydrates, making it an ideal choice for a post-workout recovery drink or a satisfying breakfast.

Preparation Time

One of the best aspects of this almond butter smoothie is its quick preparation time. From start to finish, you can whip up this delicious drink in just 10 minutes. It’s a perfect option for those busy mornings when you need a nutritious breakfast but are short on time.

How to Serve

Serving your almond butter smoothie can be as creative as you want it to be. Here are a few ideas to get you started:

  • Classic Style: Pour the smoothie into a tall glass and serve with a straw for easy sipping.
  • Garnished: Top with a sprinkle of chia seeds, sliced almonds, or a dash of cinnamon for added texture and flavor.
  • In a Bowl: Serve in a bowl and add toppings like granola, fresh berries, or coconut flakes for a smoothie bowl experience.
  • Layered: Alternate layers of smoothie and yogurt in a glass for a parfait-style presentation.
  • On the Go: Pour into a travel-friendly cup with a lid and enjoy your smoothie on your commute to work or school.

Additional Tips

Here are some additional tips to help you perfect your almond butter smoothie experience:

  1. Use Ripe Bananas: Ripe bananas are sweeter and blend more easily, giving your smoothie a natural sweetness without the need for added sugar.
  2. Try Different Nut Butters: If you’re not a fan of almond butter, feel free to substitute with peanut butter, cashew butter, or even sunflower seed butter for a different flavor profile.
  3. Add Protein: For an extra protein boost, consider adding a scoop of your favorite protein powder. This can be particularly beneficial if you’re using the smoothie as a meal replacement or post-workout snack.
  4. Experiment with Spices: Besides cinnamon, try adding nutmeg or ginger for a warm, spicy kick that complements the nutty flavor of the almond butter.
  5. Make it Green: Add a handful of spinach or kale for extra nutrients. The mild flavor of these greens won’t overpower the other ingredients, and they’ll add a vibrant color to your smoothie.

FAQ Section

Here are some frequently asked questions about the almond butter smoothie, along with their answers:

  1. Can I use a different type of milk? Yes, you can substitute almond milk with any other type of milk, such as cow’s milk, soy milk, or oat milk. Each will bring a slightly different flavor and texture to the smoothie.
  2. Is it necessary to use a frozen banana? While a frozen banana helps achieve a thicker, creamier consistency, you can use a fresh banana if preferred. Simply add more ice cubes to thicken the smoothie.
  3. How can I make the smoothie sweeter? If you prefer a sweeter smoothie, increase the amount of honey or maple syrup, or add a few pitted dates for natural sweetness.
  4. What if I have nut allergies? If you have nut allergies, you can substitute almond butter with sunflower seed butter and use a nut-free milk alternative like oat milk or rice milk.
  5. Can I prepare the smoothie in advance? While it’s best enjoyed fresh, you can prepare the smoothie in advance and store it in an airtight container in the refrigerator for up to 24 hours. Give it a good shake or stir before drinking.

Coconut Milk Chia Pudding

Recently, I embarked on a culinary adventure that introduced a new favorite to our family’s dessert repertoire: Coconut Milk Chia Pudding. This delightful dish was met with enthusiastic approval from everyone at the table, from the youngest to the oldest. The creamy texture paired with the subtle sweetness of coconut milk creates a perfect harmony of flavors that somehow feels indulgent yet light. My family loved how versatile it was, allowing for a myriad of toppings like fresh fruits, nuts, and honey, which each person could customize to their liking. This pudding not only satiated our sweet tooth but also sparked a conversation about the health benefits of chia seeds, making it a wholesome addition to our meal plan.

Ingredients

To create this delightful Coconut Milk Chia Pudding, you will need the following ingredients:

  • 1 cup of coconut milk
  • 3 tablespoons of chia seeds
  • 1 tablespoon of maple syrup or honey
  • 1 teaspoon of vanilla extract
  • A pinch of salt
  • Fresh fruits, nuts, or coconut flakes for topping

These ingredients come together to create a simple yet flavorful base that can be customized to suit your taste preferences.

Instructions

Making Coconut Milk Chia Pudding is a straightforward process that requires minimal effort but yields delicious results. Follow these steps to create your own batch:

  1. In a mixing bowl, combine the coconut milk, chia seeds, maple syrup, vanilla extract, and a pinch of salt. Stir well to ensure the chia seeds are evenly distributed.
  2. Cover the bowl and refrigerate the mixture for at least 4 hours, or overnight, to allow the chia seeds to absorb the liquid and thicken.
  3. Before serving, give the pudding a good stir to break up any clumps and achieve a smooth consistency.
  4. Serve the pudding in individual bowls or jars, and top with your choice of fresh fruits, nuts, or coconut flakes.
  5. Enjoy your delicious and nutritious Coconut Milk Chia Pudding!

This recipe is not only easy to follow but also encourages creativity with toppings, making it a fun activity for the whole family.

Nutrition Facts

This recipe yields approximately 4 servings. Each serving contains around 150 calories, making it a light yet satisfying dessert option. The main nutritional highlights include:

  • Omega-3 fatty acids from chia seeds
  • Natural sweetness from honey or maple syrup
  • Healthy fats from coconut milk

This pudding is a fantastic choice for those looking to maintain a balanced diet without sacrificing flavor.

Preparation Time

One of the most appealing aspects of Coconut Milk Chia Pudding is its simplicity in preparation. The active preparation time is less than 10 minutes, with the majority of the time spent allowing the pudding to set in the refrigerator. This makes it an ideal choice for busy individuals or families looking for a quick and healthy dessert option that can be prepared in advance.

How to Serve

Coconut Milk Chia Pudding can be served in a variety of ways, making it a versatile dessert that caters to different tastes:

  • Classic Style: Serve in a bowl with a sprinkle of coconut flakes on top.
  • Fruit Parfait: Layer the pudding with fresh berries or sliced bananas for a refreshing treat.
  • Tropical Delight: Top with mango slices and a drizzle of lime juice for a tropical twist.
  • Nutty Crunch: Add a handful of toasted almonds or walnuts for a crunchy texture.
  • Chocolate Lover: Mix in cocoa powder and top with chocolate chips for a rich, chocolatey dessert.

These serving suggestions highlight the versatility of the dish, allowing it to be tailored to fit any occasion or preference.

Additional Tips

To ensure your Coconut Milk Chia Pudding turns out perfectly every time, consider these additional tips:

  1. Consistency Check: If the pudding is too thick, add a bit more coconut milk to achieve your desired consistency.
  2. Sweetness Level: Adjust the amount of maple syrup or honey based on your personal preference for sweetness.
  3. Chia Seed Quality: Use fresh, high-quality chia seeds for the best results.
  4. Flavor Variations: Experiment with different extracts, such as almond or coconut, to add a unique twist.
  5. Batch Preparation: Make a larger batch and store it in the fridge for up to five days for a quick and easy dessert option throughout the week.

These tips will help you customize the pudding to your liking and ensure it remains a staple in your dessert rotation.

FAQ Section

Here are some frequently asked questions about Coconut Milk Chia Pudding:

  1. Can I use a different type of milk? Yes, you can substitute coconut milk with almond milk, cashew milk, or any other plant-based milk of your choice.
  2. How long does the pudding last in the refrigerator? The pudding can be stored in the refrigerator for up to five days, making it a great option for meal prep.
  3. Can I freeze the pudding? While it is possible to freeze the pudding, it may alter the texture slightly. It is best enjoyed fresh or refrigerated.
  4. What can I do if my pudding is too runny? If the pudding is too runny, try adding more chia seeds and letting it sit for an additional hour to thicken.
  5. Is this pudding suitable for a vegan diet? Yes, this pudding is vegan-friendly as long as you use maple syrup instead of honey.

These FAQs address common concerns and provide helpful solutions, making it easier for you to enjoy this delicious dessert.

Dairy-Free Banana Pancakes

Dairy-free banana pancakes have been a delightful addition to our family’s breakfast menu. With a soft, fluffy texture and a naturally sweet flavor, these pancakes have won over even the most discerning taste buds in our household. Not only are they incredibly delicious, but they also cater to those with lactose intolerance or those looking to reduce their dairy intake. The first time we made these pancakes, I was skeptical about how they would compare to traditional pancakes. However, after just one bite, I was convinced that these would become a staple in our home. The simplicity of the ingredients and the ease of preparation make them a winner for busy mornings. My family, particularly my kids, have given them rave reviews, often requesting them on weekends or special occasions.

Ingredients

To create these scrumptious dairy-free banana pancakes, you will need the following ingredients:

  • 2 ripe bananas, mashed
  • 1 cup all-purpose flour
  • 2 teaspoons baking powder
  • 1/2 teaspoon salt
  • 1 tablespoon sugar (optional for added sweetness)
  • 1 cup almond milk (or any non-dairy milk of your choice)
  • 1 tablespoon vegetable oil
  • 1 teaspoon vanilla extract
  • 1/2 teaspoon cinnamon (optional)

Instructions

Making these pancakes is a breeze, and the end result is well worth the effort. Follow these simple steps to whip up a batch of delicious dairy-free banana pancakes:

  1. In a mixing bowl, combine the mashed bananas with the almond milk, vegetable oil, and vanilla extract. Stir until well blended.
  2. In a separate bowl, whisk together the flour, baking powder, salt, sugar, and cinnamon.
  3. Slowly add the dry ingredients to the wet ingredients, mixing until just combined. Be careful not to overmix, as this can result in dense pancakes.
  4. Heat a non-stick skillet or griddle over medium heat. Lightly grease with oil or non-stick spray.
  5. Pour 1/4 cup of batter onto the skillet for each pancake. Cook until bubbles form on the surface, then flip and cook until golden brown on the other side.
  6. Repeat with the remaining batter, keeping the cooked pancakes warm in a low oven if necessary.
  7. Serve warm, topped with your favorite syrup, fresh fruit, or a dollop of dairy-free yogurt.

Nutrition Facts

This recipe yields approximately 8 pancakes, serving 4 people. Each serving contains roughly 150 calories, making it a healthy breakfast option that doesn’t skimp on flavor.

Preparation Time

The total preparation time for these pancakes is around 20 minutes. This includes about 10 minutes for gathering and mixing the ingredients, and another 10 minutes for cooking the pancakes. The quick turnaround time makes them an ideal choice for busy mornings when you want a wholesome, homemade breakfast without a lengthy cooking process.

How to Serve

Here are some serving suggestions to elevate your dairy-free banana pancakes to the next level:

  • Classic: Drizzle with maple syrup and top with a pat of dairy-free butter.
  • Berry Delight: Serve with a medley of fresh berries and a dusting of powdered sugar.
  • Nutty Crunch: Sprinkle with chopped nuts such as walnuts or almonds for added texture.
  • Tropical Twist: Add sliced bananas and a sprinkle of shredded coconut.
  • Chocolate Indulgence: Include a handful of dairy-free chocolate chips in the batter for a sweet surprise.

Additional Tips

Here are some tips to ensure your dairy-free banana pancakes turn out perfectly every time:

  1. Ripeness of Bananas: Use bananas that are ripe but not overly mushy. They should have some brown spots for optimal sweetness.
  2. Consistency of Batter: The batter should be thick but pourable. Adjust with a splash more almond milk if needed.
  3. Cooking Temperature: Keep the skillet at medium heat to ensure pancakes cook evenly without burning.
  4. Resting Batter: Let the batter rest for a few minutes before cooking to allow the baking powder to activate.
  5. Storage: Leftover pancakes can be stored in an airtight container in the fridge for up to 2 days or frozen for longer storage.

FAQ Section

  1. Can I use a different type of flour? Yes, you can substitute whole wheat flour, spelt flour, or a gluten-free blend for a different texture and flavor.
  2. What non-dairy milk works best? Almond milk is a popular choice, but you can also use soy, oat, or coconut milk depending on your preference.
  3. Can I make the batter ahead of time? While it’s best to use the batter fresh, you can prepare it a few hours in advance and store it in the fridge until ready to cook.
  4. How can I make these pancakes more filling? Consider adding a tablespoon of chia seeds or flaxseeds to the batter for extra fiber and nutrients.
  5. Are these pancakes suitable for freezing? Yes, allow the pancakes to cool completely before freezing them in a single layer on a baking sheet. Once frozen, transfer them to a freezer-safe bag or container.