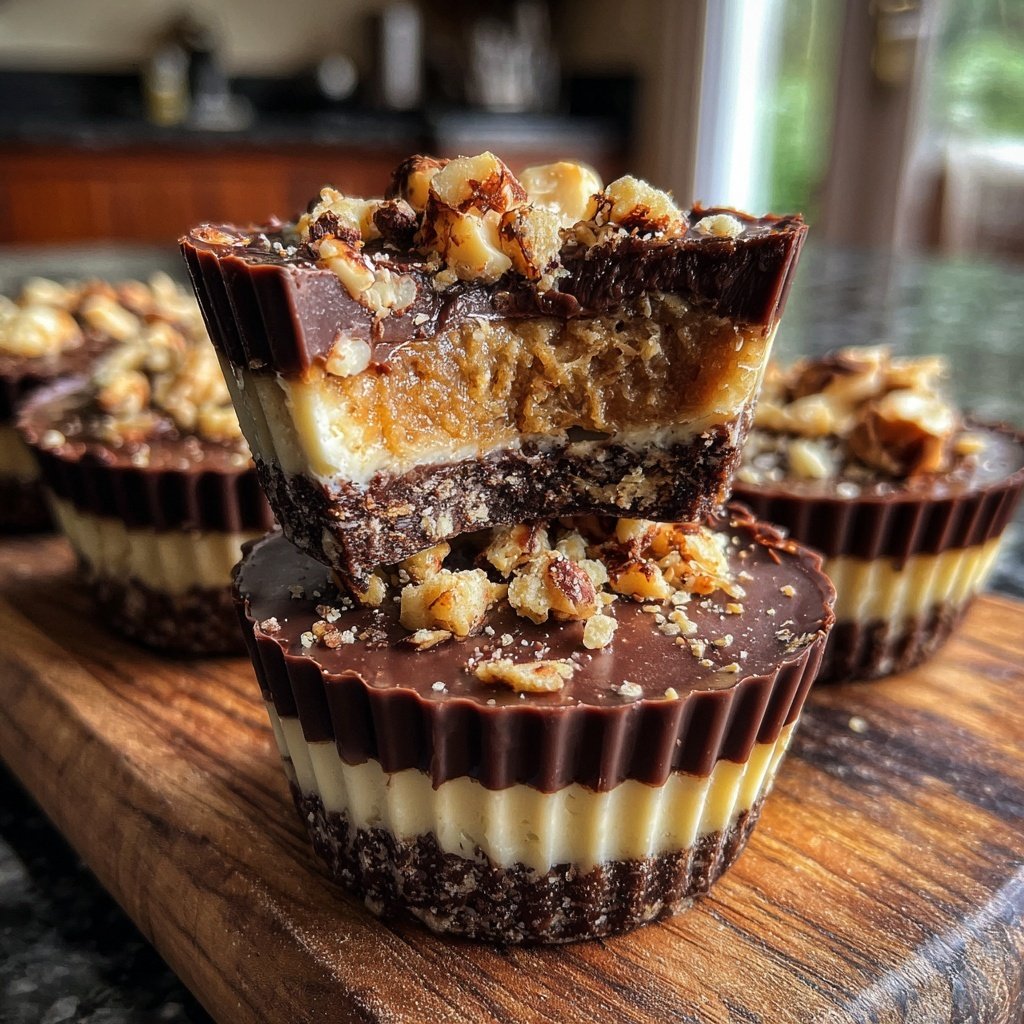
Quick Chocolate Hazelnut Cups
Highlighted under: Artisan Bakery Recipes
I love whipping up these Quick Chocolate Hazelnut Cups when I need a satisfying treat in a hurry. With just a handful of ingredients and minimal prep time, these cups are not only delicious, but they also satisfy my chocolate cravings effortlessly. The combination of rich chocolate and crunchy hazelnuts creates a delightful texture that is hard to resist. Whether I’m enjoying them alone or sharing with friends, they always bring smiles to the table. If you’re looking for a quick and indulgent dessert, these cups are a must-try!


I remember the first time I made these Quick Chocolate Hazelnut Cups; it was a spontaneous decision after I found some leftovers from a baking project. The method was surprisingly simple, and I loved watching the chocolate melt over the crunchy hazelnuts. The secret is to allow them to cool for just the right amount of time—long enough to set but not too long to make them hard.
One particular detail that makes these cups a showstopper is the addition of a pinch of sea salt before they cool completely. It enhances the flavor and contrasts beautifully with the sweetness of the chocolate. Trust me, once you try this simple addition, you'll never skip it again!
Reasons You'll Love These Cups
- Easy to make in just 15 minutes
- Decadent chocolate combined with crunchy hazelnuts
- Perfectly sweet with a hint of sea salt
The Role of Chocolate
The choice of dark chocolate chips is crucial in creating these Quick Chocolate Hazelnut Cups. Opt for chocolate with at least 70% cocoa content to ensure a rich, intense flavor that pairs beautifully with the sweetness of hazelnuts. The bitterness of the chocolate not only balances the sweetness but also adds depth to the overall taste experience. If you're feeling adventurous, consider using flavored chocolate, like orange or coffee-infused, to give the cups an interesting twist.
When melting the chocolate, it’s important to use a microwave-safe bowl to avoid any chance of damaging the chocolate's structure. Heating in short intervals reduces the risk of scorching the chocolate. Look for visual cues such as a glossy appearance to determine if the chocolate is melted properly. Stirring is key—continue mixing until all chunks are completely dissolved, to ensure a smooth consistency.
Customizing Your Cups
Feel free to get creative with mix-ins to personalize your chocolate cups. Besides hazelnuts, you could substitute with almonds, pecans, or even dried fruit like cranberries for added flavor and texture. If you prefer a nut-free version, try using crushed cookies or seeds like pumpkin or sunflower for an exciting crunch. This flexibility allows you to adjust the recipe based on what you have on hand or your dietary preferences.
For a gourmet touch, enhance the flavor by adding a sprinkle of espresso powder to the melted chocolate. This small addition can elevate the chocolate flavor, turning your Quick Chocolate Hazelnut Cups into a coffee lover’s delight. Additionally, consider drizzling caramel or melted Nutella on top before cooling for an extra layer of decadence.
Ingredients
Gather the following ingredients:
Ingredients
- 1 cup dark chocolate chips
- 1/2 cup chopped hazelnuts
- 1 tablespoon coconut oil
- A pinch of sea salt
Ensure all your ingredients are measured and ready for a quick assembly!
Instructions
Follow these simple steps to create your chocolate hazelnut cups:
Melt the Chocolate
In a microwave-safe bowl, combine the dark chocolate chips and coconut oil. Heat in the microwave in 30-second intervals, stirring in between, until the mixture is completely melted and smooth.
Prepare the Cups
Line a muffin tin with paper liners. Pour a small amount of the melted chocolate into the bottom of each liner, ensuring it coats the base evenly.
Add Hazelnuts
Sprinkle a layer of chopped hazelnuts over the melted chocolate in each cup. Then pour more melted chocolate over the nuts, covering them completely.
Set and Cool
Sprinkle a pinch of sea salt on top of the cups and transfer the muffin tin to the refrigerator for about 10 minutes, or until the chocolate is set.
Enjoy!
Once set, remove the cups from the muffin tin and enjoy them chilled or at room temperature.
Perfect for satisfying that chocolate craving!
Pro Tips
- Make sure not to overheat the chocolate while melting
- it should be smooth and glossy without burning. You can also customize these cups by adding other nuts or toppings!
Make-Ahead and Storage
These chocolate cups can be made ahead and stored in the refrigerator for up to one week. Make sure to keep them in an airtight container to prevent them from absorbing moisture or odors. For longer storage, you can freeze the cups for up to three months. Just be sure to wrap each cup individually in plastic wrap or foil and then place them in a freezer-safe bag. When ready to enjoy, simply let them thaw at room temperature.
If you anticipate serving these cups at a gathering, you can prepare them a few days in advance. Just allow about 30 minutes for them to reach room temperature if you prefer a softer texture; chilled, they’ll be firmer and have a delightful crunch.
Troubleshooting Tips
One common issue you might encounter is the chocolate seizing, which can happen if any moisture accidentally gets into the bowl while melting. If this occurs, you can attempt to rescue it by adding a small amount of coconut oil or shortening, stirring until smooth. However, prevention is key—ensure all utensils and your microwave-safe bowl are completely dry before use.
If the chocolate isn't coating the hazelnuts properly, it might be too thick. Adding a bit more melted chocolate can help create a smoother layer. Additionally, when layering in the muffin tin, be sure to give each layer enough time to slightly cool before adding the next. This will help maintain distinct layers and improve the overall texture of your finished cups.
Questions About Recipes
→ Can I use milk chocolate instead of dark chocolate?
Absolutely! Milk chocolate will give a sweeter taste, but the recipe works perfectly with either type.
→ How long do these cups last?
They can be stored in an airtight container in the refrigerator for up to a week.
→ Can I use other nuts?
Yes! Feel free to substitute hazelnuts with almonds, walnuts, or even a mix of your favorites.
→ Is it necessary to use coconut oil?
Coconut oil helps in achieving a smooth consistency when melting chocolate, but you can omit it if needed.
Quick Chocolate Hazelnut Cups
I love whipping up these Quick Chocolate Hazelnut Cups when I need a satisfying treat in a hurry. With just a handful of ingredients and minimal prep time, these cups are not only delicious, but they also satisfy my chocolate cravings effortlessly. The combination of rich chocolate and crunchy hazelnuts creates a delightful texture that is hard to resist. Whether I’m enjoying them alone or sharing with friends, they always bring smiles to the table. If you’re looking for a quick and indulgent dessert, these cups are a must-try!
What You'll Need
Ingredients
- 1 cup dark chocolate chips
- 1/2 cup chopped hazelnuts
- 1 tablespoon coconut oil
- A pinch of sea salt
How-To Steps
In a microwave-safe bowl, combine the dark chocolate chips and coconut oil. Heat in the microwave in 30-second intervals, stirring in between, until the mixture is completely melted and smooth.
Line a muffin tin with paper liners. Pour a small amount of the melted chocolate into the bottom of each liner, ensuring it coats the base evenly.
Sprinkle a layer of chopped hazelnuts over the melted chocolate in each cup. Then pour more melted chocolate over the nuts, covering them completely.
Sprinkle a pinch of sea salt on top of the cups and transfer the muffin tin to the refrigerator for about 10 minutes, or until the chocolate is set.
Once set, remove the cups from the muffin tin and enjoy them chilled or at room temperature.
Extra Tips
- Make sure not to overheat the chocolate while melting
- it should be smooth and glossy without burning. You can also customize these cups by adding other nuts or toppings!
Nutritional Breakdown (Per Serving)
- Calories: 150 kcal
- Total Fat: 10g
- Saturated Fat: 5g
- Cholesterol: 0mg
- Sodium: 35mg
- Total Carbohydrates: 13g
- Dietary Fiber: 1g
- Sugars: 8g
- Protein: 3g